Backup and Restore of Avi Vantage Configuration
Periodic backup of the Avi Vantage configuration database is recommended. This database defines all clouds, all virtual services, all users, and so on. Any user capable of logging into the admin tenant is authorized to perform a backup of the entire configuration, i.e., of all tenants. A restore operation spans all the same entities, but can only be performed by the administrator(s) capable of logging into one of the Controllers using SSH or SCP.
It is a best practice to store backups in a safe, external location, in the unlikely event that a disaster destroys the entire Avi Controller (or cluster), with no possibility of remediation. Based on how often the configuration changes, a recommended backup schedule could be daily or even hourly.
Backing Up the Avi Vantage Configuration
To back up the Avi Vantage configuration, use the Avi UI, CLI commands or API commands shown in this section. Backups can be scheduled or on-demand.
Scheduling Backup Using Avi UI
To view or edit the configuration backup scheduler’s current settings, an admin-tenant user first navigates to Administration > Controller > Configuration Backup.
Note: The scheduled backups get stored in /var/lib/avi/backups/ on all Avi Controllers in the cluster.
-
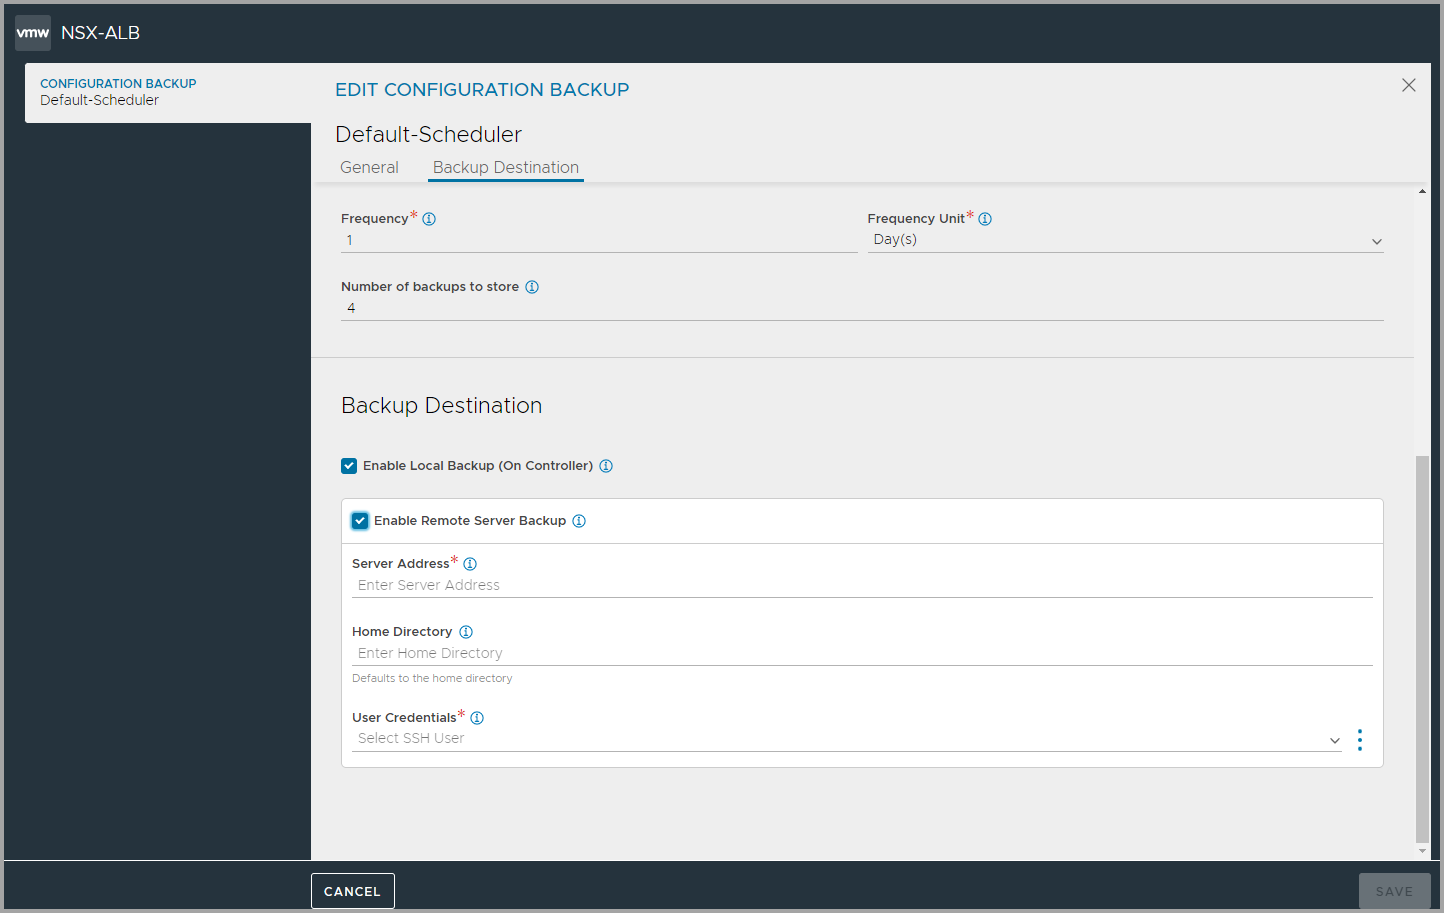
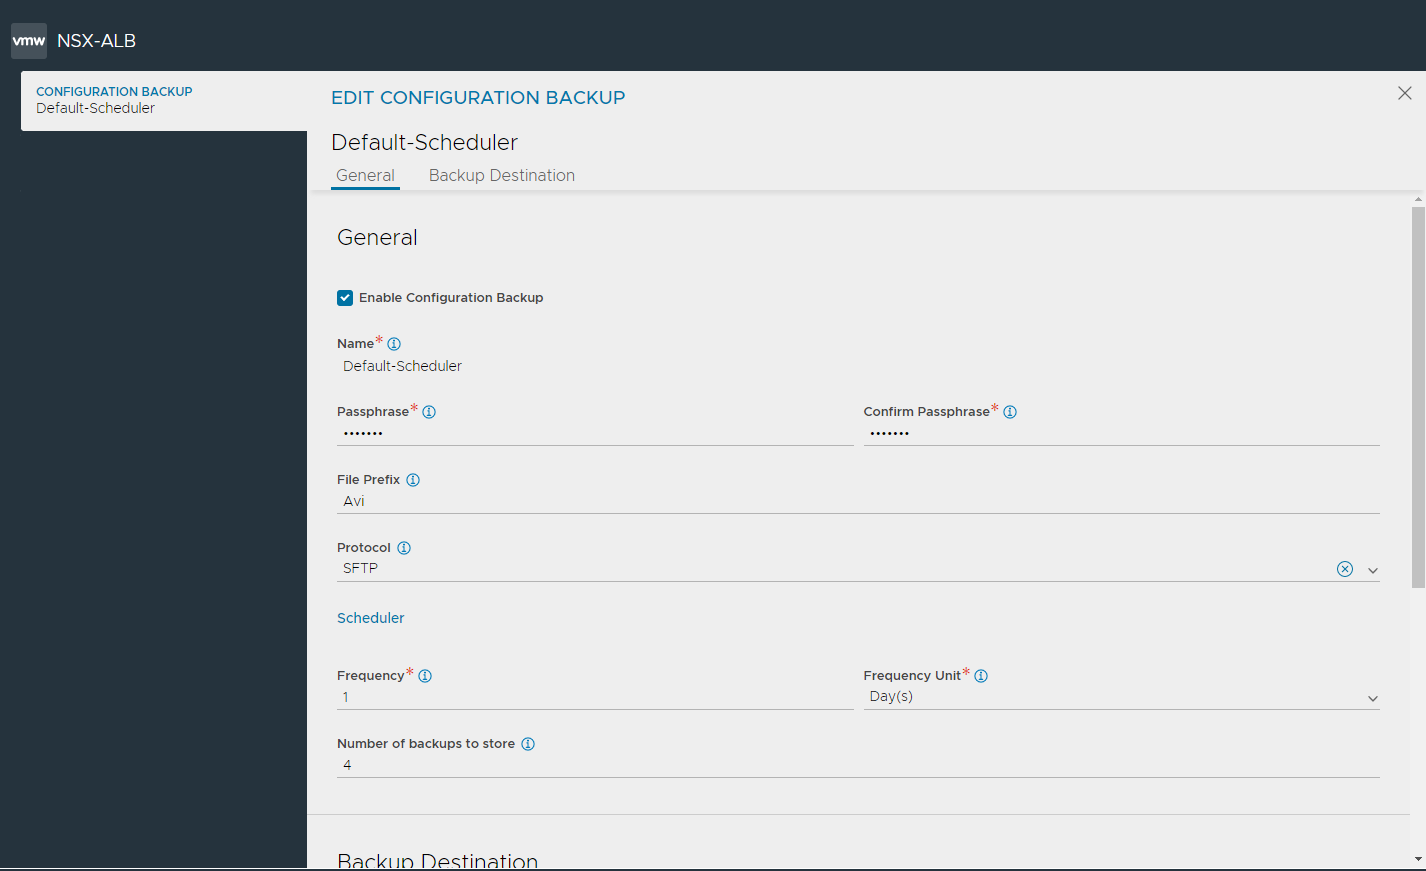
To configure backup, click Edit to view the EDIT CONFIGURATION BACKUP screen.
-
Select Enable Configuration Backup to schedule backups.
-
Enter Passphrase and confirm the passphrase to encrypt all sensitive fields contained within the backup. Choose a phrase that is not easy to guess and guard it carefully. Data cannot be restored without the passphrase.
-
Enter a File Prefix to customize the backup archive filename.
- Select a remote transfer Protocol from the drop-down list:
- Secure Copy Protocol (SCP)
- Secure File Transfer Protocol (SFTP)
- Under Scheduler, configure the following:
- Enter a value from 0 to 60 to as the Frequency to determine how often backups are to be taken. 0 indicates the backup sequence has no end time.
- Enter the Frequency Unit for backups to occur. by default the Frequency Unit is taken everday. Use this field to change the unit to minutes, hours, weeks or months.
-
Enter a number ranging from 0 to 20 as the Number of Backup (On Controller). 0 is equivalent to unchecking the Local option. The oldest backup is deleted after the most recent backup successfully completes. The oldest backup is deleted after the most recent backup successfully completes.
- You can choose to save local (on Controller) and remote backup locations independently. In the Backup Destination section, configure the following:
- Select Enable Local Backups (on Controller), to preserve the number of indicated backups on the Controller.
- Select Enable Remote Server Backup to save the backup in a remote server. Note: This option is deactivated by default, but it is recommended to specify a remote destination in case the Controller cluster fails in a non-recoverable fashion.
- In the Server Address field, enter an FQDN or IP address reachable from the Controller.
- In the Home Directory field, provide a remote destination address with write permissions.
- Use the drop-down list to select User Credentials from a previously-defined SSH user. Alternatively, click the three dots at the end of the field to Create new user credentials.

- Click Save to complete configuration backup settings.
Scheduled Backup via CLI
[admin:10-102-64-234]: > show backupconfiguration Backup-Configuration
+-------------------------------+----------------------------------------------------------+
| Field                         | Value                                                    |
+-------------------------------+----------------------------------------------------------+
| uuid                          | backupconfiguration-0c5b26a0-a45d-47af-b230-42a8901aaf57 |
| name                          | Backup-Configuration                                     |
| save_local                    | True                                                     |
| maximum_backups_stored        | 4                                                        |
| upload_to_remote_host         | True                                                     |
| ssh_user_ref                  | aviuser                                                  |
| remote_directory              | /tmp                                                     |
| remote_hostname               | 10.102.64.235                                            |
| backup_passphrase             | <sensitive>                                        |
| backup_file_prefix            | sftp                                                     |
| remote_file_transfer_protocol | SFTP                                                     |
| tenant_ref                    | admin                                                    |
+-------------------------------+----------------------------------------------------------+
[admin:10-102-64-234]: >
One can specify the value of start_date_time from the CLI (not possible via the UI):
[admin:10-10-24-52]: > configure scheduler Default-Scheduler
[admin:10-10-24-52]: scheduler> no enabled
[admin:10-10-24-52]: scheduler> start_date_time 2017-05-11T00:00:00
Overwriting the previously entered value for start_date_time
[admin:10-10-24-52]: scheduler> save
[admin:10-10-24-52]: > configure scheduler Default-Scheduler
[admin:10-10-24-52]: scheduler> enabled
Overwriting the previously entered value for enabled
[admin:10-10-24-52]: scheduler> save
Scheduled Backup via API
In this example a PUT changes the scheduler frequency to 1 week:
PUT : api/scheduler/
{'_last_modified': u'1476209663670990',
'backup_config_ref': 'https://10.10.24.52/api/backupconfiguration/backupconfiguration-5d65f12e-5da1-49e0-b703-ec65ae9a39c6',
 'enabled': True,
 'frequency': 1,
 'frequency_unit': u'SCHEDULER_FREQUENCY_UNIT_WEEK',
 'name': u'Default-Scheduler',
 'run_mode': u'RUN_MODE_PERIODIC',
 'scheduler_action': u'SCHEDULER_ACTION_BACKUP',
 'start_date_time': u'2016-10-09T15:35:46.220623',
 'tenant_ref': u'https://10.10.24.52/api/tenant/admin',
 'url': 'https://10.10.24.52/api/scheduler/scheduler-b5f7e673-8818-44d1-8f74-45238cc08235',
 'uuid': u'scheduler-b5f7e673-8818-44d1-8f74-45238cc08235'}
On-demand Backup via Avi CLI
To back up the Avi Vantage configuration on-demand, at any arbitrary time, use the following CLI command:
: > export configuration file /tmp/avi_config.json full_system
Please enter the passphrase to encrypt configuration:
Downloaded the attachment to /tmp/avi_config.json
Completed writing the export configuration to /tmp/avi_config.json
On-demand Backup via REST API
To back up the Avi Vantage configuration on-demand, at any arbitrary time, use the following API request:
GET https://[CONTROLLER-IP]/api/configuration/export?full_system=true
To also include a passphrase, use one of the following options:
In versions 16.1.3 and above:
GET https://[CONTROLLER-IP]/api/configuration/export?full_system=true&passphrase=[PASSPHRASE]
In versions 16.2 and above, use the following POST method and include passphrase in the JSON data:
POST https://[CONTROLLER-IP]/api/configuration/export?full_system=true
JSON data: {"passphrase":"[PASSPHRASE]"}
Make sure to replace [CONTROLLER-IP] with the IP address of the Avi Controller (if using a single Avi Controller node), or the IP address of the Avi Controller cluster.
On-demand Backup Script Utilizing Python
Refer to https://github.com/avinetworks/sdk/blob/master/python/avi/sdk/samples/avi_config_backup.py
Configuring Backup using Amazon S3
Starting with Avi Vantage release 18.2.3, backup configuration can be stored on Amazon S3 bucket as well.
To enable backup configuration on Amazon S3, use the configure backupconfiguration command and set value of the upload_to_s3 flag to true.
Provide the value of the following attributes to save the backup file on the Amazon S3 bucket for the required instance.
- aws_access_key: Access Key ID
- aws_secret_access: Secret Access Key
- aws_bucket_id: Name of the S3 bucket
[admin:10-1-1-1]: configure backupconfiguration Backup-Configuration
Note:
For enabling Avi Controller’s backup, you should have write permission to S3 bucket.
For the detailed information on the Access Key ID and Secret Access Key, refer to AWS Cross-Account AssumeRole Support.
Restoring the Avi Vantage Configuration
If the unlikely should occur and a disaster completely destroys the Avi Controller (or entire cluster), the device/VM hosting the Avi Controller(s) should first be restored to factory default using flushdb.sh. Failure to do so can prevent the Controller from coming up. If there is a prev partition (rename or delete the prev partition). The prev partition can either be root1 or root2mv root1/root2 prev_back
Steps to check the Partition Mapping are as listed below:
-
sudo cat/proc/cmdline
You can observe an output with eitherroot1orroot2as a current partition as shown below:
For example, we seeroot1below as current partition:Outputroot=UUID=f4a947e1-7efb-4345-9eac-1ff680fc50e0 subroot=/root1 net.ifnames=0 biosdevname=0 console=tty0 console=ttyS0,115200n8 -
Go to /host directory and rename the prev partition as shown below:
 cd /host
 ls -lrth <- This is to see if you have root1 and root2 directories.
 mv root2 prev_bak ----> as root2 is prev partition
Thereafter, the following script can be used to automate the configuration recovery process:
/opt/avi/scripts/restore_config.py
Note: Starting with Avi Vantage version 18.2, prev partition needs to be removed.
This script imports the backup configuration onto the Avi Controller. If restoring an Avi Controller cluster, this script restores the configuration and also re-adds the other two nodes to the cluster.
- Create three new Avi Controllers with the same IP address as the original cluster members. (Avi Vantage currently supports only static IP addresses.) At this point, other than having an IP address, each Avi Controller node should be in its factory default state.
- To SSH into the Controller, create an admin account with a password. To set up the admin password, see Strong Default Admin Password.
- Log onto one of the Avi Controller nodes using SSH or SCP. Use the default administrator credentials.
- Run the restore command or script:
- Copy backup file via SCP:
scp /var/backup/avi_config.json admin@<controller-ip>://tmp/avi_config.json
- Copy backup file via SCP:
- Run restore command locally via SSH:
/opt/avi/scripts/restore_config.py --config CONFIG --passphrase PASSPHRASE --do_not_form_cluster DO_NOT_FORM_CLUSTER --flushdb --vip VIP --followers FOLLOWER_IP [FOLLOWER_IP ...]
In the above command line:
CONFIGis the path of the configuration file.PASSPHRASEis the export configuration passphrase.DO_NOT_FORM_CLUSTERcauses cluster formation to be skipped.VIPis the virtual IP address of the Avi Controller.FOLLOWER_IP [FOLLOWER_IP ...]is a list of the IP addresses of the followers.CLUSTER_UUIDis the old cluster UUID to be restored.
Note: Starting with NSX Advanced Load Balancer 22.1.3, the following options have been deprecated:
--do_not_form_cluster--vip--followers
Follow the steps below to restore configuration in a cluster set-up.
- Restore the configuration on one of the nodes
- Reform the cluster by inviting the two new nodes to the cluster.


