BOT Management
Overview
A Bot is a software application that runs autonomously and is programmed to perform certain repetitive tasks much faster than human users could. Bots are automated, i.e. they run according to their instructions without any human intervention. Bots are mimicking real human work-flows across web applications to “behave” like real users.
This article explains bot detection, management, and configuration in Avi.
Bots have evolved significantly over the last few years and have become more sophisticated than ever. There are different types of Bot, such as:
-
Web Crawlers — Bots scan content on web pages, for instance, Google Bot.
-
Social Bots — Automated accounts that use artificial intelligence to steer discussions and promote specific ideas or products on social media such as Twitter and Facebook.
-
Chat Bots — These are a common type of Bot that simulate human conversation by responding to queries with programmed responses.
-
Gaming Bots — These Bots are used in videos games. These are usually based on artificial intelligence and are programmed to assume vivid characters in a video game that a human player would interact with.
-
Malicious Bots — Responsible for perpetrating online fraud, credential stuffing, and so on.
-
Scalpers — These are malicious Bots that use automated methods to secure goods, such as event tickets that are bought in bulk, and complete the checkout process in a fraction of the time it would take any legitimate user. For instance, fraudulent holding and reselling of airplane seats affecting a major airline.
-
Scrapers — Scrape data from sites without permission in order to steal data, or duplicate a site in order to set up a fraudulent phishing site or gain a competitive edge.
Bots are becoming an increasing problem for web presences, and Bot traffic has significantly increased over the last few years. According to the recent studies, only about 60% of the traffic on a given website coming from human beings. Out of the remaining 40%, 25% are categorized as bad Bots and 15% as good Bots.
| Good Bots Example | Bad Bots Example |
|---|---|
| Search engine crawlers Website health monitors Vulnerability scanners Copyright checks Feeds |
Scrapers Spam Click (Fraud) Googlebot impersionators Botnets |
Bot Detection and Bot Management
Good Bots can be useful but bad Bots are responsible for many of the most serious threats to online businesses. It is important to detect Bot traffic, determine its intent and mitigate bad Bots to enhance user experience.
Bot detection can be defined as a method to identify the client i.e. whether the traffic is coming from a human or a Bot.
Once a Bot is detected, managing Bot traffic is equally important. Bot management is a strategy that enables you to filter which Bots are allowed to access your web assets and which should be rate-limited or blocked completely.
Avi Bot Management
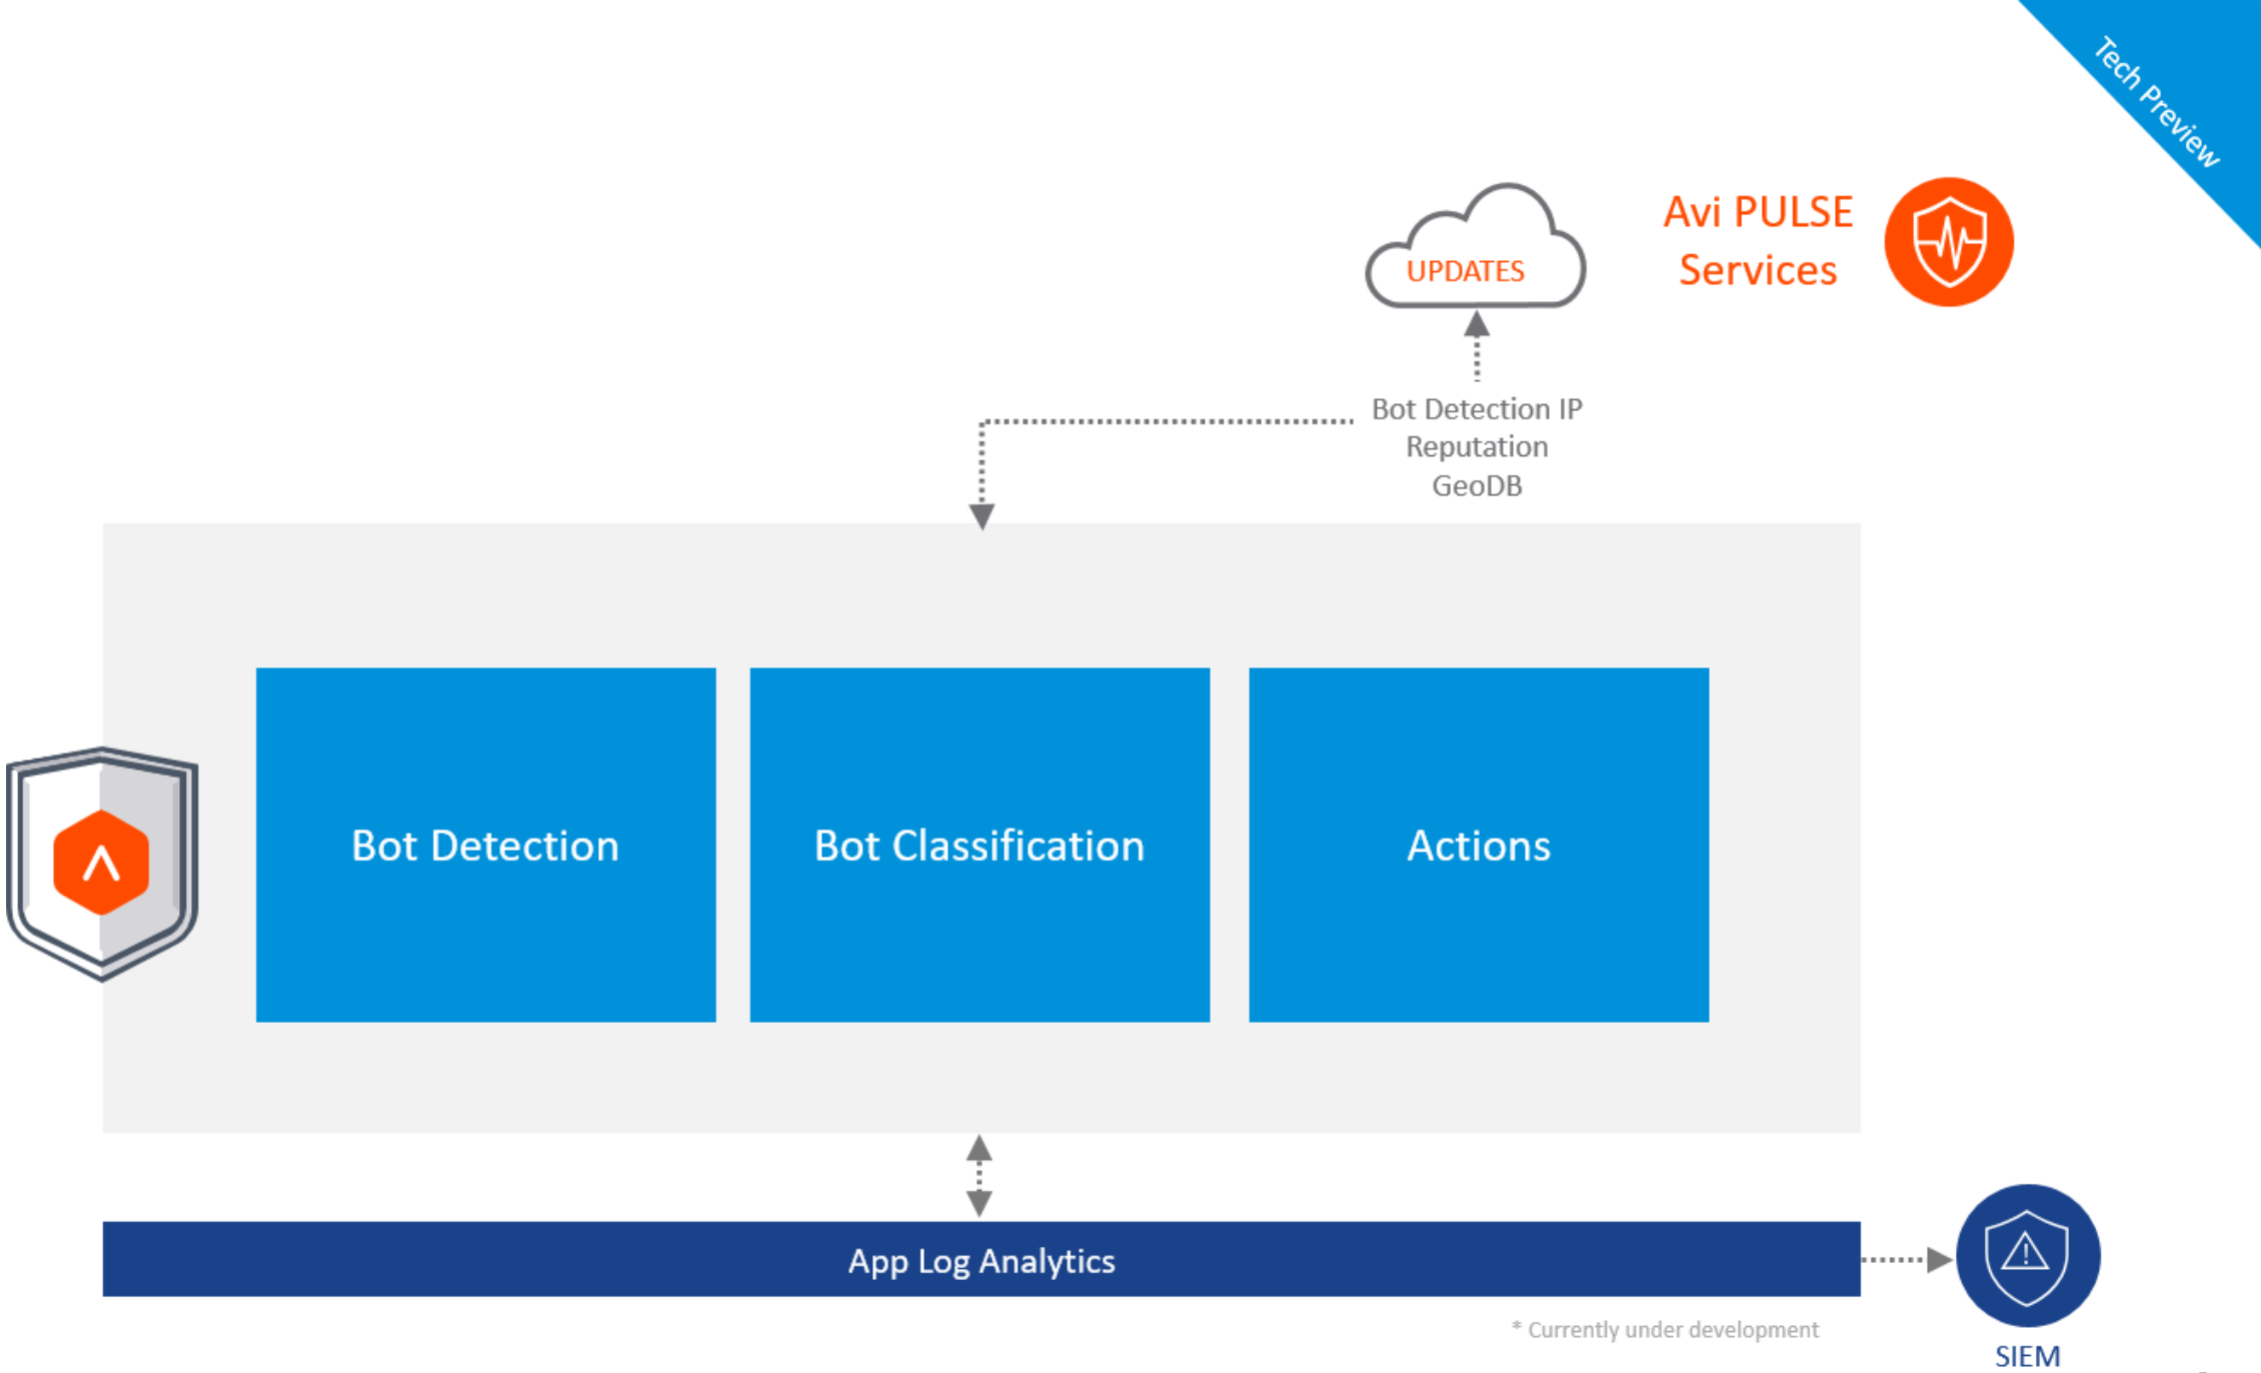
Starting with Avi Vantage version 21.1.1, the Bot management solution is introduced to mitigate bad Bots.
The figure above shows the Avi Bot management pipeline that consists of three main steps:
-
Bot Detection
-
Bot Classification
-
Actions
Bot Detection
This is the first and the most crucial step in the Bot management pipeline.
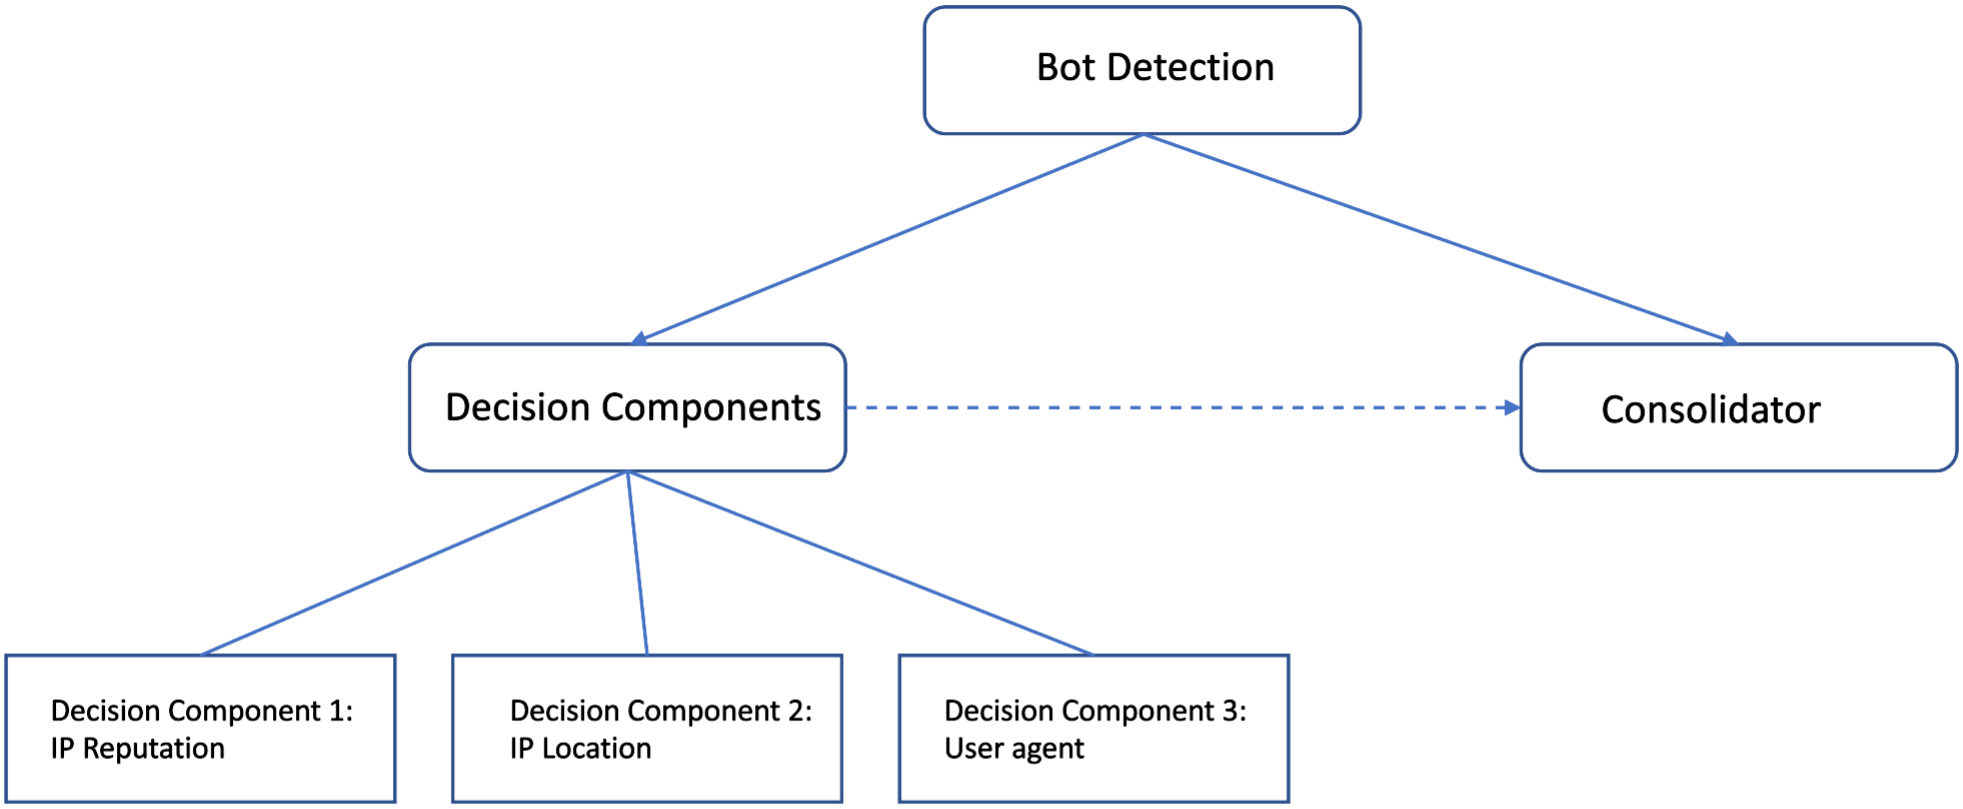
In this step, the request goes through various checks. The checks are called decision components. Each decision component (Bot detector) provides some information to characterize the request like Client Class (USER/ BOT/ undetermined), Client Type (possible values depend on class, for instance, browser or app for USER and search engine/ monitor for Bot), Confidence level (High, Medium or Low).
Decision Components/ Detectors
IP reputation — This component uses an IP reputation database that gets updated by Avi Pulse. It matches the IP address of the client against the IP reputation database. If there is a match, then the client will be marked as Bot with high confidence level. If there is no match, then it is undetermined.
IP location — In this step, Avi Vantage uses the Client-IP and does a lookup in network location DB. As part of the process, the system matches the ISP and Organization name against known search engines and cloud providers. Once the lookup is done and decision is taken, the client is marked either as Bot or Undetermined. Confidence level is also assigned.
User-Agent — The system does a heuristic scan of the incoming user agent string to look for things like SQL injections etc. If found, the request is marked as a bad Bot of type web attack. Otherwise, the system checks the User-Agent Database that gets populated using Avi Pulse. Depending on the result of this check, the client is marked as either Bot or Human. If there is no information in the Database, a pattern match is made to identify common and typical browser user agents. If that fails too, the result is undetermined.
The User-Agent check in Bot management allows User-Agent strings with an uneven number of single quotes. For instance, Mozilla/5.0 (compatible; Let’s Encrypt validation server; +https://www.letsencrypt.org)
Note: If there is any need to disable one of these decision components, it can be done using the steps mentioned in BOT Configuration section.
Consolidator
Consolidator is a built-in agent that takes results of all other decision components and creates its own client type and class based on certain logic. It inspects the data and looks for any contradictions and irregularities. It stores its own decision which is further referred by Bot mapping.
TLS Fingerprinting for Bot Detection
Starting with NSX Advanced Load Balancer version 22.1.1, the user-agent decision component has been enhanced to not only take into account the User-Agent header as sent by the client, but to also match the TLS messages from the client against the TLS fingerprint expected for the given user agent.
This improves detection of bots that masquerade as human users by sending a valid browser User-Agent header. Therefore, this additional check is only carried out if the User-Agent is a browser according to the data in the user agent cache. Furthermore, it can of course only be carried out if the connection is via https, and not http.
If there is no TLS information for the user-agent in question, the client is classified as human with medium confidence.
If there is TLS information for the user-agent in question, and the clients TLS fingerprint matches that information, the client is classed as human with high confidence.
If a mismatch is detected, the user-agent decision component labels the client a dangerous bot of type impersonator with high confidence.
TLS fingerprint information is maintained up-to-date through cloud services.
The use of TLS fingerprint information can be disabled in the bot detection policy via knob use_tls_fingerprint.
A new complex field for detailed client TLS information and fingerprint has been added to the application log; it can be enabled via the flag collect_client_tls_fingerprint in the application profile.
Bot Classification
Once the consolidator has provided its analysis, Avi Vantage classifies the Bot using a Bot Mapping Policy. The default Bot mapping is handled by configuration object called as System-BotMapping. Bot classification is the final outcome that is assigned by Bot mapping. Bots are classified as follows in Avi Vantage:
| BOT Classification | Description |
|---|---|
| HUMAN | Browser, Application |
| GOOD_BOT | Search engines like Google Bot |
| BAD_BOT | Scanner, Botnets |
| DANGEROUS_BOT | When an attack is found in the user agent string, web attacks, Botnet, denial of service |
| USER_DEFINED_BOT | Custom Bots defined in Bot mapping |
| UNKNOWN_CLIENT | Unidentified |
Note: Starting with Avi Vantage version 21.1.3, if a user-defined bot mapping is specified in a bot detection policy, the system bot mapping reference can be left empty.
Bot Mapping
The Bot can be classified on the basis of the following:
- Bot Class
- Bot Type
- Bot Identifier
Bot Decision Component
You can select the Bot decision component that has assigned class, type or the identifier. The component can be the consolidator, the user-agent detector, the IP-reputation detector or the IP-location detector. Based on these characteristics, the Bot mapping selects one of the defined Bot classification types, such as, HUMAN, GOOD_BOT and so on. Selection of multiple properties implies logical AND, i.e., all properties have to be fulfilled for a match to be successful.
All these properties are directly related to the Bot module. Starting with Avi Vantage version 21.1.3, you can assign a Bot classification type in a Bot mapping based on general request properties like the source IP or an HTTP header value.
To fit this concept into the object model, an extra
message type has been added to encapsulate the matching functionality
of a BotMappingRule: BotMappingRuleMatchTarget code.
In addition to the three Bot results mentioned above, the following request properties can be used in Bot mappings:
- The client IP address. Here the full flexibility of the existing
IpAddrMatchmessage is supported, i.e., matching can be configured by individual IP, prefix, range and IP group. If multiple targets are configured, they are combined by logical OR.
Note: Client IP is subject to the option Use_True_Client_IP. Client IP might be equal to source IP from layer-3 header or equal to the fetched IP from user-defined HTTP header. For more information refer to True Client IP in L7 Security Features.
-
You can specify the HTTP method using a
MethodMatchmessage. If multiple values are supplied, logical OR is implied. -
The path requested by the client. The usual string operations supported for a
PathMatchmessage can be configured with the exception of regular expressions. -
A combination of HTTP headers can used for matching by using the existing
HdrMatchmessage. Multiple headers are combined by logical OR. -
For convenience, the host header can be configured more easily by specifying a
HostHdrMatchmessage.
As with the previously supported properties, all specified properties
in a BotMappingRuleMatchTarget have to be matched for the overall match to be successful.
Actions
The last step is to define the action that needs to be taken to control the behavior of Bots that have been classified.
This is done using HTTP Security policies under Policies section in the Virtual Service Policies guide.
The match condition can be one of the classified Bots, and the possible actions are:
-
Allow
-
Close Connection
-
Rate Limit
-
Send Custom Response and so on
Prerequisites
Integration with Cloud Services
Cloud Services must be enabled and the Controller must be registered with Cloud Services. In particular, for the user agent and the TLS fingerprint databases to be up-to-date, the deployment must be connected to Cloud Services.
For more information on registering the Avi Controller with Avi Pulse, refer to Getting Started with Avi Pulse guide.
Security Features
Extra Memory Requirements
The following are the extra memory requirements:
-
4 GB of RAM extra needs to be allocated on SE.
-
600 MB extra config shared memory.
- SE-Group property
extra_shared_config_memory. Once extra shared config memory is allocated, you need to reboot the system.
Note: Rebooting can lead to disruption in traffic.
- SE-Group property
Refer to Extra Shared Memory to understand the additional memory requirements and configure the same.
System Limits for Bot Management
Starting with NSX Advanced Load Balancer version 22.1.1, the details of system limits for Bot management is explained in VMware Configuration Limits link given in System Limits guide. You can select the required version in VMware Configuration Limits and check for the system limits.
Bot Configuration
Enabling Bot Management
The following are the steps to enable the service on an Avi Controller:
-
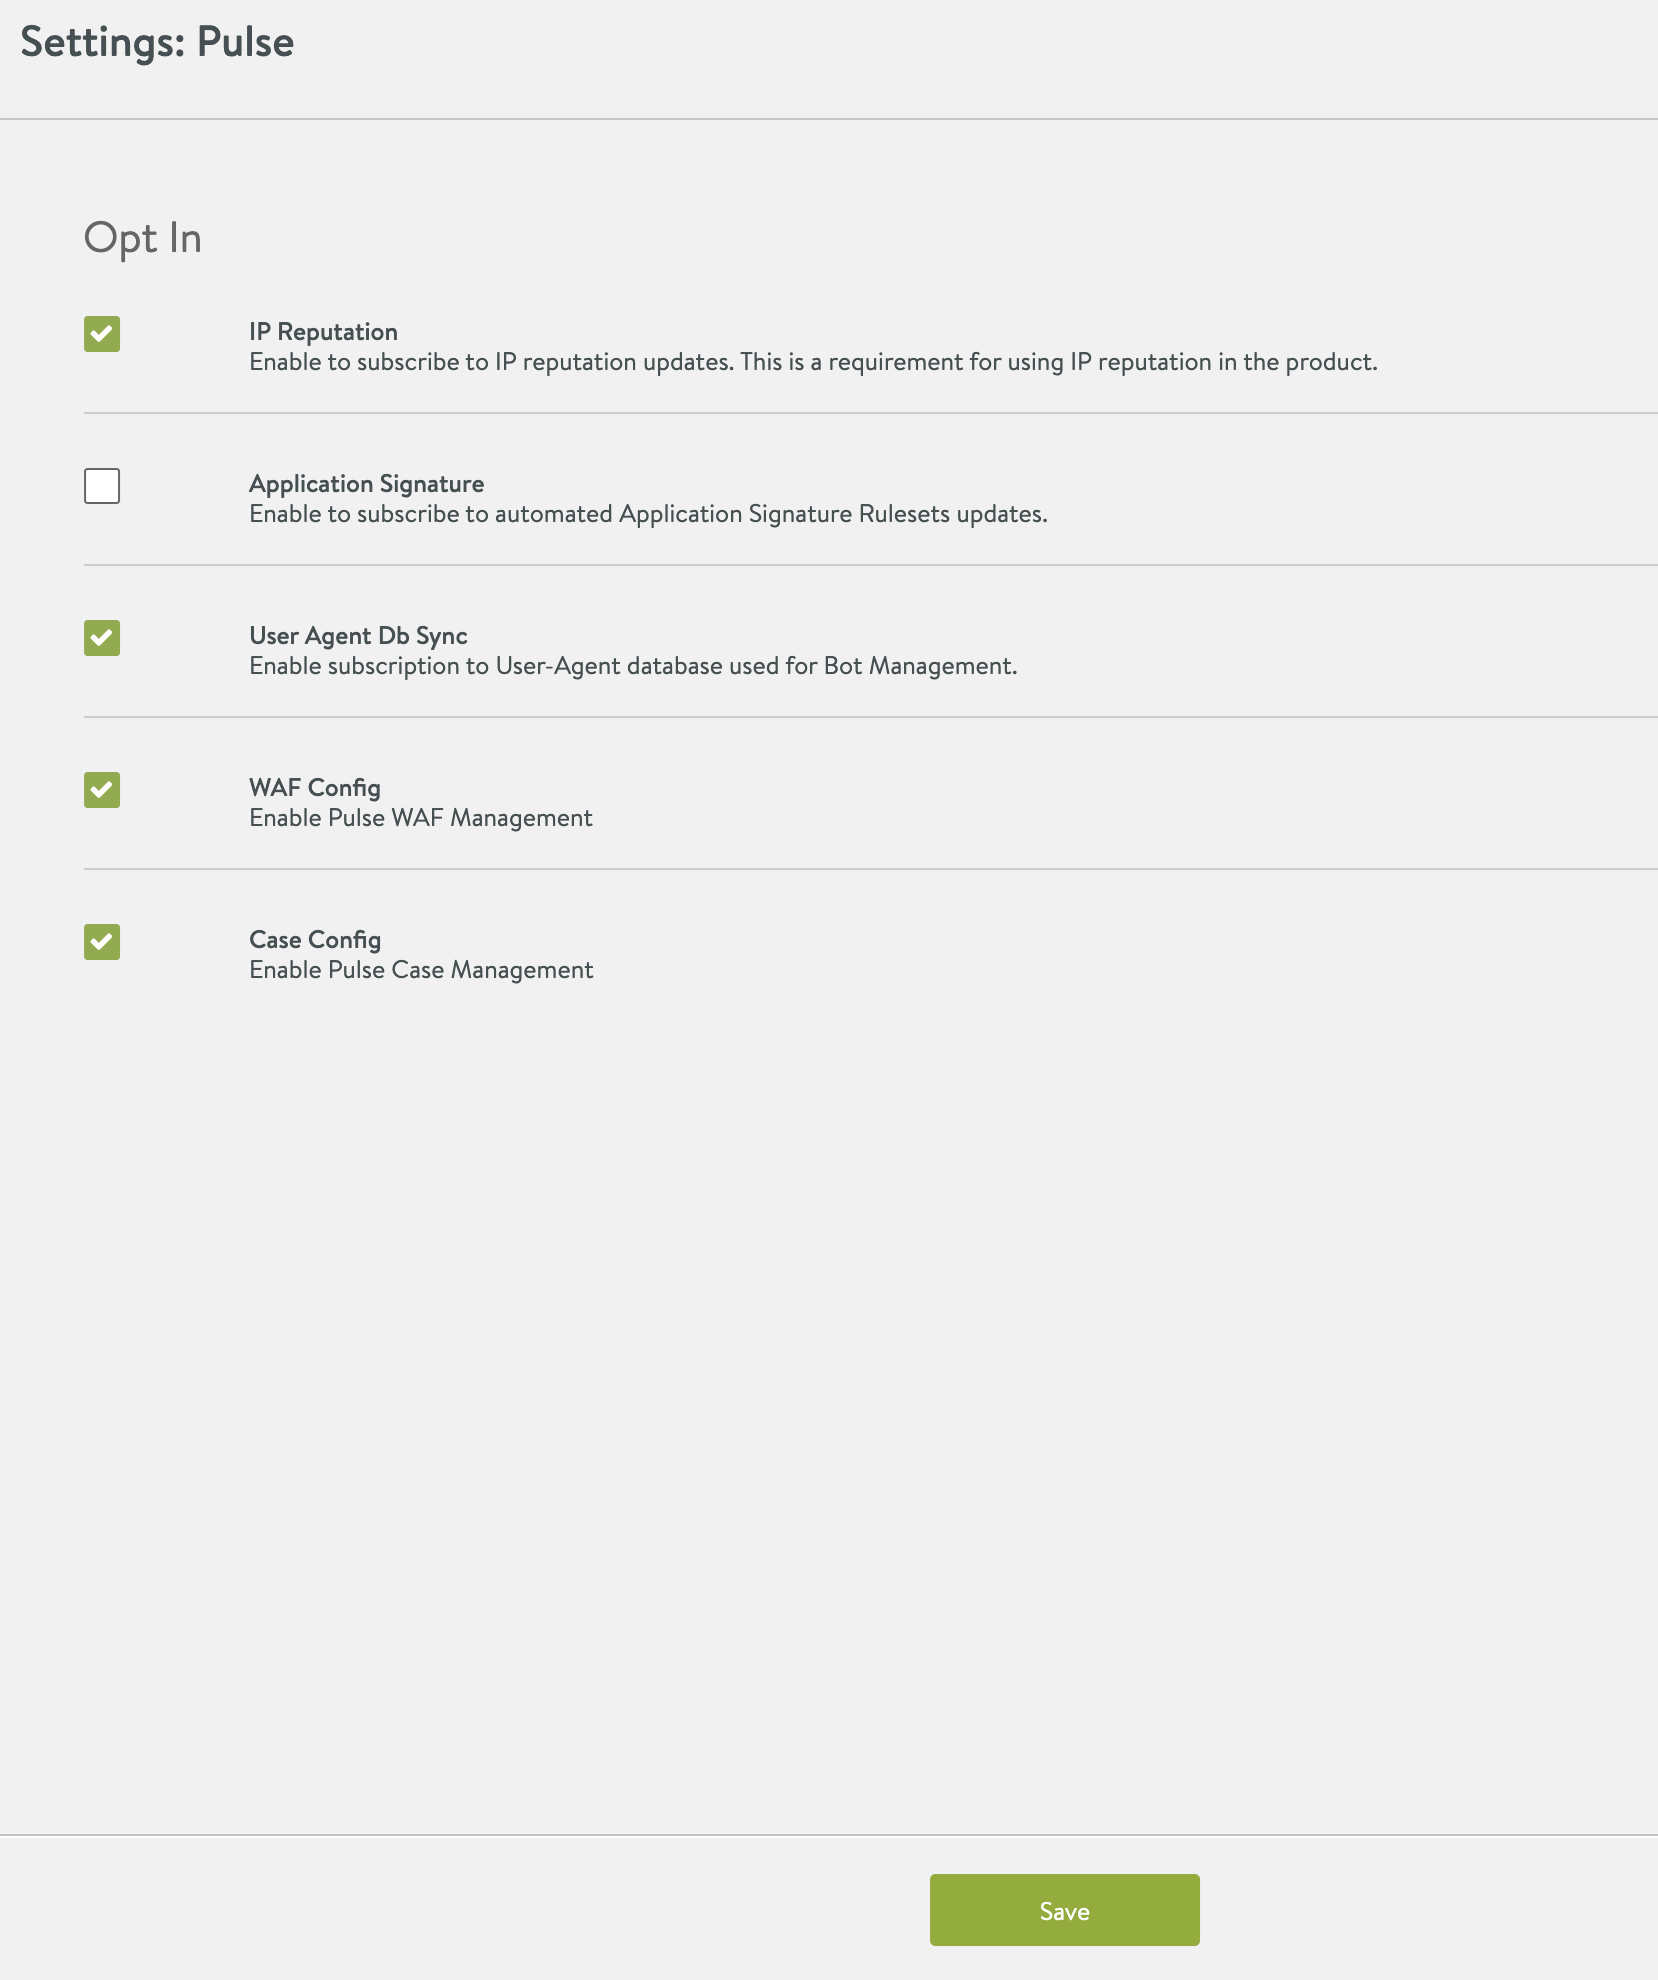
Navigate to Administration > Settings > Pulse. If the Avi Controller is registered with the Avi Pulse service, as shown below, move to the next step. If the Avi Controller is not registered with Avi Pulse service, refer to Getting Started with Avi Pulse guide for registration process.
-
Click on the edit Avi Pulse settings option.
-
Check IP Reputation and User Agent Db Sync boxes in Settings:Pulse window, as shown below:
-
Click on Save.
Once it is enabled, you can configure the rest of the entities using the following steps:
-
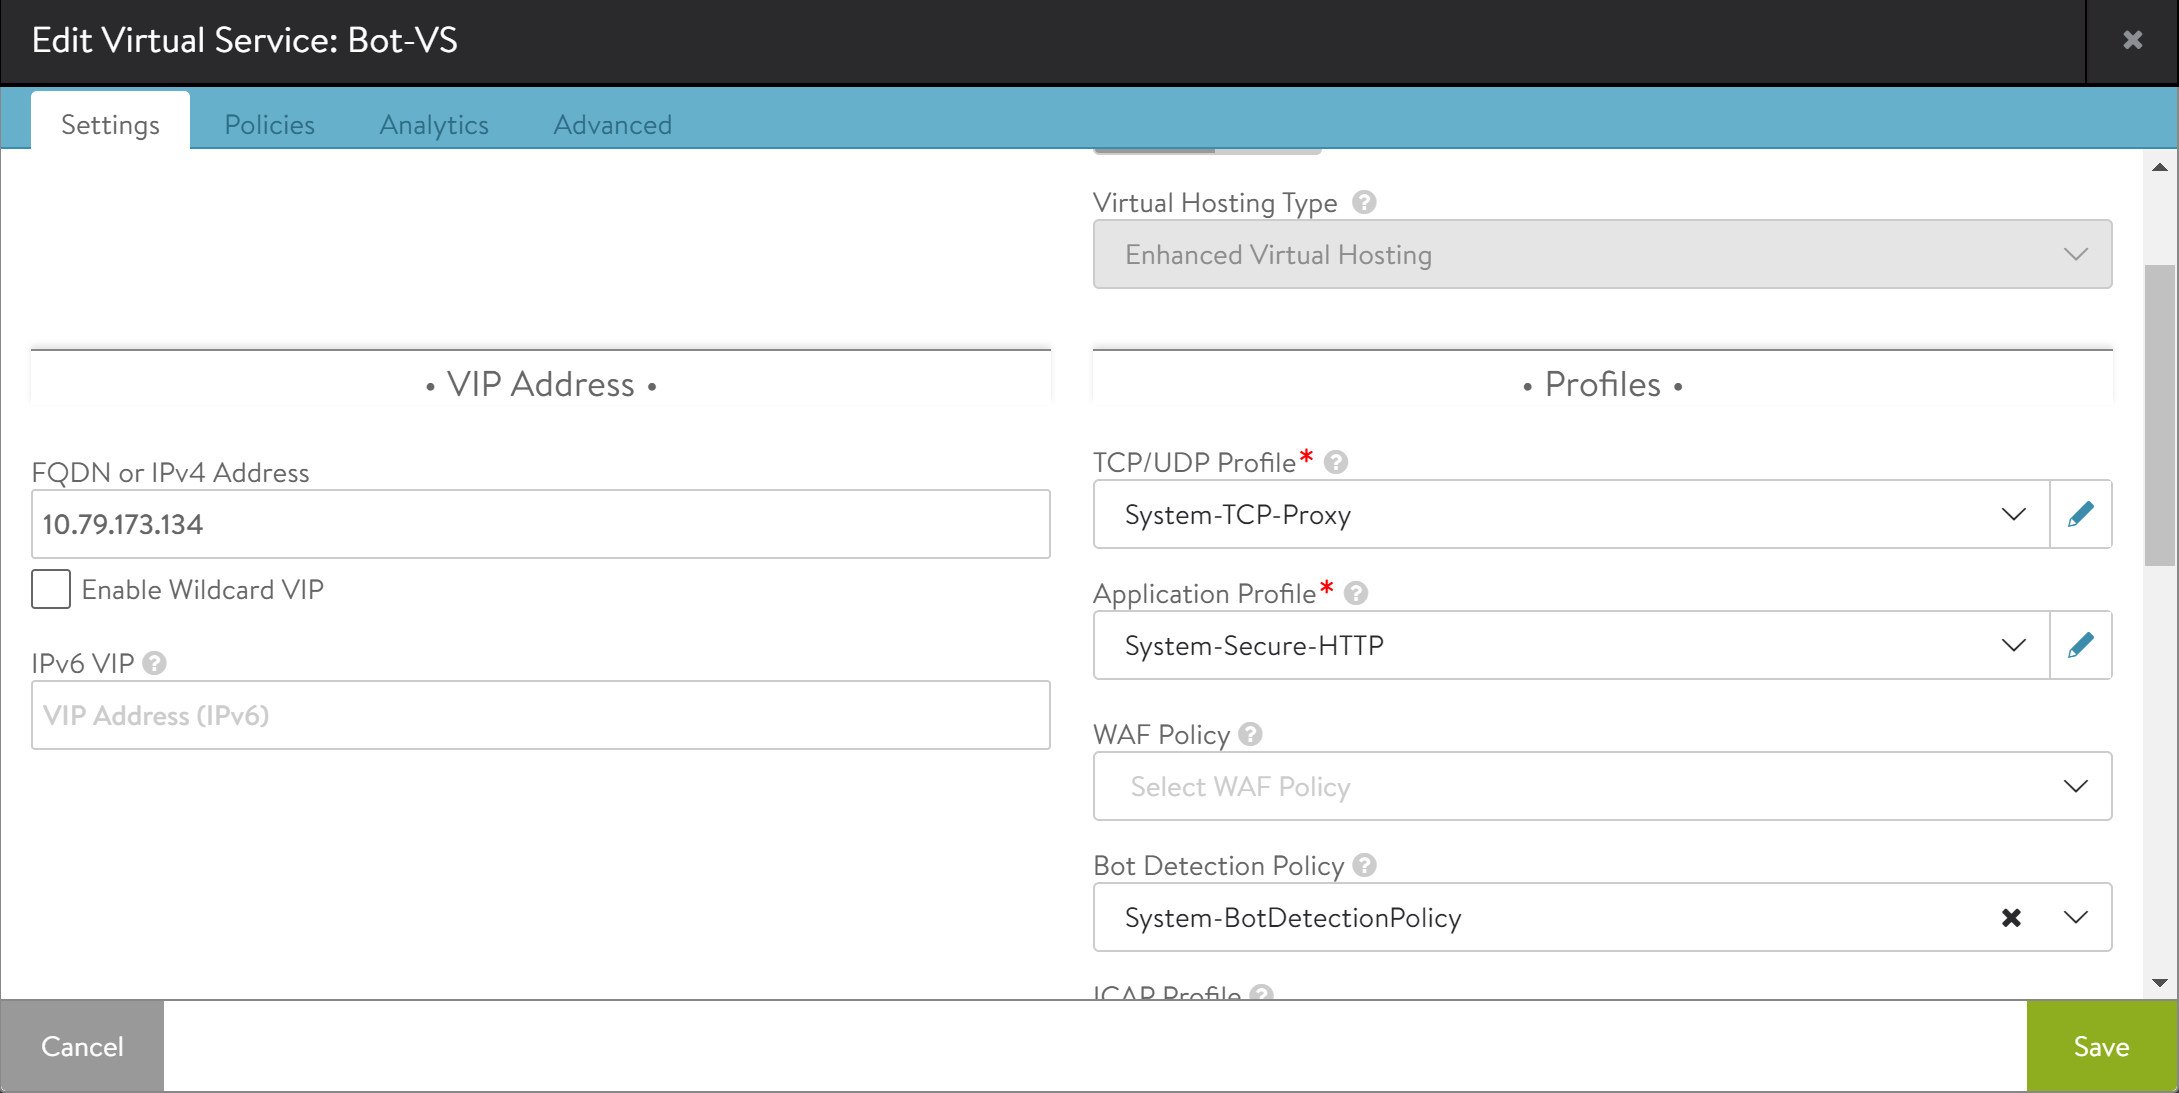
Bind the default
botdetectionpolicyi.e.,System-BotDetectionPolicyto the virtual service using the following steps:a. Navigate to Applications > Virtual Services. Click on Pencil icon to edit the virtual service.
b. Bind the
System-BotDetectionPolicyto the virtual service. -
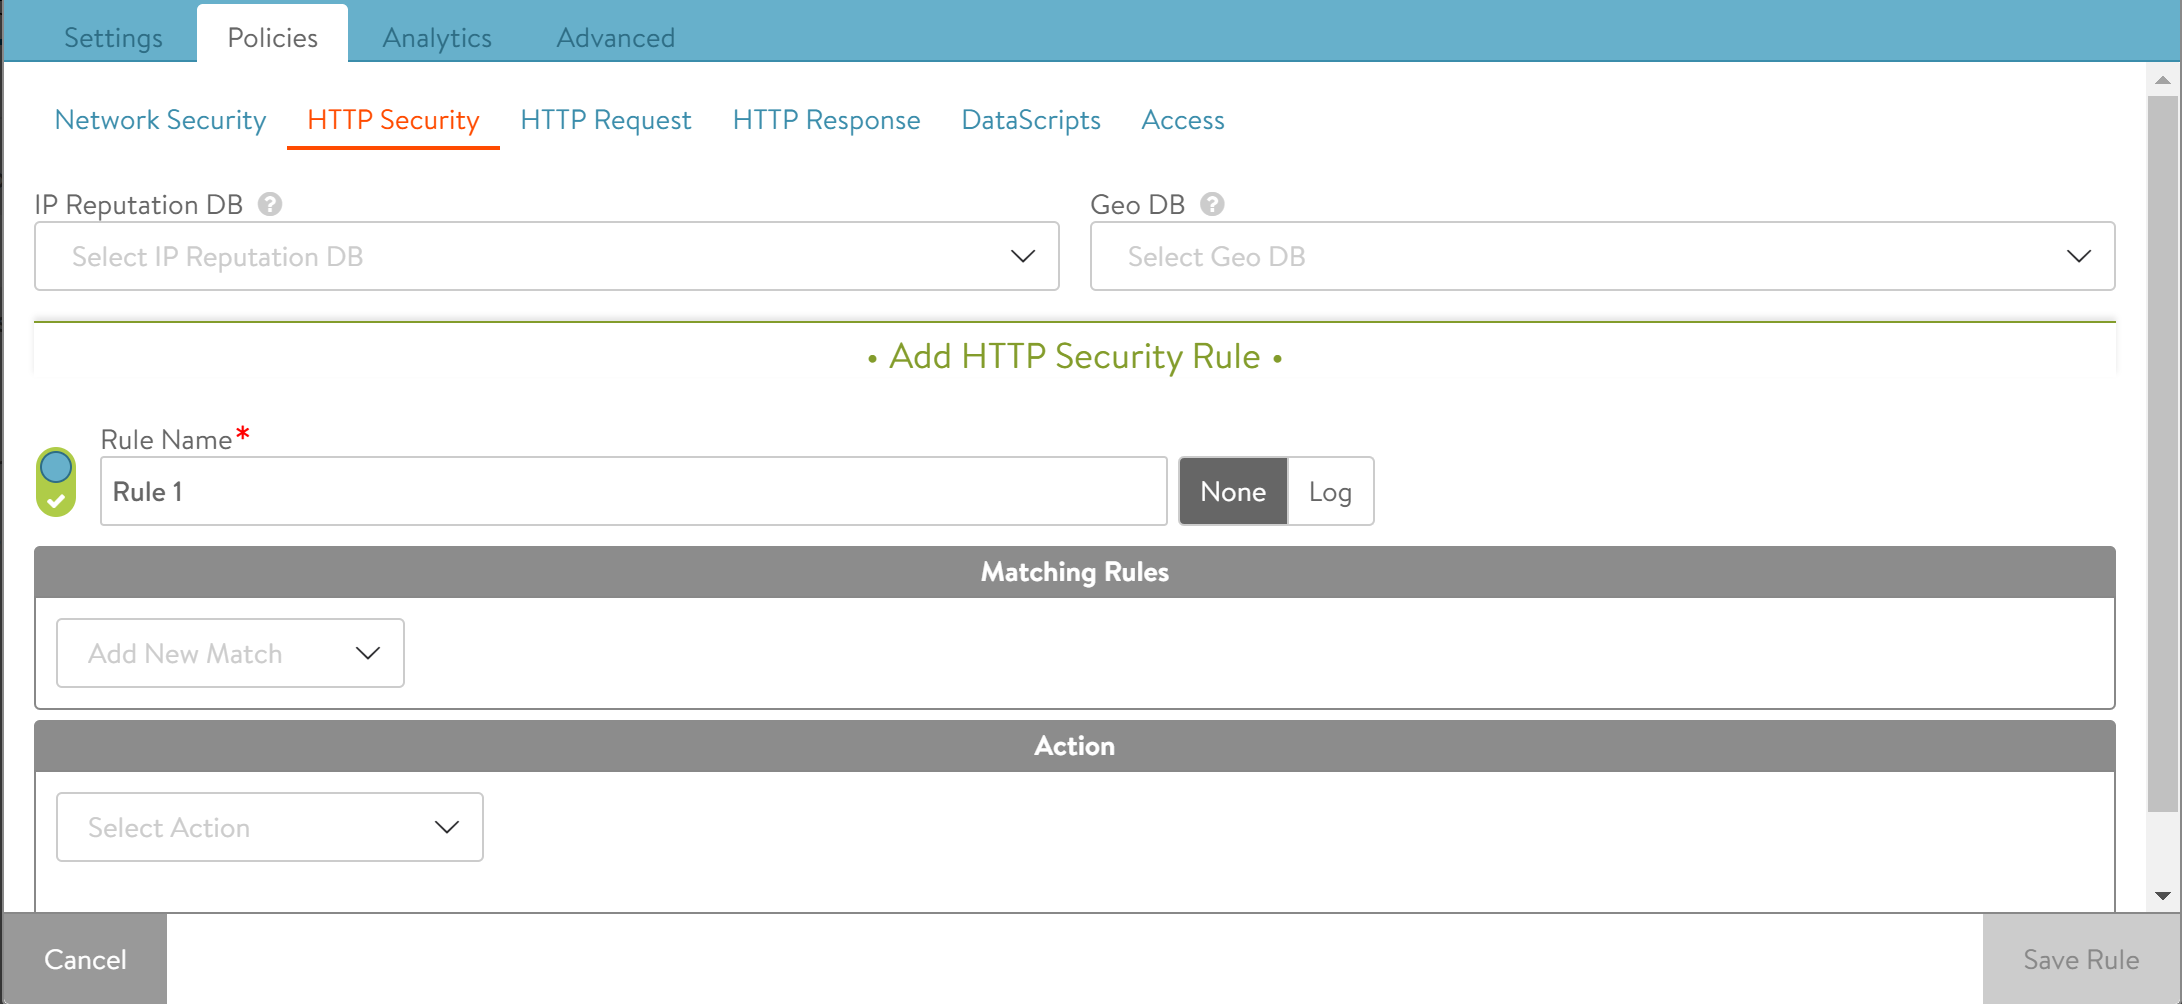
Add HTTP security policy to take the action on classified Bot.
a. Click on Policies > HTTP Security. Click on + icon under Add HTTP Security Rule section to add a new rule and assign a name to the rule.
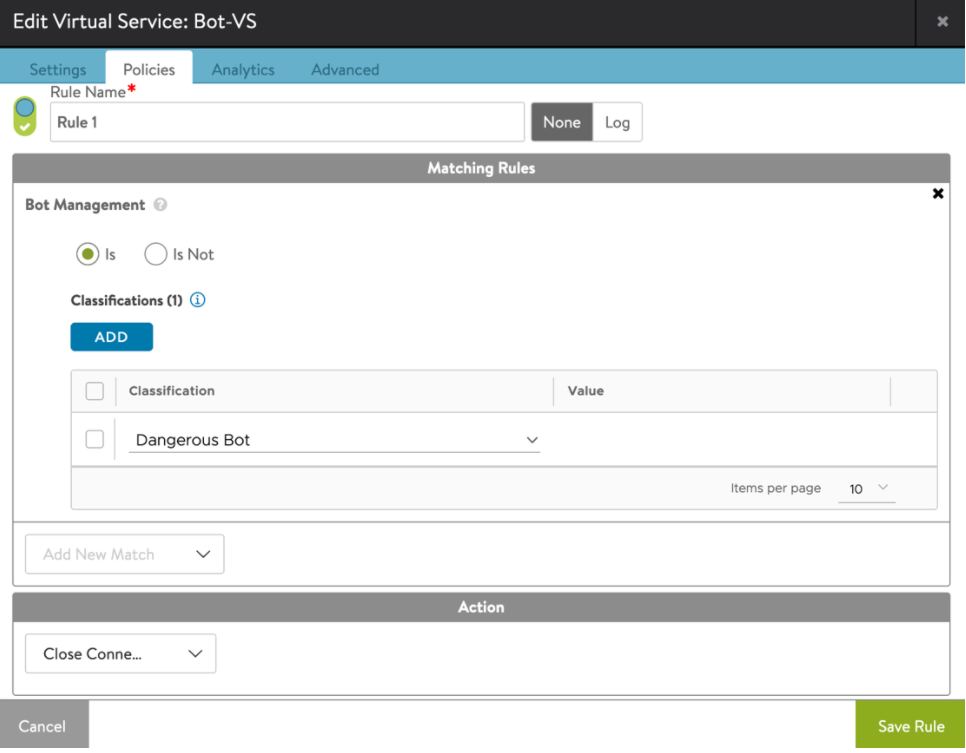
b. Select Bot management option as the match condition from the drop-down list in Matching Rules section.
c. Click on ADD under classification and click on Select Classification drop-down menu.
d. Select the Bot class from the drop-down menu.
e. Select the required action.
f. Click on Save Rule.
g. Click on Save.
CLI Configuration
The following are the steps to configure Bot using the CLI:
-
Bind the Bot detection policy to the virtual service.
-
Add HTTP security policy to take the action on the classified Bot.
[admin:ctrl]:> configure virtualservice Bot-VS [admin:ctrl]: virtualservice> bot_policy_ref System-BotDetectionPolicy [admin:ctrl]: virtualservice> save -
Add HTTP security policy to take the action on the classified Bot.
[admin:ctrl]: > configure httppolicyset Demo
 [admin:ctrl]: httppolicyset> http_security_policy
 [admin:ctrl]: httppolicyset:http_security_policy> rules
 New object being created
 [admin:ctrl]: httppolicyset:http_security_policy:rules> name rule1
 [admin:ctrl]: httppolicyset:http_security_policy:rules> match
 [admin:ctrl]: httppolicyset:http_security_policy:rules:match>
 [admin:ctrl]: httppolicyset:http_security_policy:rules:match> bot_detection_result match_operation is_in
 [admin:ctrl]: httppolicyset:http_security_policy:rules:match:bot_detection_result>
 [admin:ctrl]: httppolicyset:http_security_policy:rules:match:bot_detection_result> classifications
 New object being created
 [admin:ctrl]: httppolicyset:http_security_policy:rules:match:bot_detection_result:classifications> type dangerous_bot
 [admin:ctrl]: httppolicyset:http_security_policy:rules:match:bot_detection_result:classifications>
 [admin:ctrl]: httppolicyset:http_security_policy:rules:match:bot_detection_result:classifications> save
 [admin:ctrl]: httppolicyset:http_security_policy:rules:match:bot_detection_result> save
 [admin:ctrl: httppolicyset:http_security_policy:rules:match> save
 [admin:ctrl]: httppolicyset:http_security_policy:rules> action
 [admin:ctrl]: httppolicyset:http_security_policy:rules:action> action http_security_action_close_conn
 [admin:ctrl]: httppolicyset:http_security_policy:rules:action> save
 [admin:ctrl]: httppolicyset:http_security_policy:rules> save
 [admin:ctrl]: httppolicyset:http_security_policy> save
 [admin:ctrl]: httppolicyset> save
Note:
For each of the default objects in the system, the admin can supply their own logic that takes precedence.
-
System-BotConfigConsolidator- Custom consolidation script -
System-BotMapping- Custom mapping -
System-BotIPReputationTypeMapping- Custom mapping
Creating the customized botdetectionpolicy, botmapping, botconfigconsolidator and so on is supported. However, if you need to custom any of these, you can contact the Support team. To learn about the support options available for you, visit the VMware Support Offerings and Services page.
Logs and Visibility Example
-
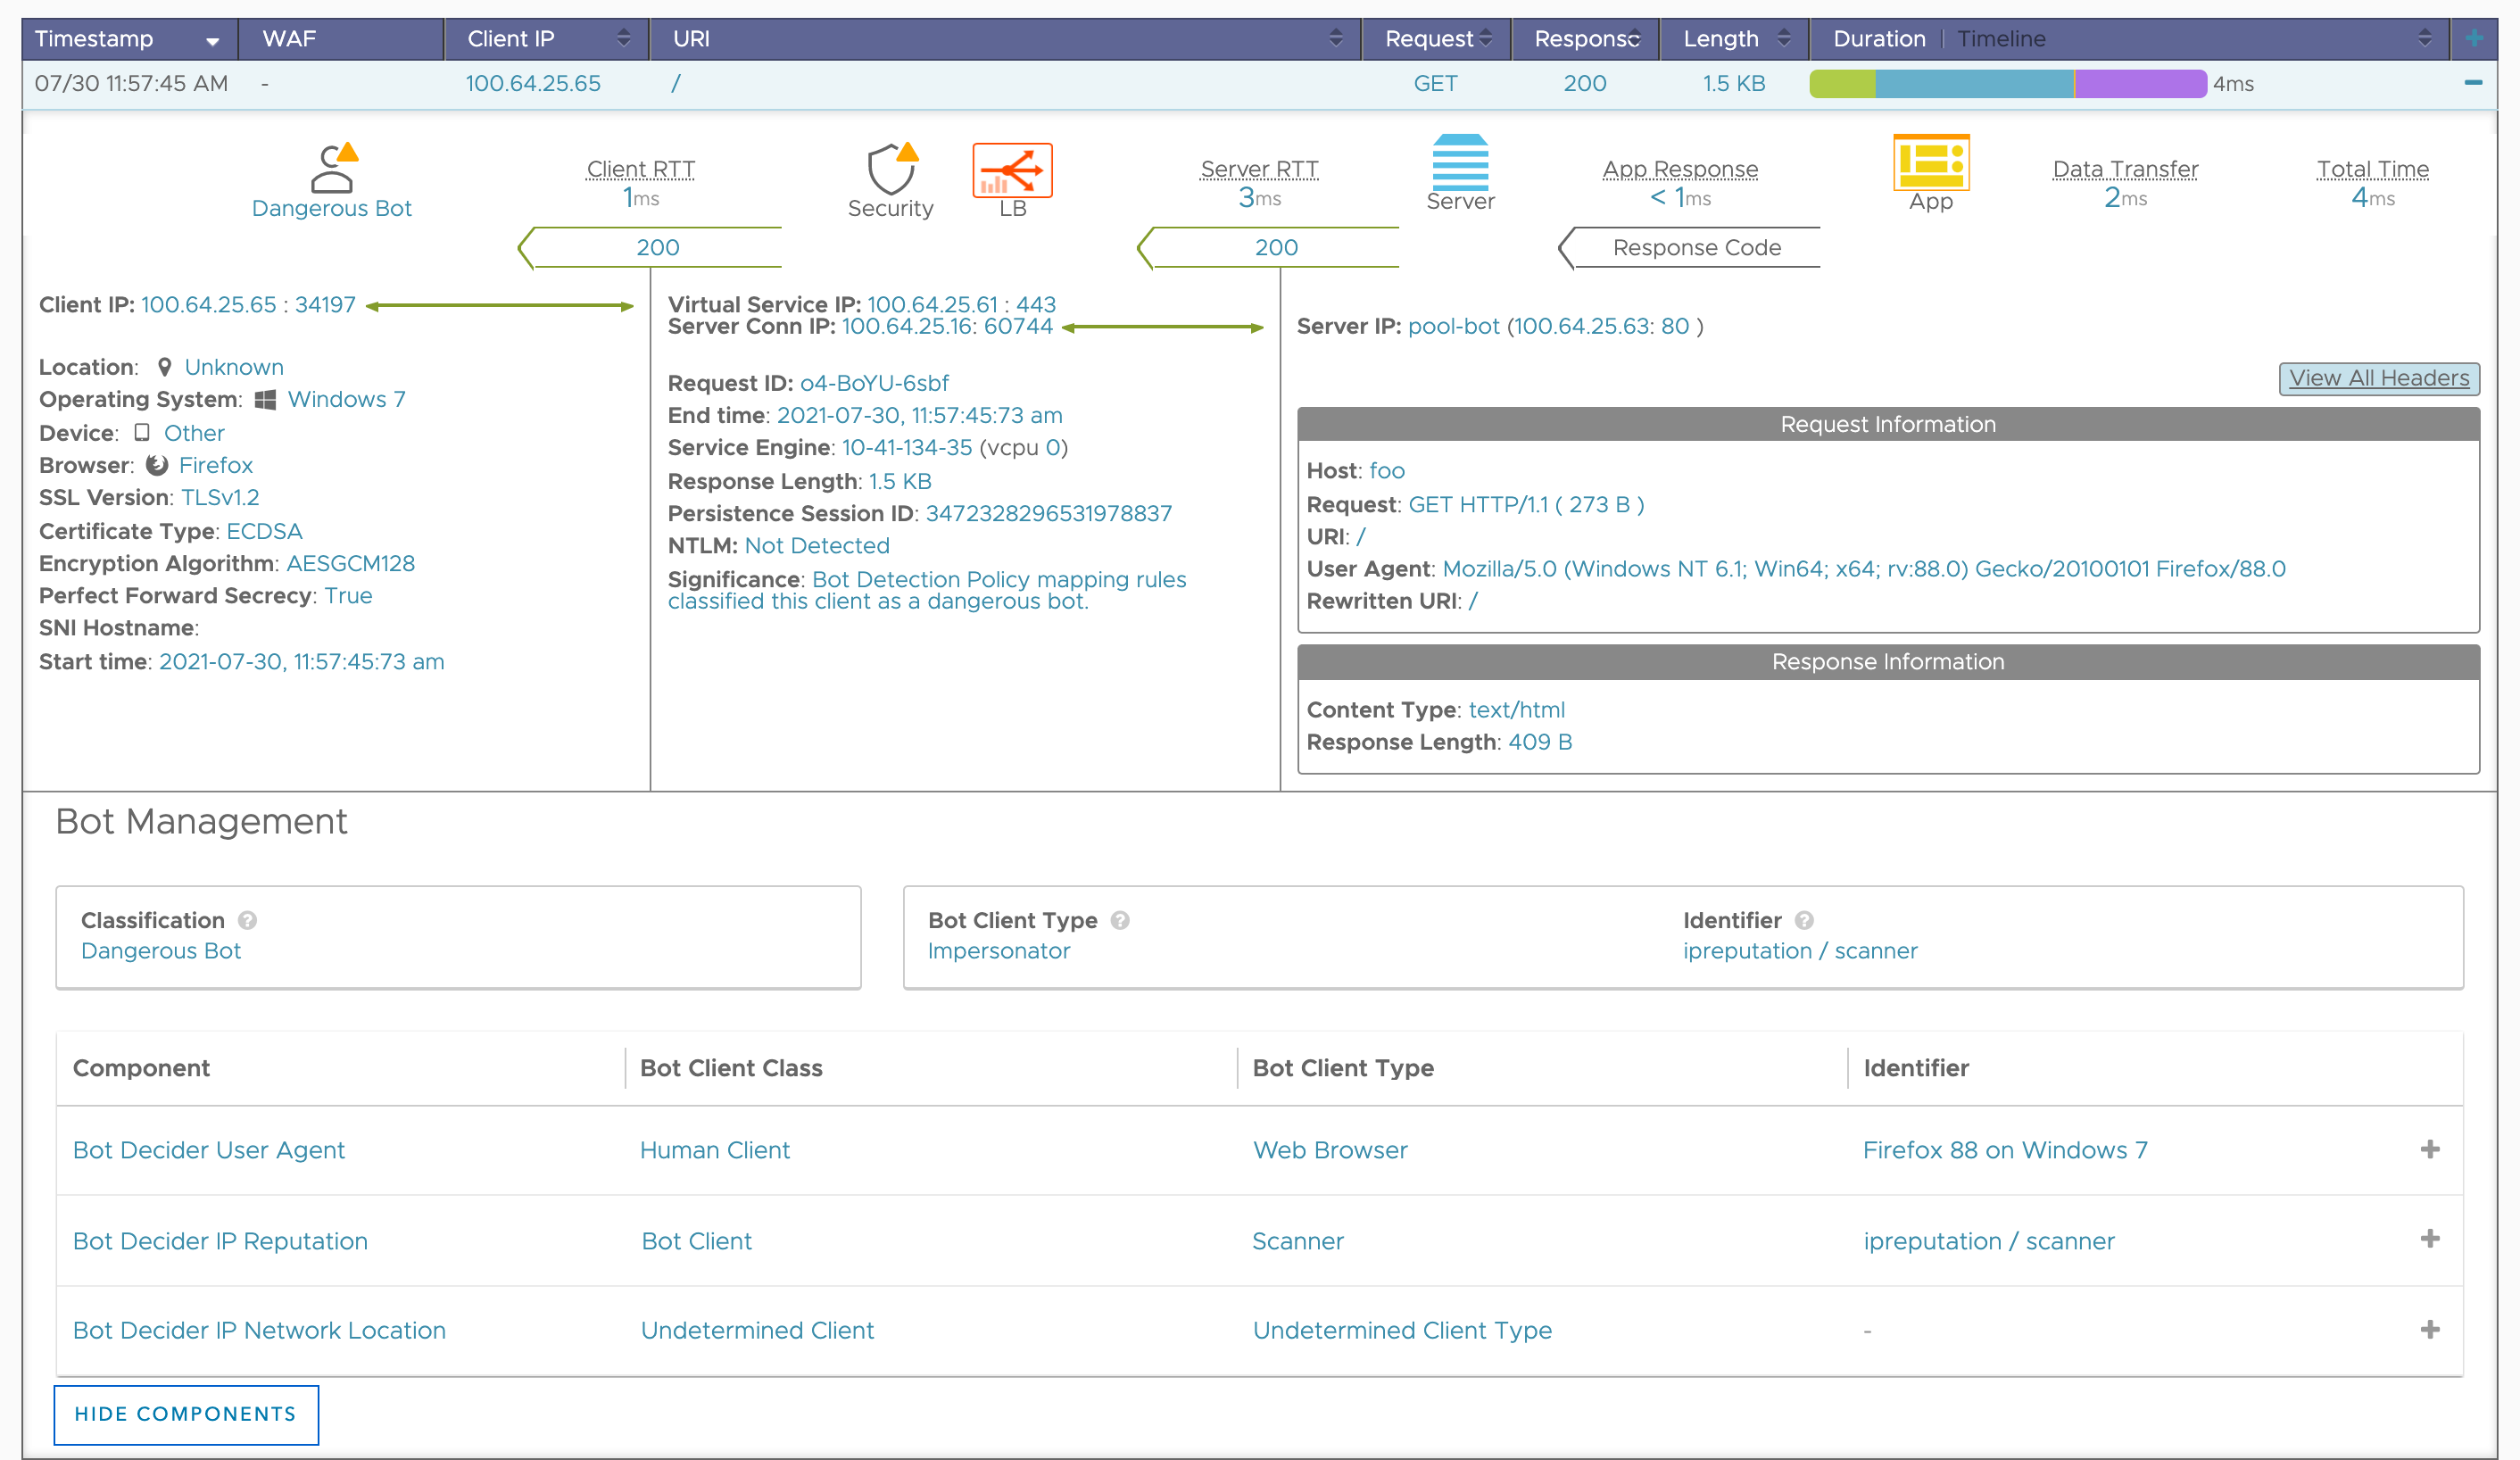
In the example below, Avi logs displays all the important data points like classification, client type, identifier and confidence level.
-
On the right side of the UI screen under logs, you can view the consolidated logs. Under summary, you can view Bot analytics. The Bot analytics displays the different types of Bot that is detected in the given period of time.
Special Cases
-
If the requirement is to skip Bot detection on certain requests, for instance, for requests coming from certain client IPs can be done by creating allow list in Bot policy.
The following are the configuration steps:
 [admin:ctrl]: > configure botdetectionpolicy System-BotDetectionPolicy
 [admin:ctrl]: botdetectionpolicy> allow_list
 [admin:ctrl]: botdetectionpolicy:allow_list>
 [admin:ctrl]: botdetectionpolicy:allow_list> rules
 New object being created
 [admin:ctrl]: botdetectionpolicy:allow_list:rules> name rule1
 [admin:ctrl]: botdetectionpolicy:allow_list:rules> condition
 [admin:ctrl]: botdetectionpolicy:allow_list:rules:condition>
 [admin:ctrl]: botdetectionpolicy:allow_list:rules:condition> client_ip
 [admin:ctrl]: botdetectionpolicy:allow_list:rules:condition:client_ip> match_criteria is_in
 [admin:ctrl]: botdetectionpolicy:allow_list:rules:condition:client_ip>
 [admin:ctrl]: botdetectionpolicy:allow_list:rules:condition:client_ip> addrs 1.1.1.1
 [admin:ctrl]: botdetectionpolicy:allow_list:rules:condition:client_ip> save
 [admin:ctrl]: botdetectionpolicy:allow_list:rules:condition> save
 [admin:ctrl]: botdetectionpolicy:allow_list:rules>
 [admin:ctrl]: botdetectionpolicy:allow_list:rules> action bot_action_
 bot_action_bypass     Bypass BOT detection.
 bot_action_continue   Stop allow-list processing and move on to BOT detection.
 [admin:ctrl]: botdetectionpolicy:allow_list:rules> action bot_action_
 bot_action_bypass     Bypass BOT detection.
 bot_action_continue   Stop allow-list processing and move on to BOT detection.
 [admin:ctrl]: botdetectionpolicy:allow_list:rules> action bot_action_bypass
 [admin:ctrl]: botdetectionpolicy:allow_list:rules> save
 [admin:ctrl]: botdetectionpolicy:allow_list> save
 [admin:ctrl]: botdetectionpolicy> save
Similarly, you can create more rules to match on other criteria like path, host header, cookie, headers, protocol etc.
allow_listis a list of rules consisting of conditions mapped to the actions. In each rule, the condition can contain properties of the request like client_ip, host header etc. The actions can be “bypass” (skip all further bot detection) or “continue” (Stop allow-list processing and move on to BOT detection). -
You need to disable one of the three decision components, for instance, you can disable IP location check component.
 [admin:ctrl]:> configure botdetectionpolicy System-BotDetectionPolicy
 [admin:ctrl]:botdetectionpolicy> ip_location_detector
 [admin:ctrl]:botdetectionpolicy:ip_location_detector> no enabled
 +--------------------------------+-------------------------------+
 |           Field                |              Value            |
 +--------------------------------+-------------------------------+
 |   enabled                      |  False                        |
 |   ip_location_db_ref           |  System-GeoDB                 |
 |   system_cloud_providers_ref   |  System-BotCloudProviders     |
 |   system_search_engines_ref    |  System-BotSearchEngines      |
 +--------------------------------+-------------------------------+
 [admin:ctrl]:botdetectionpolicy:ip_location_detector> save
 [admin:ctrl]:botdetectionpolicy>save
Note: Starting with Avi Vantage version 21.1.3, the name of individual BotMappingRule objects in a BotMapping object is mandatory. Hence, you will not be able to create any new objects without a name. Existing objects are assigned an auto-generated name during the upgrade, following the pattern ‘Mapping Rule 0’, ‘Mapping Rule 1’ etc, where the number in the name is the index of the rule.
Document Revision History
| Date | Change Summary |
|---|---|
| July 15, 2022 | Added TLS Fingerprinting for Bot Detection section for 22.1.1 Added System Limits for Bot Management section for 22.1.1 |

