Installing Avi Vantage for a Linux Server Cloud
Overview
This article describes how to install Avi Vantage in a Linux server cloud. Avi Vantage is a software-based solution that provides real-time analytics and elastic application delivery services, including user-to-application timing, SSL termination, and load balancing. Installing Avi Vantage directly onto Linux servers leverages the raw horsepower of the underlying hardware without the overhead added by a virtualization layer.
Notes:
VMware recommends that users disable hyperthreading (HT) in the BIOS of the Linux servers upon which Avi runs prior to installing Avi Vantage on them. It does not get changed often, but RHEL, OEL and CentOS may map physical and hyperthreaded cores differently. Rather than basing its decision on the behaviour or characteristics of a core, Avi Vantage has a predictive map of the host OS via which it skips or ignores hyperthreaded cores. When an OS gets upgraded, this map might change, which means we might be utilizing a HT core instead of a virtual core, which in turn will impact performance.
Docker Container
The Avi Vantage Linux server cloud solution uses containerization provided by Docker for support across operating systems and for easy installation.
Deployment Topologies
Avi Vantage can be deployed onto a Linux server cloud in the following topologies. The minimum number of Linux servers required for deployment depends on the deployment topology. A three-Controller cluster is strongly recommended for production environments.
| Deployment Topology | Min Linux Servers Required | Description |
|---|---|---|
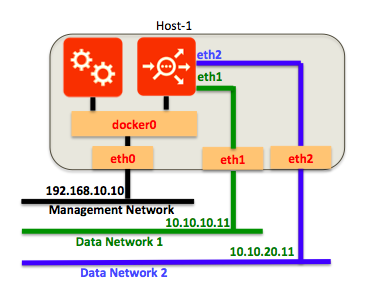
| Single host | 1 | Avi Controller and Avi SE both run on a single host. |
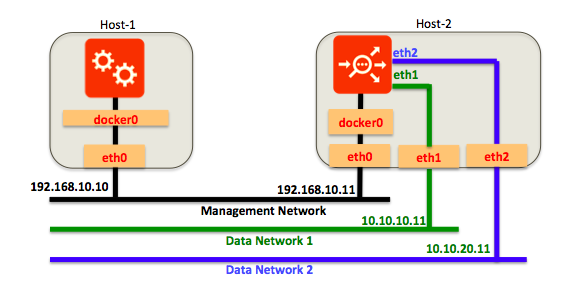
| Separate hosts | 2 | Avi Controller and Avi SE run on separate hosts. The Avi Controller is deployed on one of the hosts. The Avi SE is deployed on the other host. |
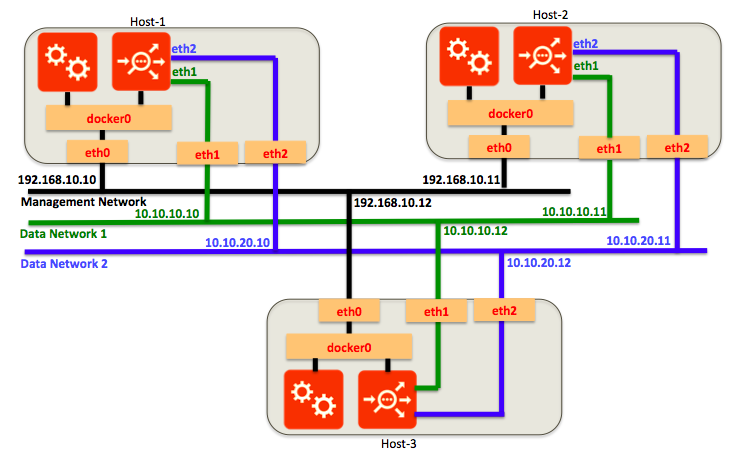
| 3-host cluster | 3 | Provides high availability for the Avi Controller. |
A single instance of the Avi Controller is deployed on each host. At any given time, one of the Avi Controllers is the leader and the other 2 are followers.
Single-host Deployment
Single-host deployment runs the Avi Controller and Avi SE on the same Linux server. This is the simplest topology to deploy. However, this topology does not provide high availability for either the Avi Controller or Avi SE.
Note: In single-host mode, in-band management is not supported.
Two-host Deployment
Two-host deployment runs the Avi Controller on one Linux server and the Avi SE on another Linux server.
Three-host Cluster Deployment
Three-host deployment requires a separate instance of the Avi Controller on each of 3 Linux servers.

In a 3-host cluster deployment, one of the Avi Controller instances is the leader. The other 2 instances are followers. If the leader goes down, one of the followers takes over so that control-plane functionality for users is continued.
Deployment Prerequisites
This section lists the minimum requirements for installation.
Hardware Requirements
Each Linux server to be managed by Avi Vantage must meet at least the following physical requirements:
IOMMU should be turned off if SE has to be used in DPDK mode.
| Component | Minimum Requirement |
|---|---|
| CPU | Intel Xeon with 8 cores |
| Memory | 24 GB RAM |
| Disk | 64 GB |
| Network Interface Controller (NIC) | For Intel NICs, refer to this section of the Ecosystem Support article For Mellanox NICs, refer to Mellanox Support on Avi Vantage |
Note: IOMMU can be turned off through BIOS or by specifying intel_iommu=off or amd_iommu=off based on the architecture type in kernel command line of the host. For more details on linux drivers, refer to Linux Drivers.
Software Requirements
Installation of Avi Vantage for a Linux server cloud also requires the following software:
| Software | Version |
|---|---|
| Avi Vantage (distributed by VMware as a Docker image) | 16.2 or greater |
| Docker (image management service that runs on Linux) | 1.6.1 or greater |
| Operating systems (OS) and kernel versions to enable DPDK | Refer to the Ecosystem Support article |
| Python to run scripts | Installable various ways; left to the customer's preference |
Notes:
- You can place the Avi Controller and Service Engine containers on the same host starting only from RHEL version 7.4. If co-located on the same host, restarting either container will fail for RHEL versions prior to 7.4. For more details on supported versions of RHEL, refer to Ecosystem Support guide.
- It is mandatory to disable SELinux when deploying the Controller as a Podman instance. By default, SELinux is enabled in CentOS/RHEL. The required steps are:
- Log into the host machine as root.
- Invoke the
getenforcecommand to determine whether SELinux is enforcing, permissive, or disabled. - If the output of
getenforceis eitherpermissiveordisabled, nothing more need be done. If the output isenforcing, perform all subsequent steps. - Open the
/etc/selinux/configfile (in some systems, open/etc/sysconfig/selinuxinstead). - Change the line
SELINUX=enforcingtoSELINUX=permissive. - Save and close the file.
- Reboot the system
Default port assignments are as shown below. If these are in use, chose alternative ports for the purposes listed.
| Ports | Purpose |
|---|---|
| 5098 | SSH (CNTRL_SSH_PORT) |
| 8443 | Secure bootstrap communication between SE and Controller (SYSINT_PORT) |
| 80, 443 | Web server ports (HTTP_PORT, HTTPS_PORT) |
| 161 | SNP MIB walkthrough |
| 5054 | shell CLI |
Requirement for Installation of libselinux-python
Installation of libselinux-python is required only if all the following conditions met.
- The host runs with OEL 6.9 or prior.
- The host uses “
selinuxfor security.
Installation
To install Avi Vantage, some installation tasks are performed on each of the Linux hosts:
- Avi Controller host — The installation wizard for the Avi Controller must be run on the Linux server that will host it. If deploying a 3-host cluster of Avi Controllers, run the wizard only on the host that will be the cluster leader. (The cluster can be configured at any time after installation is complete.)
Installation Workflow
Avi Vantage deployment for a Linux server cloud consists of the following:
- Install the Docker platform (if not already installed). On Ubuntu, the command line would be:
apt-get install docker.io - Install the NTP server on the host OS.
- Install the Avi Controller image onto a Linux server.
- Use the setup wizard to perform initial configuration of the Avi Controller:
- Avi Vantage user account creation (your Avi Vantage administrator account)
- DNS and NTP servers
- Infrastructure type (Linux)
- SSH account information (required for installation and access to the Avi SE instance on each of the Linux servers that will host an Avi SE)
- Avi SE host information (IP address, DPDK, CPUs, memory)
- Multitenancy support
The SSH, Avi SE host, and multitenancy selections can be configured either using the wizard or later, after completing it. (The wizard times out after a while.) This article provides links for configuring these objects using the Avi Controller web interface.
Detailed steps are provided below.
1. Install Docker
Refer to the Docker Installation article, which covers
- Docker Editions
- Getting the installation images for various Linux variants
- Selecting a storage driver for Docker
- Verifying your Docker installation
2. Install NTP Server on Host Operating System
Install NTP server using the following command: sudo yum install ntp
3. Install Avi Controller Image
- Use SCP to copy the .tgz package onto the Linux server that will host the Avi Controller:
scp docker_install.tar.gz root@Host-IP:/tmp/ - Use SSH to log into the host:
ssh root@Host-IP - Change to the
/tmpdirectory:cd /tmp/ - Unzip the .tgz package:
sudo tar -xvf docker_install.tar.gz
- Run the
setup.pyscript. It can be run in interactive mode or as a single command string.- If entered as a command string, the script sets the options that are included in the command string to the specified values, and leaves the other values set to their defaults. Go to Step 6.
- In interactive mode, the script displays a prompt for configuring each option. Go to Step 7.
Note: To ensure proper operation of the avi_baremetal_setup.py script in either steps 6 or 7, the locale must be set to English. Use the LANG=en_US.UTF-8 command.
- To run the setup script as a single command, enter a command string such as the following:
./avi_baremetal_setup.py -c -cc 8 -cm 24 -i 10.120.0.39The options are explained in the CLI help:
avi_baremetal_setup.py [-h] [-d] [-s] [-sc SE_CORES] [-sm SE_MEMORY_MB] [-c] [-cc CON_CORES] [-cm CON_MEMORY_GB] -i CONTROLLER_IP -m MASTER_CTL_IP-h, --help show this help message and exit
-d, --dpdk_mode Run SE in DPDK Mode. Default is False
-s, --run_se Run SE locally. Default is False
-sc SE_CORES, --se_cores SE_CORES
Cores to be used for AVI SE. Default is 1
-sm SE_MEMORY_MB, --se_memory_mb SE_MEMORY_MB
Memory to be used for AVI SE. Default is 2048
-c, --run_controller Run Controller locally. Default is No
-cc CON_CORES, --con_cores CON_CORES
Cores to be used for AVI Controller. Default is 4
-cm CON_MEMORY_GB, --con_memory_gb CON_MEMORY_GB
Memory to be used for AVI Controller. Default is 12
-i CONTROLLER_IP, --controller_ip CONTROLLER_IP
Controller IP Address
-m MASTER_CTL_IP, --master_ctl_ip MASTER_CTL_IP
Master controller IP Address
- To run in interactive mode, start by entering
avi_baremetal_setup.py. Here is an example:./avi_baremetal_setup.pyWelcome to AVI Initialization ScriptDPDK Mode: Pre-requisites(DPDK): This script assumes the below utilities are installed: docker (yum -y install docker) Supported Nics(DPDK): Intel 82599/82598 Series of Ethernet Controllers Supported Vers(DPDK): OEL/CentOS/RHEL - 7.0,7.1,7.2Non-DPDK Mode: Pre-requisites: This script assumes the below utilities are installed: docker (yum -y install docker) Supported Vers: OEL/CentOS/RHEL - 7.0,7.1,7.2Caution : This script deletes existing AVI docker containers & images.Do you want to proceed in DPDK Mode [y/n] y Do you want to run AVI Controller on this Host [y/n] y Do you want to run AVI SE on this Host [n] n Enter The Number Of Cores For AVI Controller. Range [4, 39] 8 Please Enter Memory (in GB) for AVI Controller. Range [12, 125] 24 Please Enter directory path for Avi Controller Config (Default [/opt/avi/controller/data/]) Please Enter disk (in GB) for Avi Controller config (Default [30G]) Do you have separate partition for Avi Controller Metrics? If yes, please enter directory path, else leave it blank Do you have separate partition for Avi Controller Client Log? If yes, please enter directory path, else leave it blank Please Enter Controller IP 10.120.0.39 Run SE : No Run Controller : Yes Controller Cores : 8 Memory(mb) : 24 Controller IP : 10.120.0.39Disabling AVI Services... Loading AVI CONTROLLER Image. Please Wait.. kernel.core_pattern = /var/crash/%e.%p.%t.coreInstallation Successful. Starting Services...
- Start the Avi Controller on the host to complete installation:
sudo systemctl start avicontroller
- If deploying a 3-host cluster, repeat the steps above on the hosts for each of the other 2 Controllers.
Note: Following reboot, it takes about 3 to 5 minutes before the web interface becomes available. Until the reboot is complete, web interface access will appear to be frozen. This is normal. Starting with Avi Vantage release 16.3, reboot is not required.
DHCP on Datapath Interfaces
The DHCP mode is supported on datapath interfaces (regular interfaces/bond) in baremetal/LSC Cloud. Starting with Avi Vantage version 20.1.3, it can also be enabled from the Controller GUI.
You can also enable DHCP from the Controller using the following command:
configure serviceengine <serviceengine-name>
You can check the desired data_vnics index (i) using the following command:
data_vnics index <i>
dhcp_enabled
save
save
This should enable DHCP on the desired interface.
To disable DHCP on a particular data_vnic, you can replace dhcp_enabled by no dhcp_enabled in the above command sequence.
If DHCP is disabled on a datapath interface, a static IP address should be configured on it. Otherwise the connectivity through the NIC would be lost.
Note: It is recommended to enable DHCP on interfaces that are actively used only. It is advised to leave DHCP disabled on unmanaged/unused interfaces.
Next Steps
To continue with the initial setup wizard and to add Avi Service Engine hosts to the Linux server cloud, read Configuring Avi Vantage for Application Delivery in Linux Server Cloud.
If you clicked through the SSH or Avi SE host pages of the wizard, see the following articles to complete installation:
Related Articles
- Upgrading Avi Vantage Software
- Upgrades in an Avi GSLB Environment
- Is DHCP supported on Avi Vantage for Linux Server Cloud?
Document Revision History
| Date | Change Summary |
|---|---|
| December 23, 2020 | Added DHCP on Datapath Interfaces for 20.1.3 |


