Thales Luna (formerly SafeNet Luna) HSM
Introduction
Avi Vantage includes integration support for networked Thales Luna HSM products (formerly SafeNet Luna Network HSM) and AWS CloudHSM V2.
This article covers the Thales Luna Network HSM (formerly SafeNet Luna Network HSM) integration. For more information on the re-branding, click here.
This article describes how to configure Avi Vantage to use the key generation and encryption/decryption services provided by Thales Luna Network HSM. This enables use of Thales Luna Network HSM to store keys associated with SSL/TLS resources configured on a virtual service.
Integration Support
Avi Vantage can be configured to support a cluster of HSM devices in high availability (HA) mode. Avi Vantage support of HSM devices requires installation of the user’s Thales Luna Client Software bundle, which can be downloaded from the Thales website.
By default, Avi Service Engines and Controllers use their respective management interfaces for HSM communication. On CSP, Avi Vantage supports the use of a dedicated Service Engine data interface for HSM interaction. Also, on the CSP platform, you can use dedicated Controller interface for HSM communication.
The user may choose to create the HSM group in the admin tenant with all the Service Engines spread across multiple tenants. This way, HSM can be enabled on a per-SE-group basis by attaching the HSM group to the corresponding SE group. In this mode, the configuration to choose between a dedicated interface and a management interface for HSM communication is done in the admin tenant; all other tenants are forced to use that configuration.
Alternatively, you can create HSM groups in their respective tenants. The configuration choice of a dedicated or management interface for HSM communication is determined at the tenant level. In this mode, Controller IPs can overlap in every HSM group. Internally, the certificate for these overlapping clients is created once and reused for any subsequent HSM group creation.
Prerequisites
Before using Avi Vantage with Thales Luna Network HSM, the following are required:
- Thales Luna devices are installed on your network.
- Thales Luna devices are reachable from the Avi Controller and Avi Service Engines.
- Thales Luna devices must have a virtual HSM partition defined before installing the client software. Clients are associated with a unique partition on the HSM. These partitions should be pre-created on all the HSMs that will be configured in HA/non-HA mode. Also note that the password to access these partitions should be the same across the partitions on all HSM devices.
- Server certificates for Thales Luna devices are available for creating the HSM Group in Avi for mutual authentication.
-
Each Avi Controller and Service Engine must:
- Have the client license from Thales Luna to access the HSM.
- Be able to reach the HSM at ports 22 and 1792 through Controller management or Controller dedicated and SE management or SE dedicated management interface.
Download
You need to download the following:
- Thales Luna Network HSM client software
- Thales Luna Network HSM customer documentation
HSM Group Updates
After creation, update or deletion of an HSM group requires reloading of a new Thales Luna configuration, which can only be achieved by restarting the Avi SEs. Restart of Avi SEs temporarily disrupts traffic.
Thales Luna Software Import
To enable support for Thales Luna Network HSM, the downloaded Thales Luna client software bundle must be uploaded to the Avi Controller. It must be named “safenet.tar” and can be prepared as follows:
- Copy files from the downloaded software into any given directory (for instance, safenet_pkg).
- Change directory (cd) to that directory, and enter the cp commands as follows:
Note: This example uses HSM version 7.3.3.
cp 610-012382-008_revC/linux/64/configurator-5.4.1-2.x86_64.rpm configurator-5.4.1-2.x86_64.rpm
cp LunaClient_7.3.0-165_Linux/64/configurator-7.3.0-165.x86_64.rpm configurator-7.3.0-165.x86_64.rpm
cp LunaClient_7.3.0-165_Linux/64/libcryptoki-7.3.0-165.x86_64.rpm libcryptoki-7.3.0-165.x86_64.rpm
cp LunaClient_7.3.0-165_Linux/64/vtl-7.3.0-165.x86_64.rpm vtl-7.3.0-165.x86_64.rpm
cp LunaClient_7.3.0-165_Linux/64/lunacmu-7.3.0-165.x86_64.rpm lunacmu-7.3.0-165.x86_64.rpm
cp LunaClient_7.3.0-165_Linux/64/cklog-7.3.0-165.x86_64.rpm cklog-7.3.0-165.x86_64.rpm
cp LunaClient_7.3.0-165_Linux/64/multitoken-7.3.0-165.x86_64.rpm multitoken-7.3.0-165.x86_64.rpm
cp LunaClient_7.3.0-165_Linux/64/ckdemo-7.3.0-165.x86_64.rpm ckdemo-7.3.0-165.x86_64.rpm
cp LunaClient_7.3.0-165_Linux/64/lunacm-7.3.0-165.x86_64.rpm lunacm-7.3.0-165.x86_64.rpm
tar -cvf safenet.tar configurator-7.3.0-165.x86_64.rpm libcryptoki-7.3.0-165.x86_64.rpm vtl-7.3.0-165.x86_64.rpm lunacmu-7.3.0-165.x86_64.rpm cklog-7.3.0-165.x86_64.rpm multitoken-7.3.0-165.x86_64.rpm ckdemo-7.3.0-165.x86_64.rpm lunacm-7.3.0-165.x86_64.rpm- HSM package can be uploaded in the web interface at Administration > Settings > Upload HSM Packages.
- HSM package upload is also supported through the CLI. You can use the following command in the Avi Controller CLI shell to upload the HSM package:
upload hsmpackage filename /tmp/safenet_pkg/safenet.tarThis command uploads the packages and installs them on the Avi Controller or Avi Controllers (if clustered). If the Controller is deployed as a 3-node cluster, the command installs the packages on all 3 nodes. Upon completion of the above command, the system displays “HSM Package uploaded successfully” message.
- Avi SEs in an SE group referring to an HSM group need a one-time reboot for auto-installation of the HSM packages. To reboot an Avi SE, issue the following CLI shell command:
reboot serviceengine Avi-se-ksueq- To allow Avi Controllers to talk to Thales Luna HSM, the Thales Luna client software bundle distributed with the product must be uploaded to Avi Vantage. The software bundle preparation and upload is described above. In this example, note that the Avi SE name is “Avi-se-ksueq.”
Enabling HSM Support in Avi Vantage
After using the above steps to install the Thales Luna software bundle onto the Avi Controller, the Controller may be configured to secure virtual services with HSM certificates.
For more details on automated CSR workflow for Thales Luna HSM, refer to Automated CSR Workflow for Thales Luna HSM.
- Create the HSM group and add the HSM devices to it.
- Register the client with HSM devices.
- Set up HA across HSM devices (optional).
- Associate the HSM group with the SE group.
- Add the application certificates and keys by importing them. These are the keys and certificates generated out of band.
- Enable HSM support on a virtual service.
Detailed steps are provided in the following sections:
Step 1: Create the HSM Group and Add the HSM Devices to It
To begin, use the following commands on Controller bash shell to fetch the certificates of the HSM servers. The example below fetches certificates from two servers 1.1.1.11 and 1.1.1.13
username@avi:~$ sudo scp admin@1.1.1.11:server.pem hsmserver11.pem
username@avi:~$ sudo scp admin@1.1.1.13:server.pem hsmserver13.pem
The contents of these certificates are used while creating the HSM Group. Avi Vantage supports trusted authentication for all nodes in the system. This can be done by providing IP addresses of Controller(s) and Service Engine(s) which will interact with HSM. Use the below options of the HSM Group editor. The Thales Luna server certificates can also be provided by the Security team managing the Thales Luna appliances. In either case, having access to these certificates is a pre-requisite to creating any HSM configuration in Avi Vantage.
By default, SEs use the management network to interact with the HSM. On CSP, Avi Vantage also supports the use of a dedicated network for HSM interaction. Also, on the CSP platform, you can use a dedicated interface on the Controllers for HSM communication.
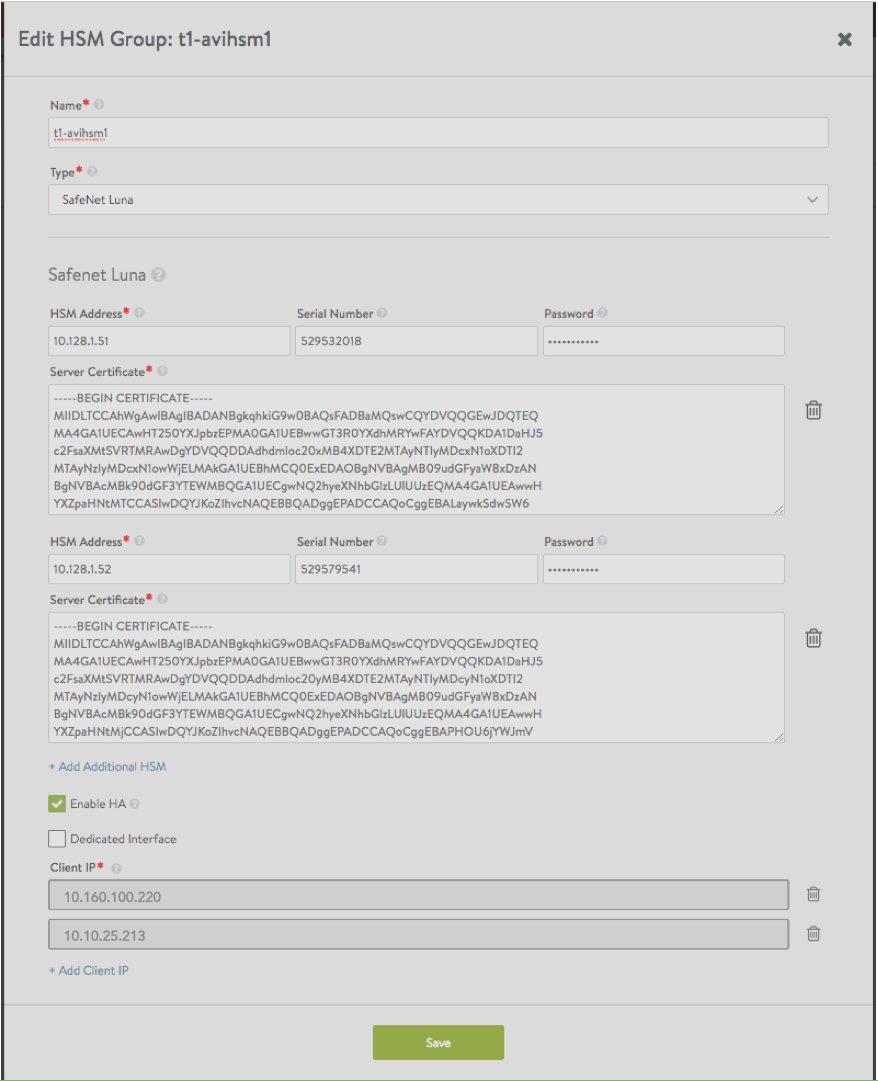
Next, create the HSM group. From the GUI, switch to the desired tenant and navigate to Templates > Security > HSM Groups. Click on Create and provide a suitable name and Type as SafeNet Luna. Specify the IP addresses of the desired Thales Luna appliances and the respective server certificates obtained previously. Multiple HSMs may be included in the group via the green Add Additional HSM button.
For more information on switching tenants, refer to Switch Between Tenants article.
The Password and partition Serial Number fields (as shown in the below screenshot of the Avi UI) can be populated if the respective HSM partition passwords are available at this stage. Otherwise, this has to be done after client registration step below.
Note, if any dedicated SE or Controller interfaces have been configured for HSM communication, check Dedicated Interface box and verify the IPs listed are those of the desired dedicated interfaces on the Service Engines and/or Controllers. The UI should allow changing the IP addresses if this is not the case.
Also note that all Avi Vantage Controllers and all Service Engines associated with the SE group should have at least 1 IP address in the list to ensure access to the HSMs. This step is extremely important because Thales Luna appliances will not allow communications from un-registered client-IP addresses. Click on Save once all client-IP addresses have been verified.
Step 2: Register the Client with HSM Devices for Mutual Authentication
The clients in this case are Avi Vantage Controllers and Service Engines and the generated client certificates need to be registered with the Thales Luna appliances for purposes of mutual authentication. This can be done directly per steps 3 and 4 below or by sending the client certificates to the concerned security team managing the HSM appliances.
Follow these steps:
- Icon next to the Edit icon leads to a page which allows the user to download generated certificates.

- After download, save the certificate as **.pem**. In this example, the certificate needs to be saved as 10.160.100.220.pem before
scpto HSM.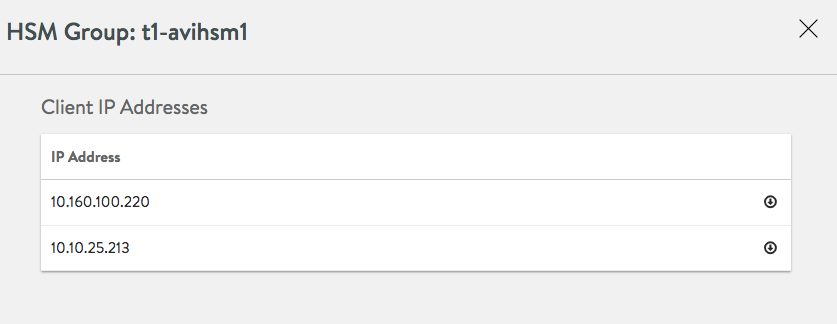
scp 10.160.100.220.pem admin@1.1.1.11: - Register the client on the HSM.
username@avi:~$ ssh admin@1.1.1.11 admin@1.1.1.11's password: Last login: Thu May 12 19:52:00 2016 from 12.97.16.194 Luna SA 7.3.3-7 Command Line Shell - Copyright (c) 2001-2014 SafeNet, Inc. All rights reserved. [1.1.1.11] lunash: client register -c 10.160.100.220 -i 10.160.100.220 'client register' successful. Command Result : 0 (Success) [1.1.1.11] lunash: client assignPartition -c 10.160.100.220 -p par43 'client assignPartition' successful. Command Result : 0 (Success) [1.1.1.11] lunash: exit - Perform the above steps (1) and (2) for all HSM devices.The next steps must only be performed after all client certificates are registered on all HSM appliances configured above to verify the registration. First ensure the (partition) password is populated in the HSM group by editing the same.
- On the Avi Controller bash shell, the application ID must be opened before the Avi SE can communicate with the HSM. This can be done using the following command, which will automatically be replicated to each Avi Controller in the cluster. In case HSM groups were created in different tenants,
safenet.pyscripts can take an optional argument-t. Alternately the default admin tenant can be provided as the argument value.Verify that the application ID can be opened successfully per output below.
username@avi:~$ /opt/avi/scripts/safenet.py -p [HSM-GROUP] -i [CLIENT IP OF CONTROLLER REGISTERED WITH HSM] -t [TENANT_NAME] —c "/etc/luna/bin/sautil -v -s 1 -i 1792:1793 -o -p my_partition_password"
Copyright (C) 2009 SafeNet, Inc. All rights reserved.
sautilis the property of SafeNet, Inc. and is provided to our customers for
the purpose of diagnostic and development only.  Any re-distribution of this
program in whole or in part is a violation of the license agreement.
Config file: /etc/Chrystoki.conf.
Will use application ID [1792:1793].
Application ID [1792:1793] opened.
Open ok.
Session opened. Handle 1
HSM Slot Number is 1.
HSM Label is "ha1                             ".WARNING: Application Id 1792:1793 has been opened for access. Thus access will
remain open until all sessions associated with this Application Id are
closed or until the access is explicitly closed.
Note: In the step above, if an error message appears stating that the application is already open, you can close it using the following command. After closing it, reopen the application.
username@avi:~$ /opt/avi/scripts/safenet.py -p [HSM-GROUP] -i [CLIENT IP OF CONTROLLER REGISTERED WITH HSM] -t [TENANT_NAME] —c "/etc/luna/bin/sautil -v -s 1 -i 1792:1793 -c -p my_partition_password"

Copyright (C) 2009 SafeNet, Inc. All rights reserved.
sautilis the property of SafeNet, Inc. and is provided to our customers for
the purpose of diagnostic and development only.  Any re-distribution of this
program in whole or in part is a violation of the license agreement.
Config file: /etc/Chrystoki.conf.
Close ok.
Step 3: Setting Up HA Across HSM Devices (optional)
Avi Vantage automates configuration of HA across HSM devices. Before configuring HA, ensure that the clients are registered with the HSM using listSlots command. This command provides details about the HSM devices to be set up. The serial number provided in the output of this command is needed to set up HA across these devices. Verify that the partition serial numbers listed below match the ones set up on the Thales Luna appliances or the ones provided by the security team. This should also match with the configuration in the HSM group object. Internally, the serial number is used to configure HA if the client is registered on more than one partition on the HSM.
More details about each of these commands can be found in the Thales Luna documentation.
username@avi:~$ /opt/avi/scripts/safenet.py -p [HSM-GROUP] -i [CLIENT IP OF CONTROLLER REGISTERED WITH HSM] -t [TENANT_NAME] -c "/usr/safenet/lunaclient/bin/vtl listSlots"

Number of slots: 5

The following slots were found:

Slot #         Description                    Label             Serial #     Status
========= ==================== =============================== ========== ============
slot #1   LunaNet Slot         par43                           156908040  Present
slot #2   LunaNet Slot         par40                           156936072  Present
slot #3   -                    -                               -          Not present
slot #4   -                    -                               -          Not present
slot #5   -                    -                               -          Not present
HA can be enabled from the CLI as follows after switching to the appropriate tenant if required.
[username:avi]: > switchto tenant [TENANT_NAME]
[username:avi]: > configure hardwaresecuritymodulegroup safenet-network-hsm-1
[username:avi]: hardwaresecuritymodulegroup>  hsm type hsm_type_safenet_luna
[username:avi]: hardwaresecuritymodulegroup:hsm> sluna
[username:avi]: hardwaresecuritymodulegroup:hsm:sluna> is_ha
[username:avi]: hardwaresecuritymodulegroup:hsm:sluna> save
[username:avi]: hardwaresecuritymodulegroup:hsm:sluna> save
[username:avi]: hardwaresecuritymodulegroup> save
Alternatively, this can also be done in the web interface by selecting the HSM group and editing it to select the ‘Enable HA’ check box. This option is available only while editing the HSM group with more than one server.
Once HA is set up, verify the output of the listSlots command to ensure the “avi_group” virtual card slot is configured.
[username:avi]: /opt/avi/scripts/safenet.py -p [HSM-GROUP] -i [CLIENT IP OF CONTROLLER REGISTERED WITH HSM] -t [TENANT_NAME] -c "/usr/safenet/lunaclient/bin/vtl listSlots"

Number of slots: 1

The following slots were found:

Slot #          Description                 Label               Serial #     Status
========= ==================== =============================== ========== ============
slot #1   HA Virtual Card Slot avi_group                       1529532014 Present
Step 4: Associate the HSM Group with an SE Group
The HSM group must be added to the SE group that will be used by virtual service.
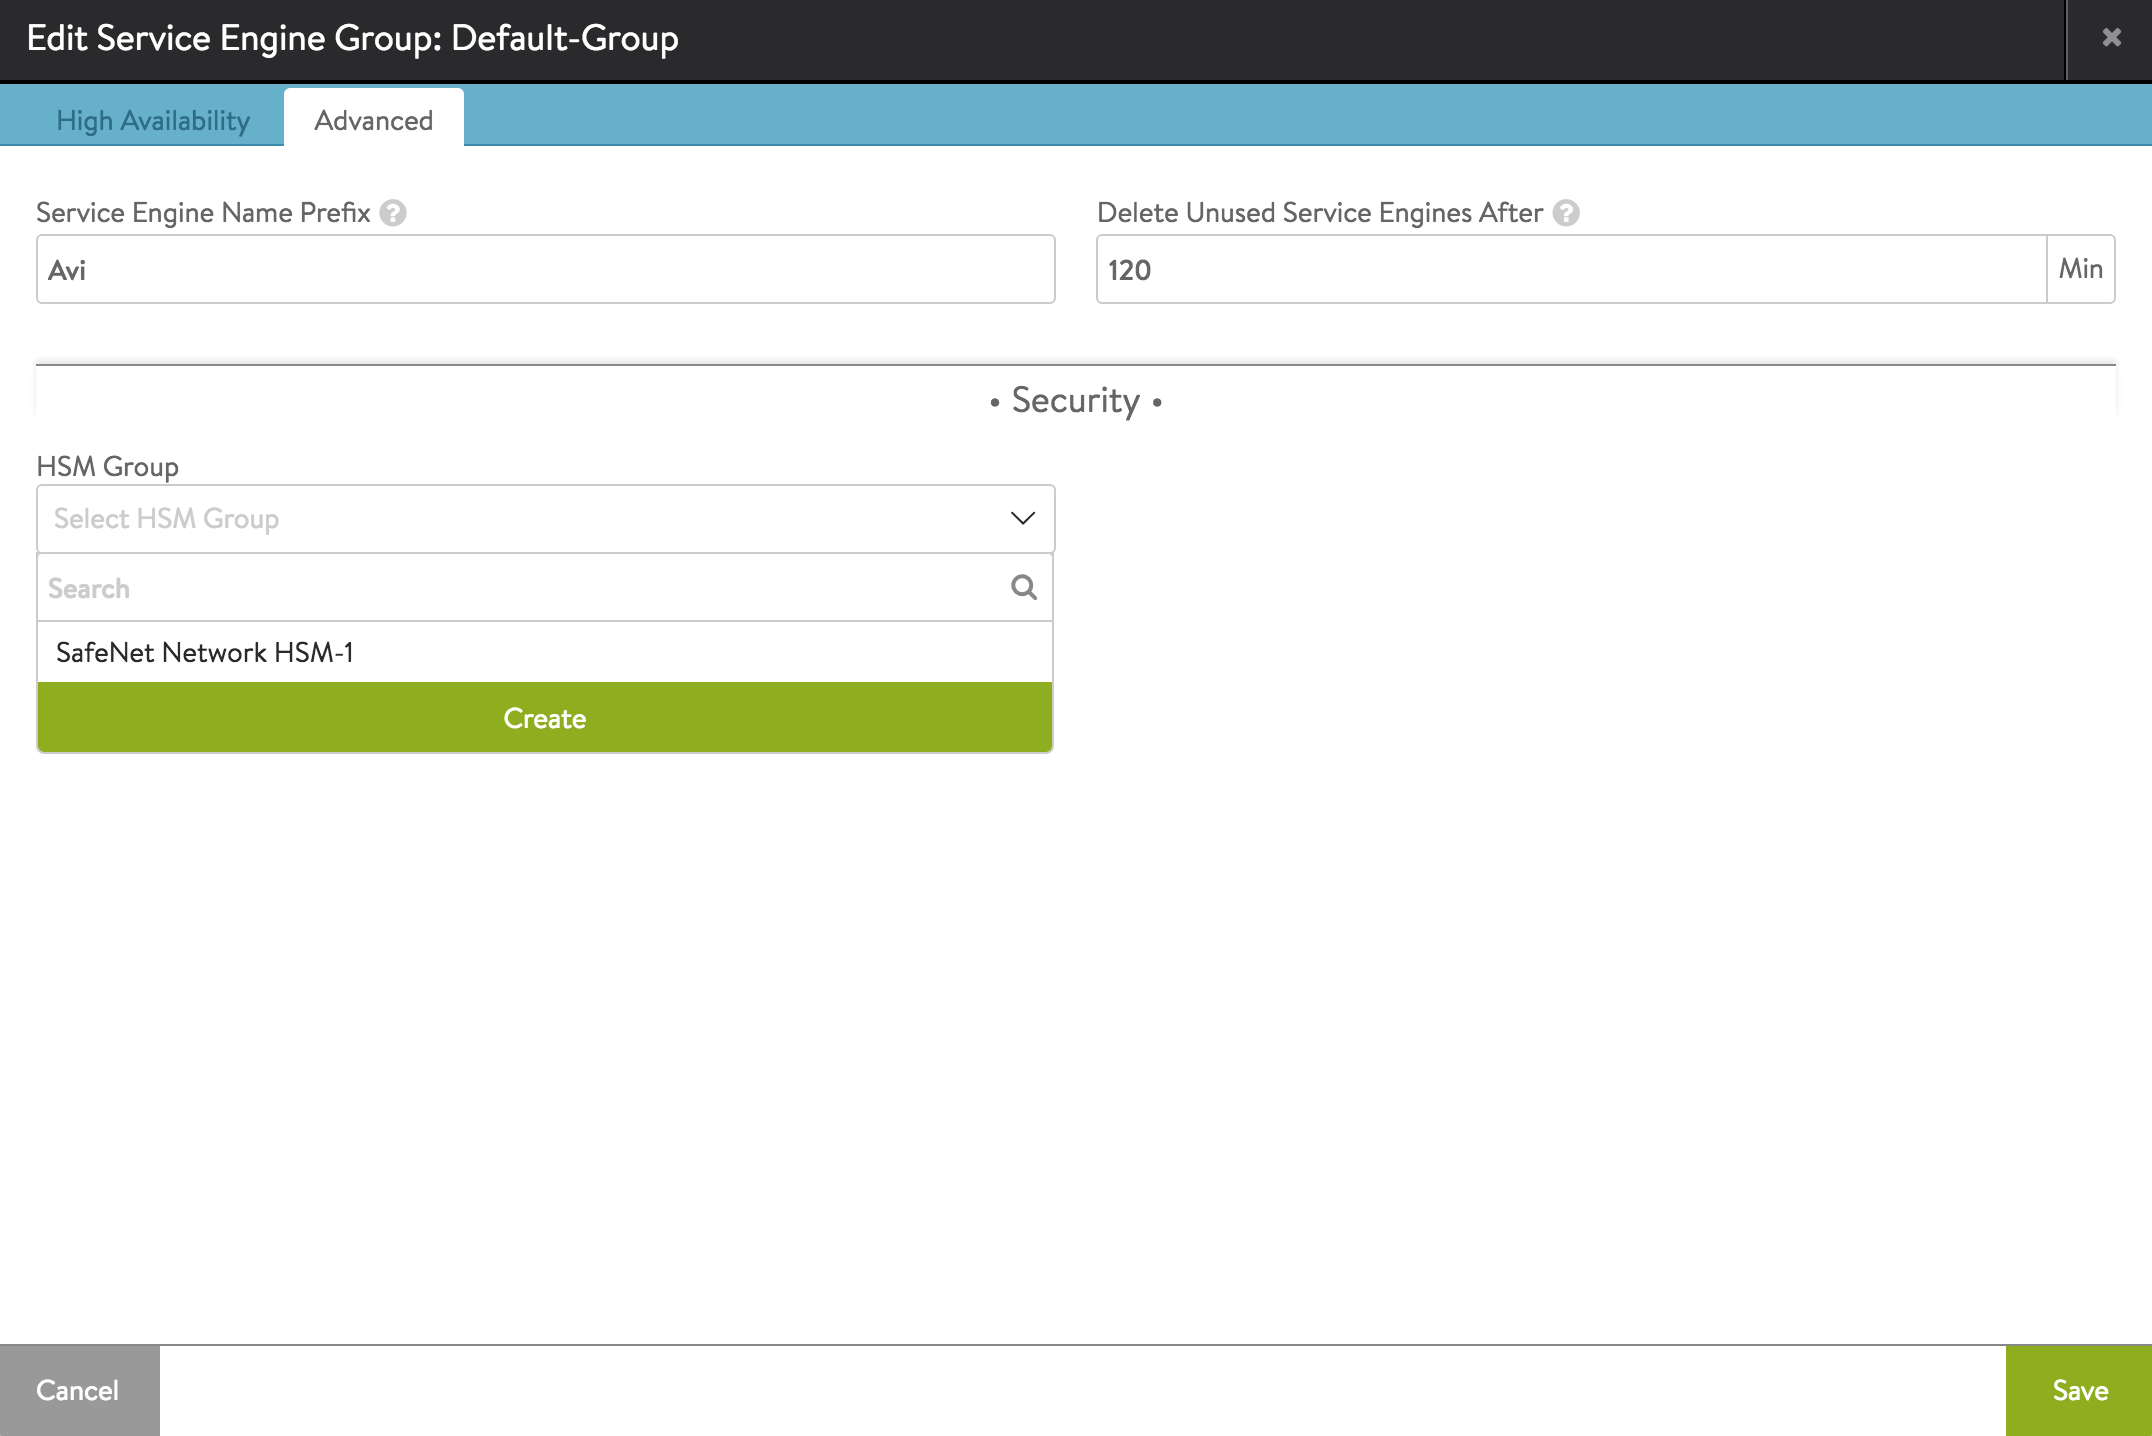
Switch to appropriate tenant. Navigate to Infrastructure > Cloud > Default-Cloud > Service Engine Group. Bring up the SE group editor for the desired SE group. Click on0 Advanced tab. Select the desired HSM group from the pulldown and click on Save.
This also can be configured using the CLI shell:
[username:avi]: > switchto tenant [TENANT_NAME]
[username:avi]: > configure serviceenginegroup [SE-GROUP]
[username:avi]: hardwaresecuritymodulegroup_ref
Step 5: Add the Application Certificates and Keys
5.1 Create Application Certificate and Keys.
The Controller is setup as a client of HSM and can be used to create keys and certificates on the HSM. Both the RSA and EC type of key/cert creation is supported.
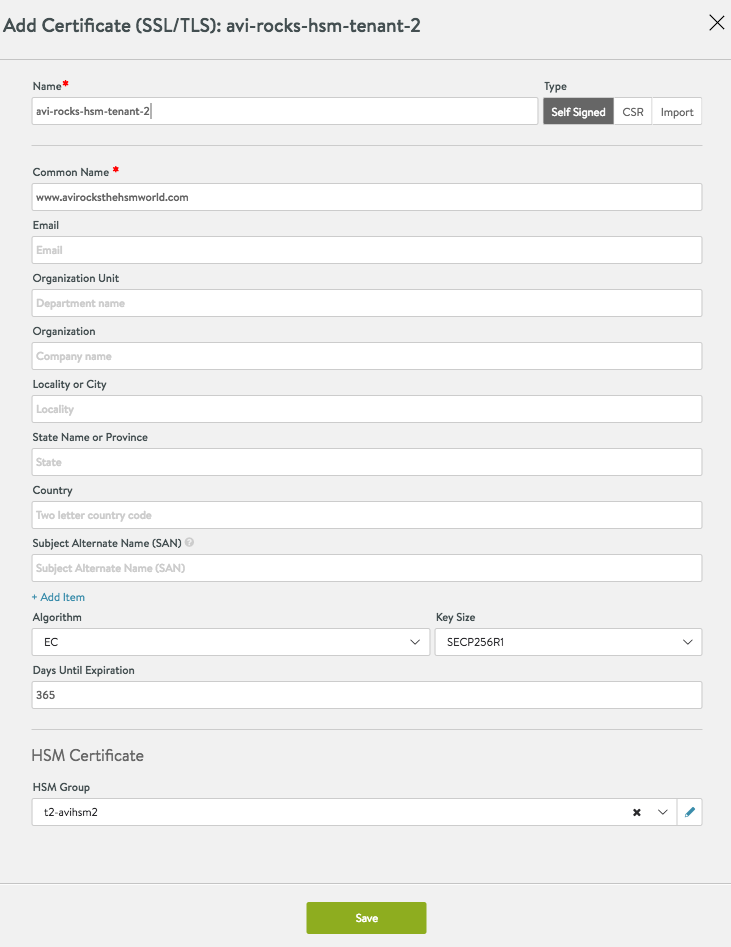
Use a browser to navigate to the Avi Controller’s management IP address. If Avi Vantage is deployed as a 3-node Controller cluster, navigate to the management IP address of the cluster. Use this procedure to create keys and certificates. The creation process is similar to any other key/certificate creation. For a key/certificate bound to HSM, select the HSM group while creating the object. The picture below illustrates the creation of self-signed certificate bound to a HSM group.
Navigate to Templates > Security > SSL/TLS Certificates, and click on Create > Application Certificate.
Note in the above picture, HSM Group t2-avihsm2 is selected. This is the HSM group that was created earlier. You can create the self-signed EC cert on HSM provided in t2-avihsm2 by clicking on Save button.
5.2 Import Application Certificate and Keys
Use a browser to navigate to the Avi Controller’s management IP address. If Avi Vantage is deployed as a 3-node Controller cluster, navigate to the management IP address of the cluster. Use this procedure to import the private keys created using the Thales Luna cmu/sautil utilities, and the associated certificates.
- Navigate to Templates > Security > SSL/TLS Certificates, and click on Create > Application Certificate.
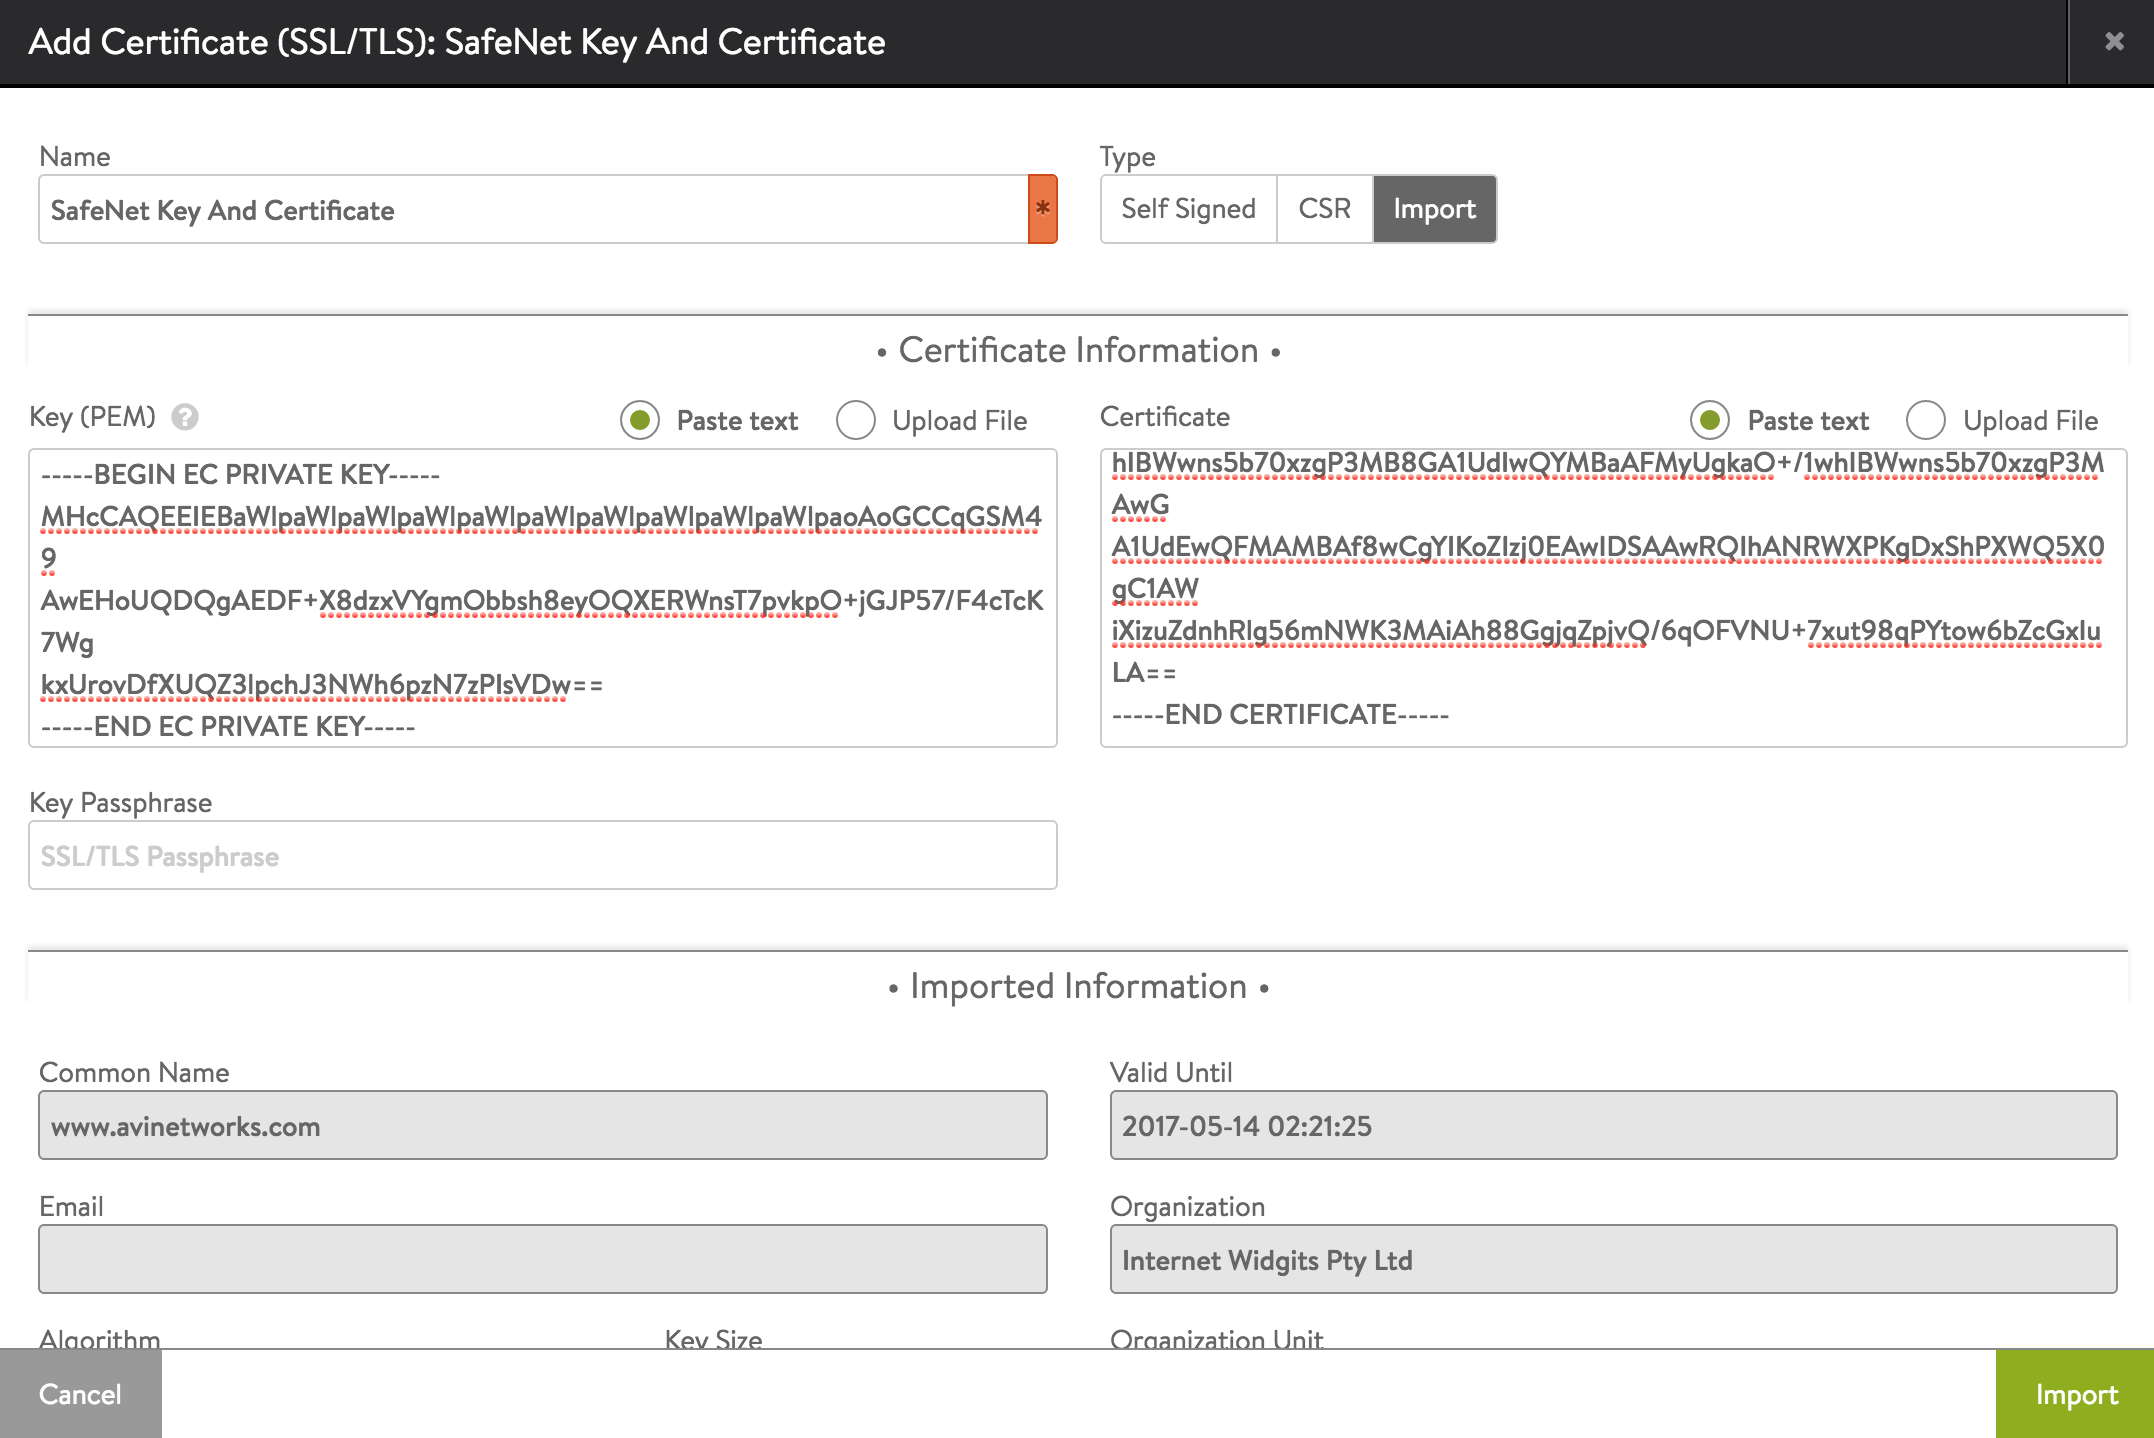
- Specify the name for the certificate definition.
- Click on Import.
- Prepare to import the private key for the server certificate.
- Above Key field, in the Certificate Information section, select Paste text (to copy-and-paste the certificate text directly in the web interface) or Upload File.
- If the key file is secured by a passphrase, enter it in the Key Passphrase field.
- Paste the key file (if copy-and-pasting) or navigate to the location of the file (if uploading).
- Prepare to import the server certificate:
- Above the Certificate field, select Paste text or Upload File.
- Paste the key file (if copy-and-pasting) or navigate to the location of the file (if uploading).
- Click Validate. Avi Vantage checks the key and certificate files to ensure they are valid.
Step 6: Enable HSM Support on a Virtual Service
- In the Controller web management interface, navigate to Applications > Virtual Services.
- Click New or Edit.
- If configuring a new virtual service, specify the name of the VIP.
- Select the HSM certificate from the SSL Certificate drop-down list.
- Specify the virtual service name and VIP address.
- In the Service Port section, enable SSL.
- Click on Advanced. On the Advanced page, select the SE group to which the HSM group was added.
- Click on Save.
The virtual service is now ready to handle SSL/TLS traffic using the encryption/decryption services of the Thales Luna Network HSM device.
Document Revision History
| Date | Change Summary |
|---|---|
| February 11, 2021 | Change from SafeNet HSM to Thales Luna HSM |

