Configuring Avi Vantage for SIP Application
Overview
Session Initiation Protocol (SIP) is a communication protocol used for signalling and controlling sessions for VoIP and instant messaging applications. SIP is used for establishing unicast or multicast sessions between the users and also for setting up and terminating voice or video calls. This protocol is independent of the underlying transport protocol and supports SIP load balancing using TCP proxy and UDP proxy. For secure transmissions, SIP is encrypted using TLS. Session Description Protocol (SDP) in SIP specifies the media format. The media streams use either Real-time Transport Protocol (RTP) or Secure RTP (SRTP).
User agent (UA) is a logical network endpoint used to create or receive SIP messages. In most implementation, the setup involves user agents and a proxy, such as session border controller (SBC).
A SIP client uses the following four-way mechanism to register with the server:
- The UA client (UAC) , which is the SIP client, initiates a request. The requests are always keywords, such as, REGISTER, INVITE, or BYE.
- The UA server (UAS) responds with a challenge.
- The client responds with a request and the token (depending on the public or private key encryption model).
- The server will then authenticate using the token and respond with an OK.
For complete information on SIP and associated call flow, refer to the SIP RFC.
This document discusses the configuration required on Avi Vantage for supporting SIP applications.
Integrating Avi Vantage with SIP Applications
The following is a call workflow when an user agent (UA1) tries to establish a call with another user agent (UA2):
- UA1 ——> (INVITE) ——–> Proxy
- Proxy —-> (100 TRYING) —-> UA1
- Proxy —-> (INVITE) ——–> UA2
- UA2 ——> (180 RINGING) —> Proxy
- Proxy —-> (180 RINGING) —> UA1
- UA2 ——> (Off hook) ——> Proxy
- UA2 ——> (200 OK) ——–> Proxy
- Proxy —-> (200 OK) ——–> UA1
Avi Vantage is deployed between the proxy and the value added services (VAS), where the SIP request and the response are transmitted through a parser and the call ID is hashed. Avi Vantage also monitors the server health and so the invite need not be re-transmitted.
Supported Features
Currently, SIP implementation has been validated on OpenStack No-Access and VMware clouds, but it is not restricted to a specific cloud type. The following are the features supported for this integration:
- Load balancing SIP over IPV4.
- Interoperability over UDP which translates to interoperability with CSCF and the application servers.
- UDP proxy network profile.
- SIP virtual service application profile, which uses either UDP proxy network profile or TCP proxy network profile.
- SIP virtual service over UDP proxy.
- Consistent-hash load balancing based on unique call ID.
- SIP health monitor to detect SIP server failures.
SIP-related configuration is currently supported only on the CLI.
Limitations
Currently the following features are not supported for SIP:
- Preserve client IP for SIP virtual service and application profile
- Inline health monitoring
- SIP TLS and encryption
- Record route option
- IPv6
Configuring Avi Vantage for SIP
Follow the steps below to configure Avi Vantage for SIP applications:
- Cloud Configuration
- Application Profile Configuration
- UDP Network Profile Configuration
- TCP Network Profile Configuration
- Health Monitor Configuration
- Pool Configuration
- Virtual Service Configuration
Cloud Configuration
Configure a cloud particularly for SIP using the configure cloud command.
The CLI command is as follows:
    [admin:10-X-X-X]: > configure cloud cloud_sip
    Updating an existing object. Currently, the object is:
    +------------------------------+--------------------------------------------+
    | Field                        | Value                                      |
    +------------------------------+--------------------------------------------+
    | uuid                         | cloud-20342e0f-a6a7-4dfe-b90d-1797d39bcc78 |
    | name                         | cloud_sip                                  |
    | vtype                        | CLOUD_NONE                                 |
    | apic_mode                    | False                                      |
    | dhcp_enabled                 | False                                      |
    | mtu                          | 1500 bytes                                 |
    | prefer_static_routes         | False                                      |
    | enable_vip_static_routes     | False                                      |
    | license_type                 | LIC_CORES                                  |
    | state_based_dns_registration | True                                       |
    | tenant_ref                   | admin                                      |
    | license_tier                 | ENTERPRISE_18                              |
    +------------------------------+--------------------------------------------+
Configure the underlying cloud setup as per your requirements. Refer to the following links for the cloud specific configuration:
- Installing Avi Vantage for OpenStack and Creating Service Engine Using Heat Templates
- Installing Avi Vantage for VMware vCenter
Note: For OpenStack No-Access clouds, security group rules should be configured to allow the required SIP ports (5060/5061 or any non-default ports).
The following CLI command displays a vCenter cloud configuration:
[admin:10-X-X-X]: > show cloud cloud_sip
+------------------------------+--------------------------------------------+
| Field                        | Value                                      |
+------------------------------+--------------------------------------------+
| uuid                         | cloud-20342e0f-a6a7-4dfe-b90d-1797d39bcc78 |
| name                         | cloud_sip                                  |
| vtype                        | CLOUD_VCENTER                              |
| vcenter_configuration        |                                            |
|   username                   | root                                       |
|   password                   | password                                   |
|   vcenter_url                | 10.1.1.1                                   |
|   privilege                  | WRITE_ACCESS                               |
|   datacenter                 | SantaClara                                 |
| apic_mode                    | False                                      |
| dhcp_enabled                 | False                                      |
| mtu                          | 1500 bytes                                 |
| prefer_static_routes         | False                                      |
| enable_vip_static_routes     | False                                      |
| license_type                 | LIC_CORES                                  |
| state_based_dns_registration | True                                       |
| tenant_ref                   | admin                                      |
| license_tier                 | ENTERPRISE_18                              |
+------------------------------+--------------------------------------------+
Application Profile Configuration
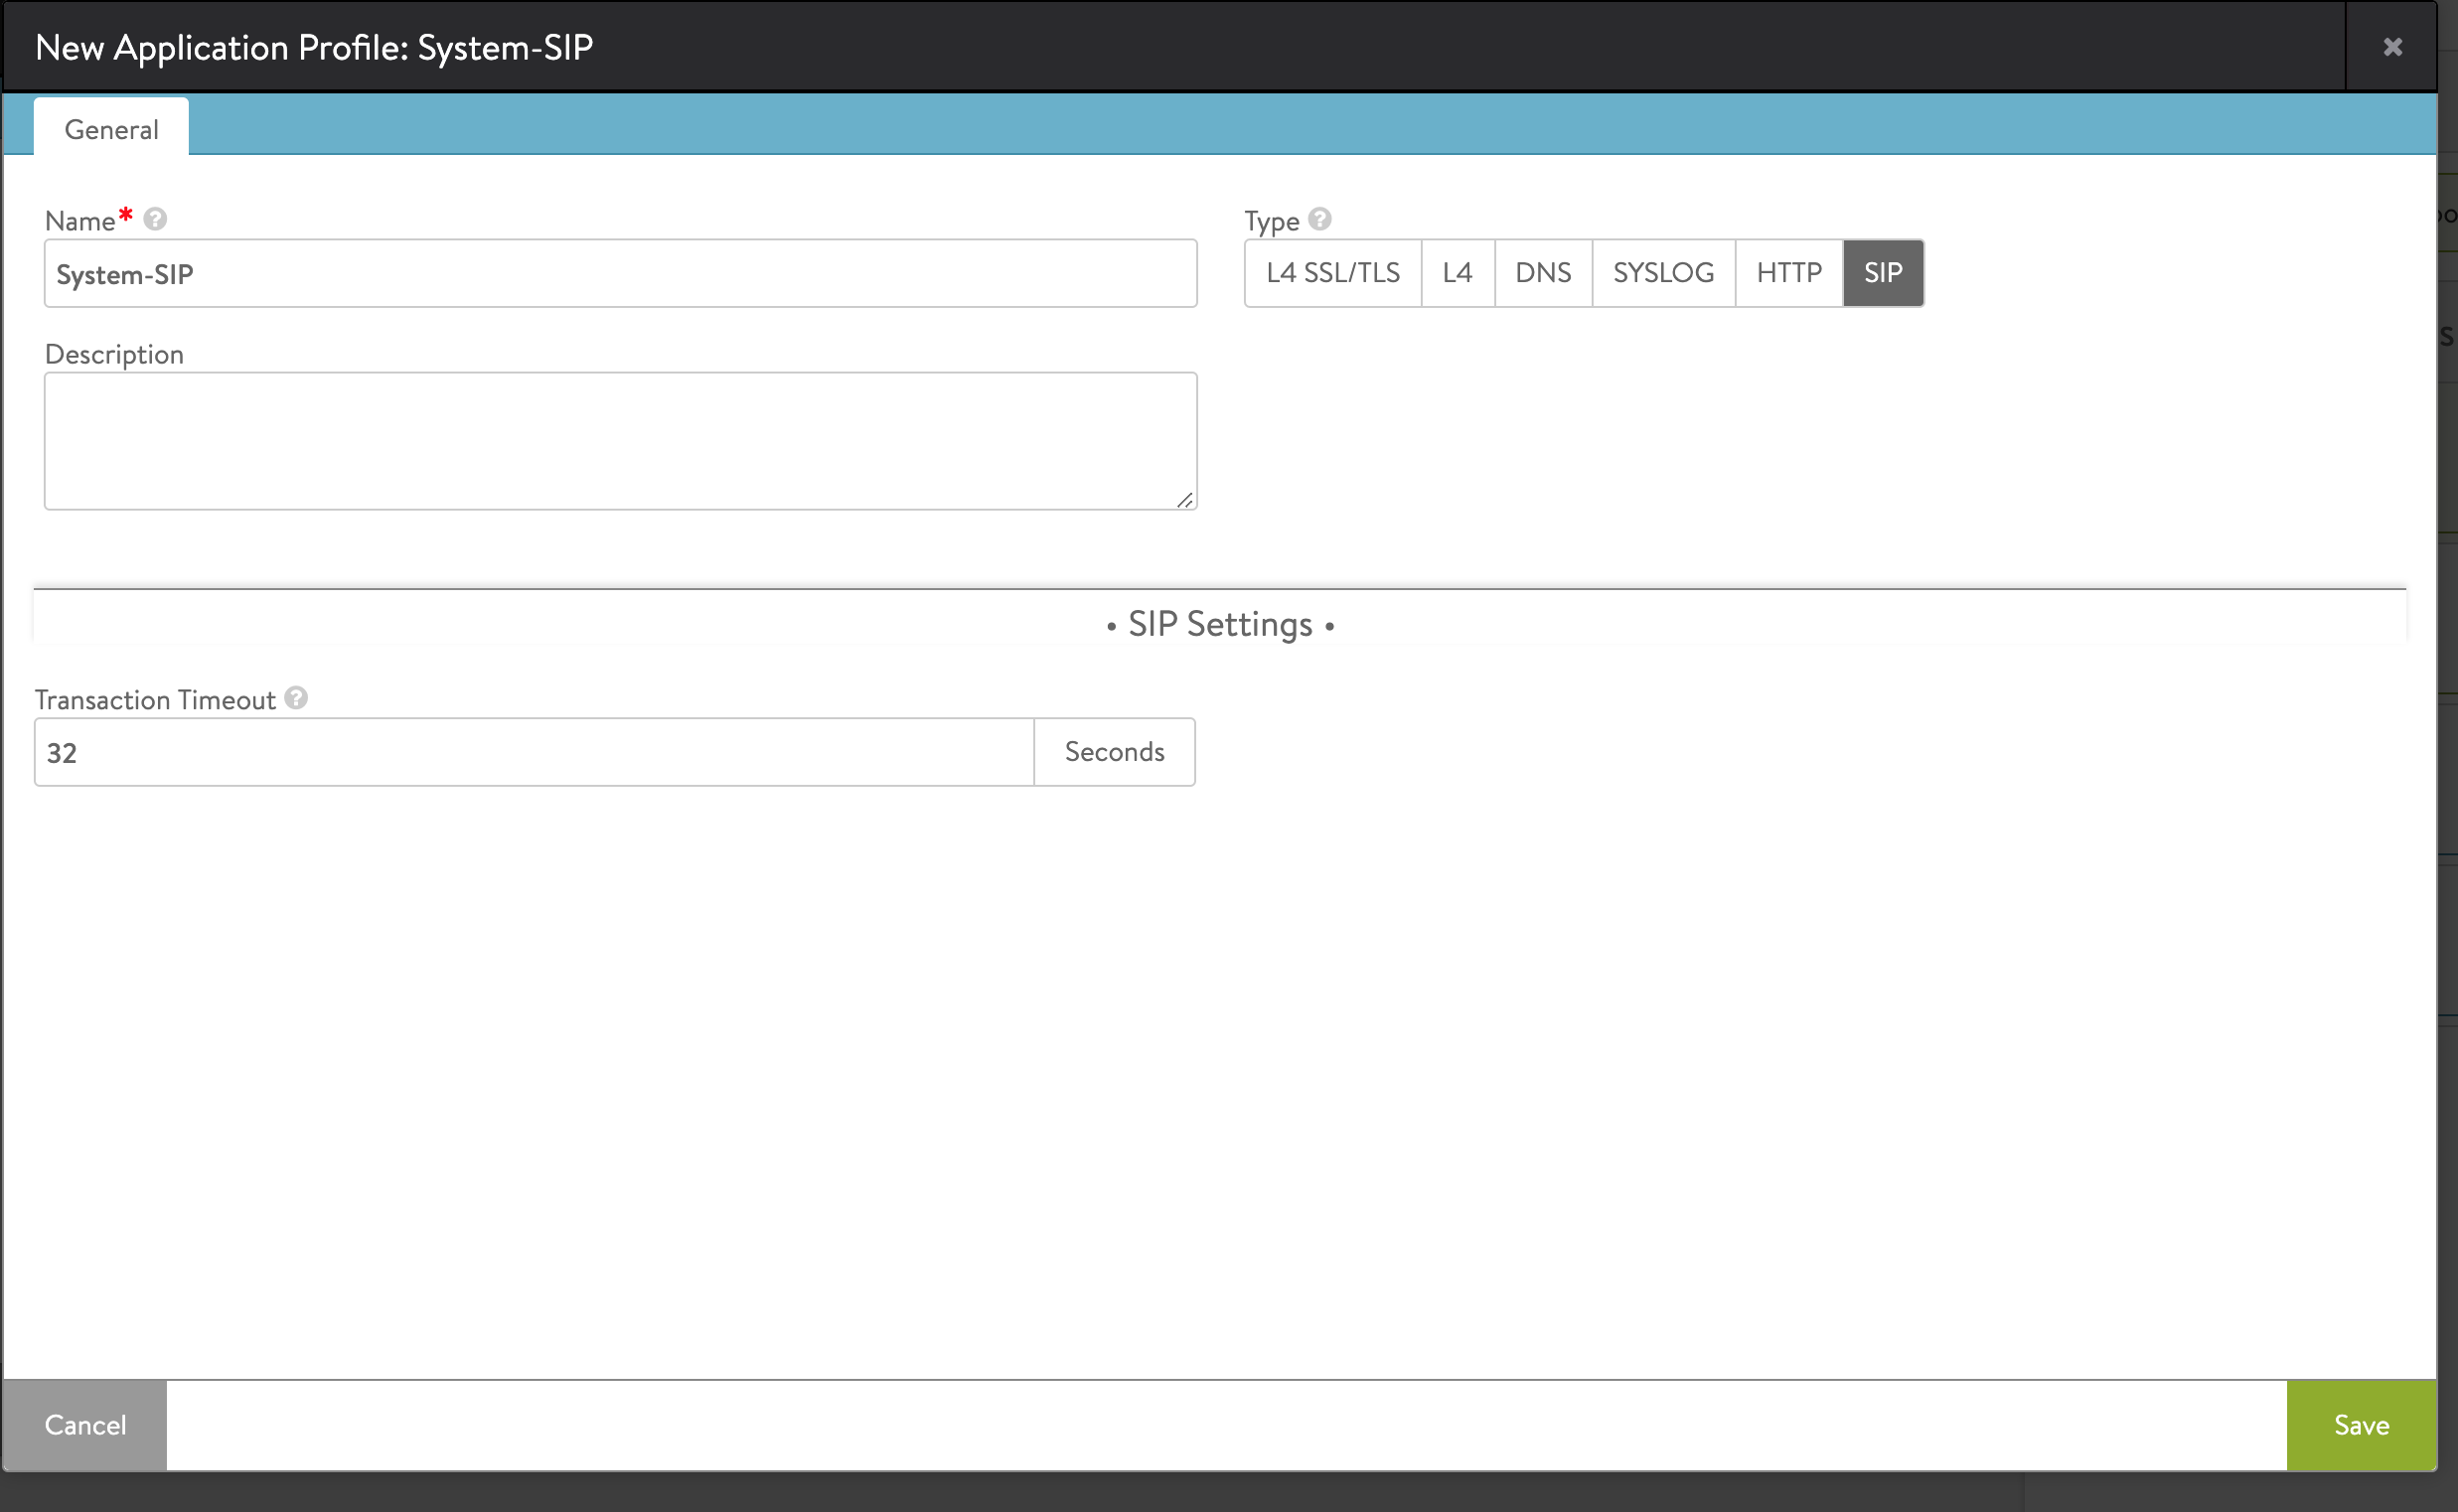
Configure the SIP application profile using the configure applicationprofile command with the following fields:
The following is CLI example of configuring a SIP specific application profile:
[admin:10-X-X-X]: > configure applicationprofile sip_app
[admin:10-X-X-X]: applicationprofile> type APPLICATION_PROFILE_TYPE_SIP
[admin:10-X-X-X]: applicationprofile> sip_service_profile
[admin:10-X-X-X]: applicationprofile:sip_service_profile> transaction_timeout 50
[admin:10-X-X-X]: applicationprofile:sip_service_profile> save
+-----------------------+---------------------------------------------------------+
| Field                 | Value                                                   |
+-----------------------+---------------------------------------------------------+
| uuid                  | applicationprofile-60836d31-4291-4882-a50b-0c60a63766fb |
| name                  | sip_app                                                 |
| type                  | APPLICATION_PROFILE_TYPE_SIP                            |
| preserve_client_ip    | False                                                   |
| preserve_client_port  | False                                                   |
| sip_service_profile   |                                                         |
| transaction_timeout   | 50 sec                                                  |
| tenant_ref            | admin                                                   |
+-----------------------+---------------------------------------------------------+
UDP Network Profile Configuration
Configure the System-UDP-Proxy network profile using the configure networkprofile command with the following fields:
- profile
- udp_proxy_profile
- session_idle_timeout
- udp_proxy_profile
The following is CLI example of configuring UDP network profile:
[admin:10-X-X-X]: > configure networkprofile System-UDP-Proxy
[admin:10-X-X-X]: networkprofile> profile
[admin:10-X-X-X]: networkprofile:profile> udp_proxy_profile
[admin:10-X-X-X]: networkprofile:profile:udp_proxy_profile> session_idle_timeout 60
[admin:10-X-X-X]: networkprofile:profile:udp_proxy_profile> save
[admin:10-X-X-X]: networkprofile> save
+--------------------------+-----------------------------------------------------+
| Field                    | Value                                               |
+--------------------------+-----------------------------------------------------+
| uuid                     | networkprofile-c2c639ef-b51f-4b17-afd7-584a3752343b |
| name                     | System-UDP-Proxy                                    |
| profile                  |                                                     |
| type                     | PROTOCOL_TYPE_UDP_PROXY                             |
| udp_proxy_profile        |                                                     |
| session_idle_timeout     | 60 sec                                              |
| tenant_ref               | admin                                               |
+--------------------------+-----------------------------------------------------+
Refer to TCP_UDP Profile for more details.
TCP Network Profile Configuration
Configure the System-TCP-Proxy network profile using the configure tdpudpprofile command with the following fields:
- profile
- tcp/udp profile
- system-tcp-proxy
- tcp/udp profile
Refer to TCP_UDP Profile for more details.
Creating the Health Monitor Using the UI
To create the SIP health monitor,
-
From the NSX Advanced Load Balancer UI, navigate to Templates > Profiles > Health Monitors.
-
Click on Create to open the CREATE HEALTH MONITOR screen.
-
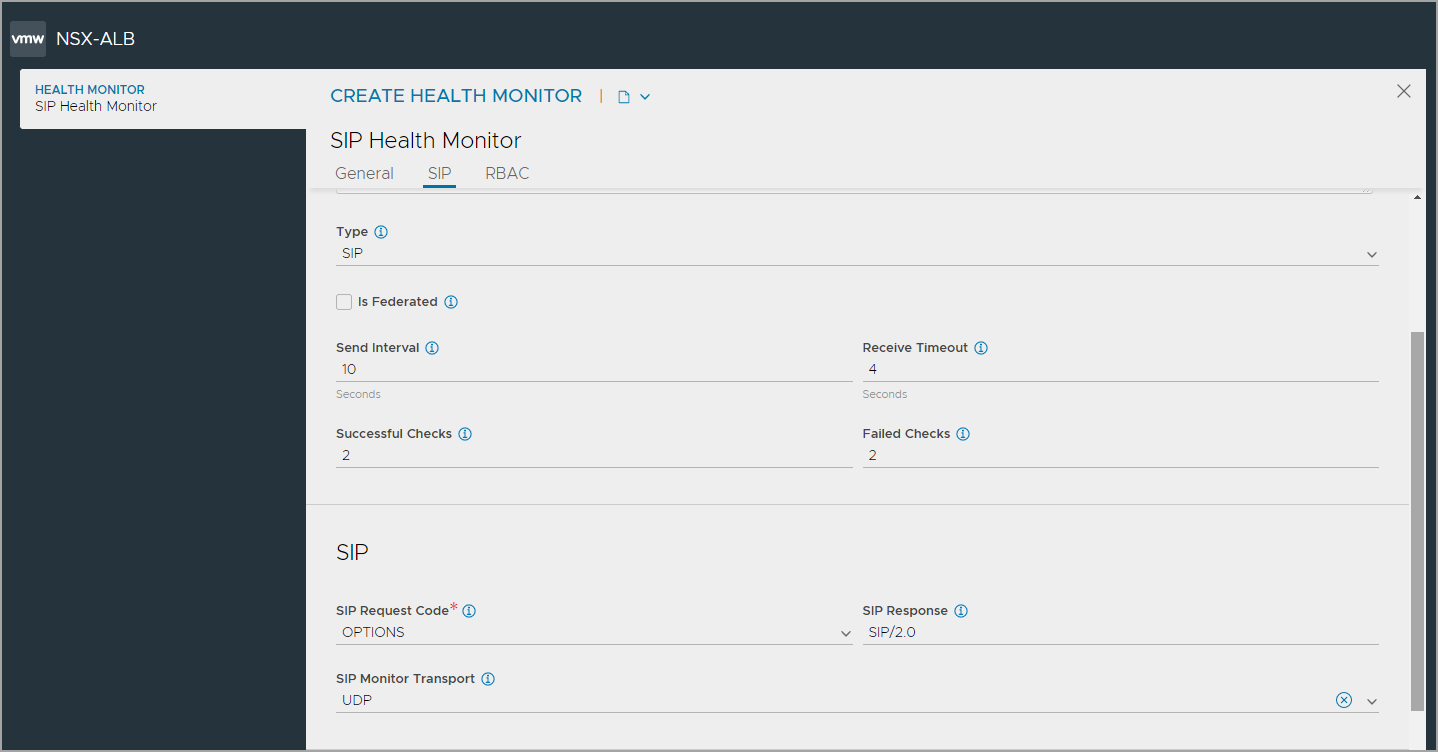
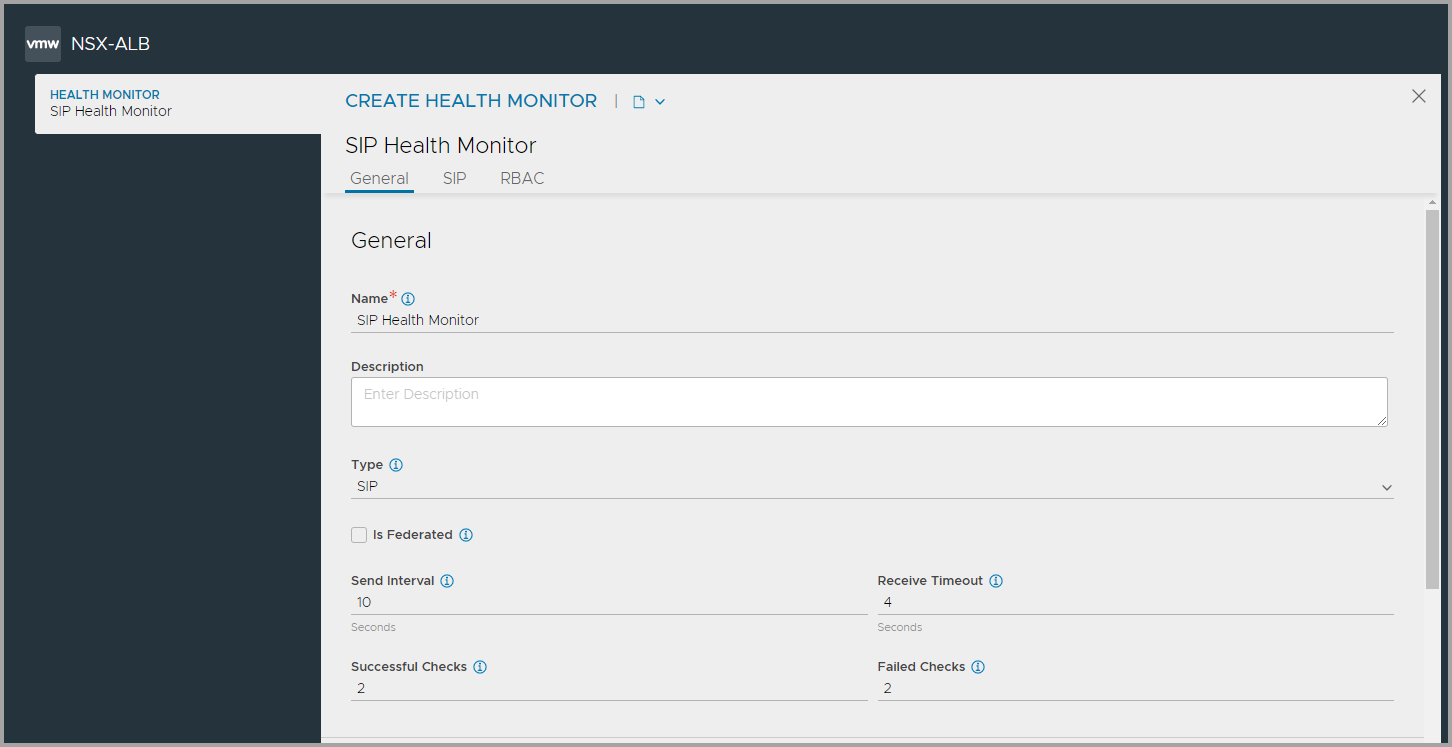
Under the General tab, enter the basic information about the health monitor. Note: Select SIP as the Type to view the settings specific to SIP health monitor.
-
Configure SIP health monitor settings.
-
Configure Role-Based Access Control (RBAC)
-
Click Save to complete the SIP Health Monitor creation.
Configuring General Settings
Under the General tab of the CREATE HEALTH MONITOR screen, configure the following:
-
Enter a unique Name for the monitor.
-
Enter a Description.
-
Select SIP as the Type of Health Monitor.
Note: Once the Type of Monitor is selected, options specific to the SIP health monitor type are displayed. -
Select the option Is Federated? to replicate the object across the federation. When this option is not selected, the object is visible within the Controller-cluster and its associated SEs.This option is enabled only when GSLB is activated. A federated health monitor is used for GSLB purposes while it is not applicable for a regular health-monitor. A GSLB service cannot be associated with a regular health monitor, because GSLB service is a federated object, while the health monitor is not. Conversely, a pool cannot be associated with a federated health monitor because the pool is not a federated object.
-
Enter the Send Interval value (in seconds). This value determines how frequently the health monitor initiates an active check of a server. The frequency range is 1 to 3600.
-
Enter the Receive Timeout value (in seconds). The server must return a valid response to the health monitor within the specified time limit. The receive timeout range is 1 to 2400 or the send interval value minus 1 second.
Note: If the status of a server continually flips between up and down, this may indicate that the receive timeout is too aggressive for the server. -
Enter Successful Checks. This is the number of consecutive health checks that must succeed before NSX Advanced Load Balancer marks a down server as up. The minimum is 1, and the maximum is 50.
-
Enter Failed Checks. This is the number of consecutive health checks that on failing, NSX Advanced Load Balancer marks a server as down. The minimum is 1, and the maximum is 50.
Configuring SIP Health Monitor Settings
To configure the SIP health monitor settings,
-
Enter the SIP Request Code and SIP Response.
-
Specify the transport protocol to be used in the SIP Monitor Transport field.
Configuring RBAC
Under the Role-Based Access Control (RBAC) section, configure labels to control access to the health monitor based on the defined roles
- Click Add.
- Enter the Key and the corresponding values.
See granular-rbac for more information.
Configuring the SIP Health Monitor Using the CLI
Configure the SIP specific health monitor using the configure healthmonitor command with the following fields:
- type – health_monitor_sip
- sip_monitor
- sip_request_code
- sip_response
- sip_monitor_transport
The following is CLI example of configuring SIP specific health monitor with other additional options:
[admin:10-X-X-X]: > configure healthmonitor System-Sip-custom

[admin:10-X-X-X]: healthmonitor> type health_monitor_sip

Overwriting the previously entered value for type
[admin:10-X-X-X]: healthmonitor> send_interval 10
Overwriting the previously entered value for send_interval
[admin:10-X-X-X]: healthmonitor> receive_timeout 4
Overwriting the previously entered value for receive_timeout
[admin:10-X-X-X]: healthmonitor> successful_checks 2
Overwriting the previously entered value for successful_checks
[admin:10-X-X-X]: healthmonitor> failed_checks 2
Overwriting the previously entered value for failed_checks

[admin:10-X-X-X]: healthmonitor> sip_monitor
[admin:10-X-X-X]: healthmonitor:sip_monitor> sip_request_code sip_options
Overwriting the previously entered value for sip_request_code
[admin:10-X-X-X]: healthmonitor:sip_monitor> sip_response "SIP"
Overwriting the previously entered value for sip_response
[admin:10-X-X-X]: healthmonitor:sip_monitor> save
[admin:10-X-X-X]: healthmonitor> save
+--------------------+----------------------------------------------------+
| Field              | Value                                              |
+--------------------+----------------------------------------------------+
| uuid               | healthmonitor-25bb24ce-9f5e-4c44-9d4b-2848e774343e |
| name               | System-Sip-custom                                  |
| send_interval      | 10 sec                                             |
| receive_timeout    | 4 sec                                              |
| successful_checks  | 2                                                  |
| failed_checks      | 2                                                  |
| type               | HEALTH_MONITOR_SIP                                 |
| sip_monitor        |                                                    |
|   sip_request_code | SIP_OPTIONS                                        |
|   sip_response     | SIP                                                |
| is_federated       | False                                              |
| tenant_ref         | admin                                              |
+--------------------+----------------------------------------------------+
Pool Configuration
Configure the SIP pool using the configure pool command with the following fields:
- default_server_pool – 5060
- lb_algorithm_hash – LB_ALGORITHM_CONSISTENT_HASH_CALLID
- health_monitor_ref – The health monitor configured in the previous section, System-Sip-Custom
- servers
- ip
The following is CLI example of configuring a SIP specific pool:
[admin:10-X-X-X]: > configure pool sip_pool
[admin:10-X-X-X]: pool> default_server_port 5060
[admin:10-X-X-X]: pool> servers
New object being created
[admin:10-X-X-X]: pool:servers> ip 10.2.2.2
[admin:10-X-X-X]: pool:servers> exit
[admin:10-X-X-X]: pool> lb_algorithm LB_ALGORITHM_CONSISTENT_HASH
[admin:10-X-X-X]: pool> lb_algorithm_hash LB_ALGORITHM_CONSISTENT_HASH_CALLID
[admin:10-X-X-X]: pool> health_monitor_refs System-Sip-custom
[admin:10-X-X-X]: pool> save
+---------------------------------------+-------------------------------------------+
| Field                                 | Value                                     |
+---------------------------------------+-------------------------------------------+
| uuid                                  | pool-c9786d78-66a2-4d89-9218-7140c009c68d |
| name                                  | sip_pool                                  |
| default_server_port                   | 5060                                      |
| graceful_disable_timeout              | 1 min                                     |
| connection_ramp_duration              | 10 min                                    |
| max_concurrent_connections_per_server | 0                                         |
| health_monitor_refs[1]                | System-Sip_Custom                         |
| servers[1]                            |                                           |
|   ip                                  | 10.2.2.2                                  |
|   hostname                            | 10.2.2.2                                  |
|   enabled                             | True                                      |
|   ratio                               | 1                                         |
|   verify_network                      | False                                     |
|   discovered_networks[1]              |                                           |
|     network_ref                       | NA                                        |
|     subnet[1]                         | 10.140.12.1/32                            |
|   resolve_server_by_dns               | False                                     |
|   static                              | False                                     |
|   rewrite_host_header                 | False                                     |
| server_count                          | 1                                         |
| lb_algorithm                          | LB_ALGORITHM_CONSISTENT_HASH            |
| lb_algorithm_hash                     | LB_ALGORITHM_CONSISTENT_HASH_CALLID       |
| inline_health_monitor                 | True                                      |
| use_service_port                      | False                                     |
| capacity_estimation                   | False                                     |
| server_auto_scale                     | False                                     |
| vrf_ref                               | global                                    |
| fewest_tasks_feedback_delay           | 10 sec                                    |
| enabled                               | True                                      |
| request_queue_enabled                 | False                                     |
| request_queue_depth                   | 128                                       |
| host_check_enabled                    | False                                     |
| sni_enabled                           | True                                      |
| rewrite_host_header_to_sni            | False                                     |
| rewrite_host_header_to_server_name    | False                                     |
| lb_algorithm_core_nonaffinity         | 2                                         |
| lookup_server_by_name                 | False                                     |
| tenant_ref                            | admin                                     |
| cloud_ref                             | Default-Cloud                             |
+---------------------------------------+-------------------------------------------+
Virtual Service Configuration
Configure the SIP virtual service using the configure virtualservice command with the following fields:
- services
- port – 5060
- port_range_end – 5060
- vip
- ip_address
- application_profile_ref – application profile created in the earlier section sip_app
- pool_ref – pool created in the earlier section sip_pool
-
network_profile_ref
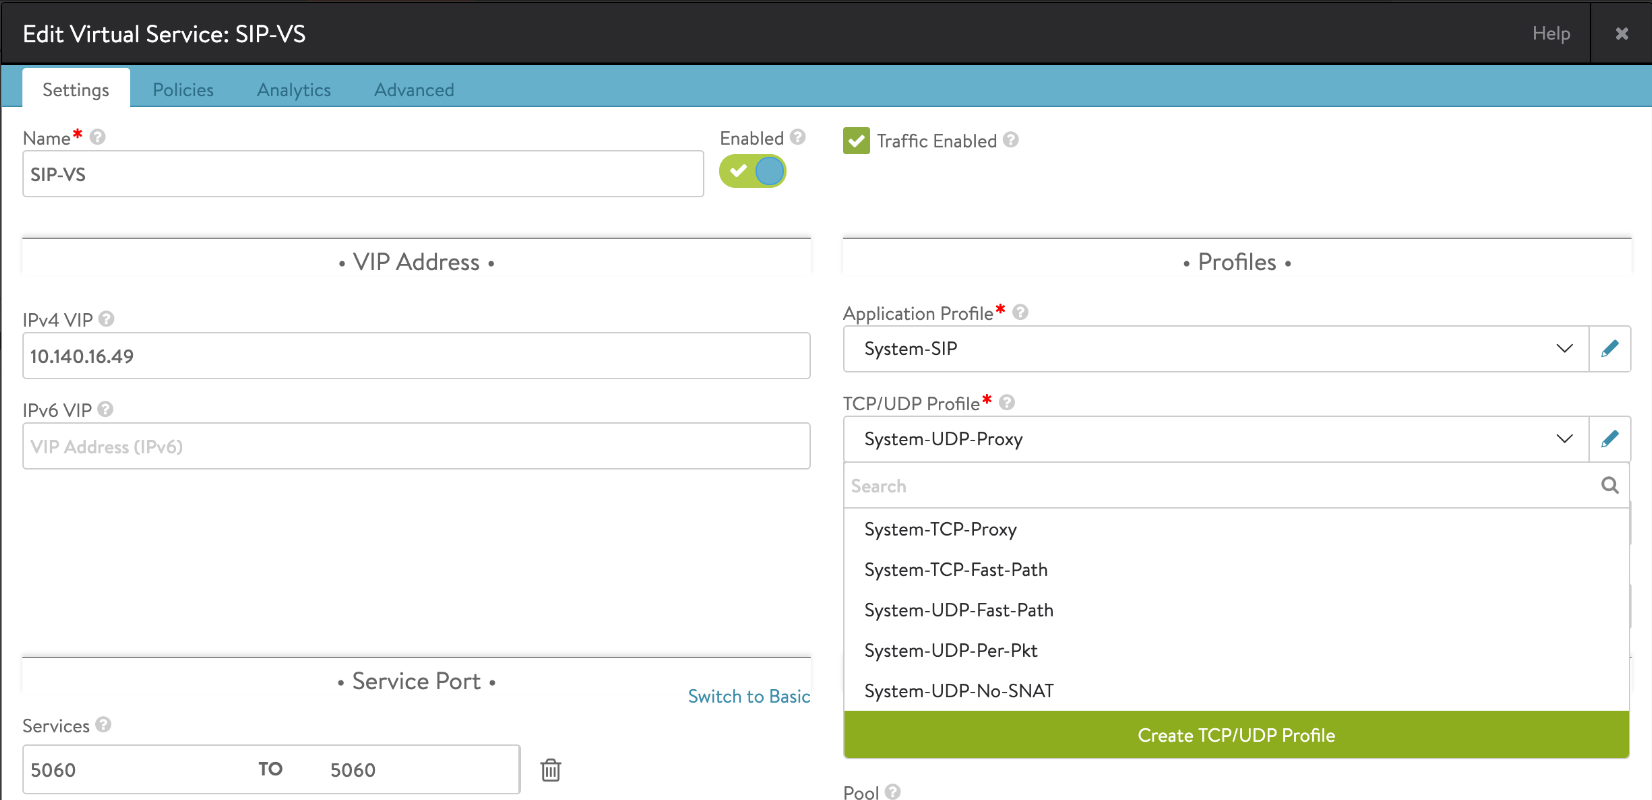
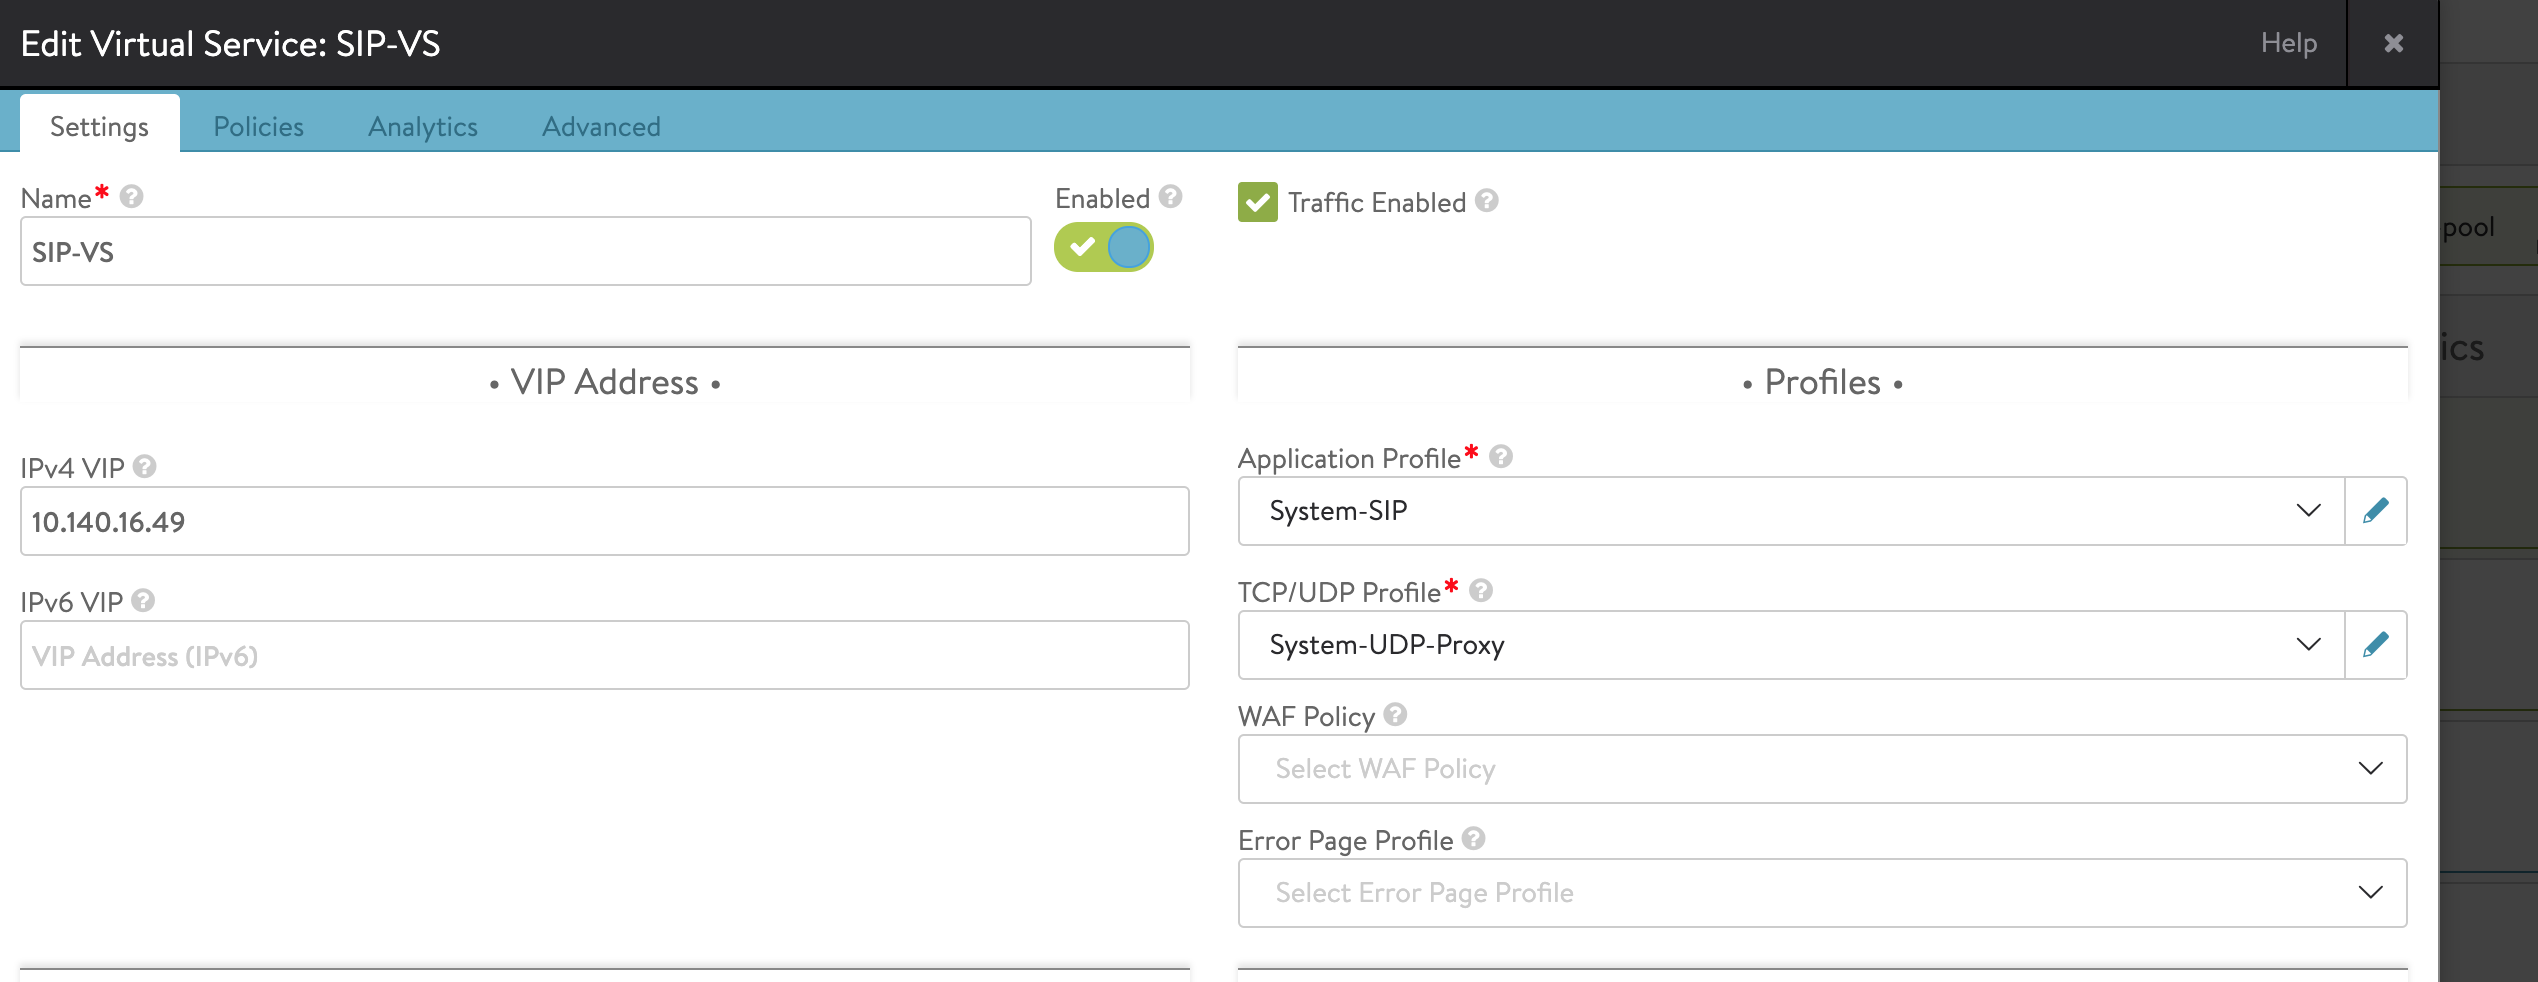
SIP Application/Load Balancing using UDP-Proxy
Select the application profile created earlier and then select network profile, i.e., TCP/UDP profile as System-UDP-Proxy.
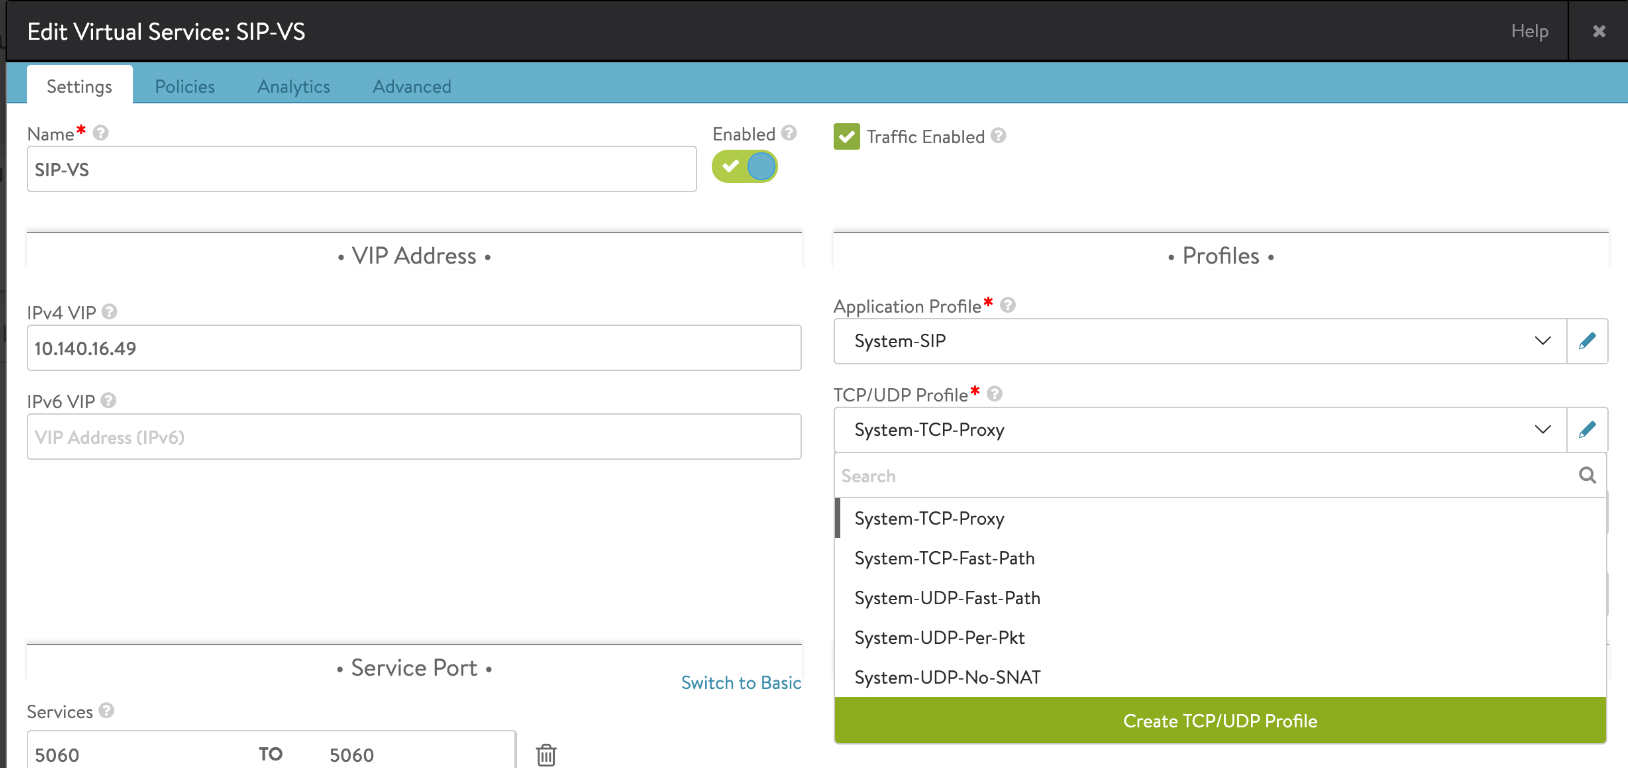
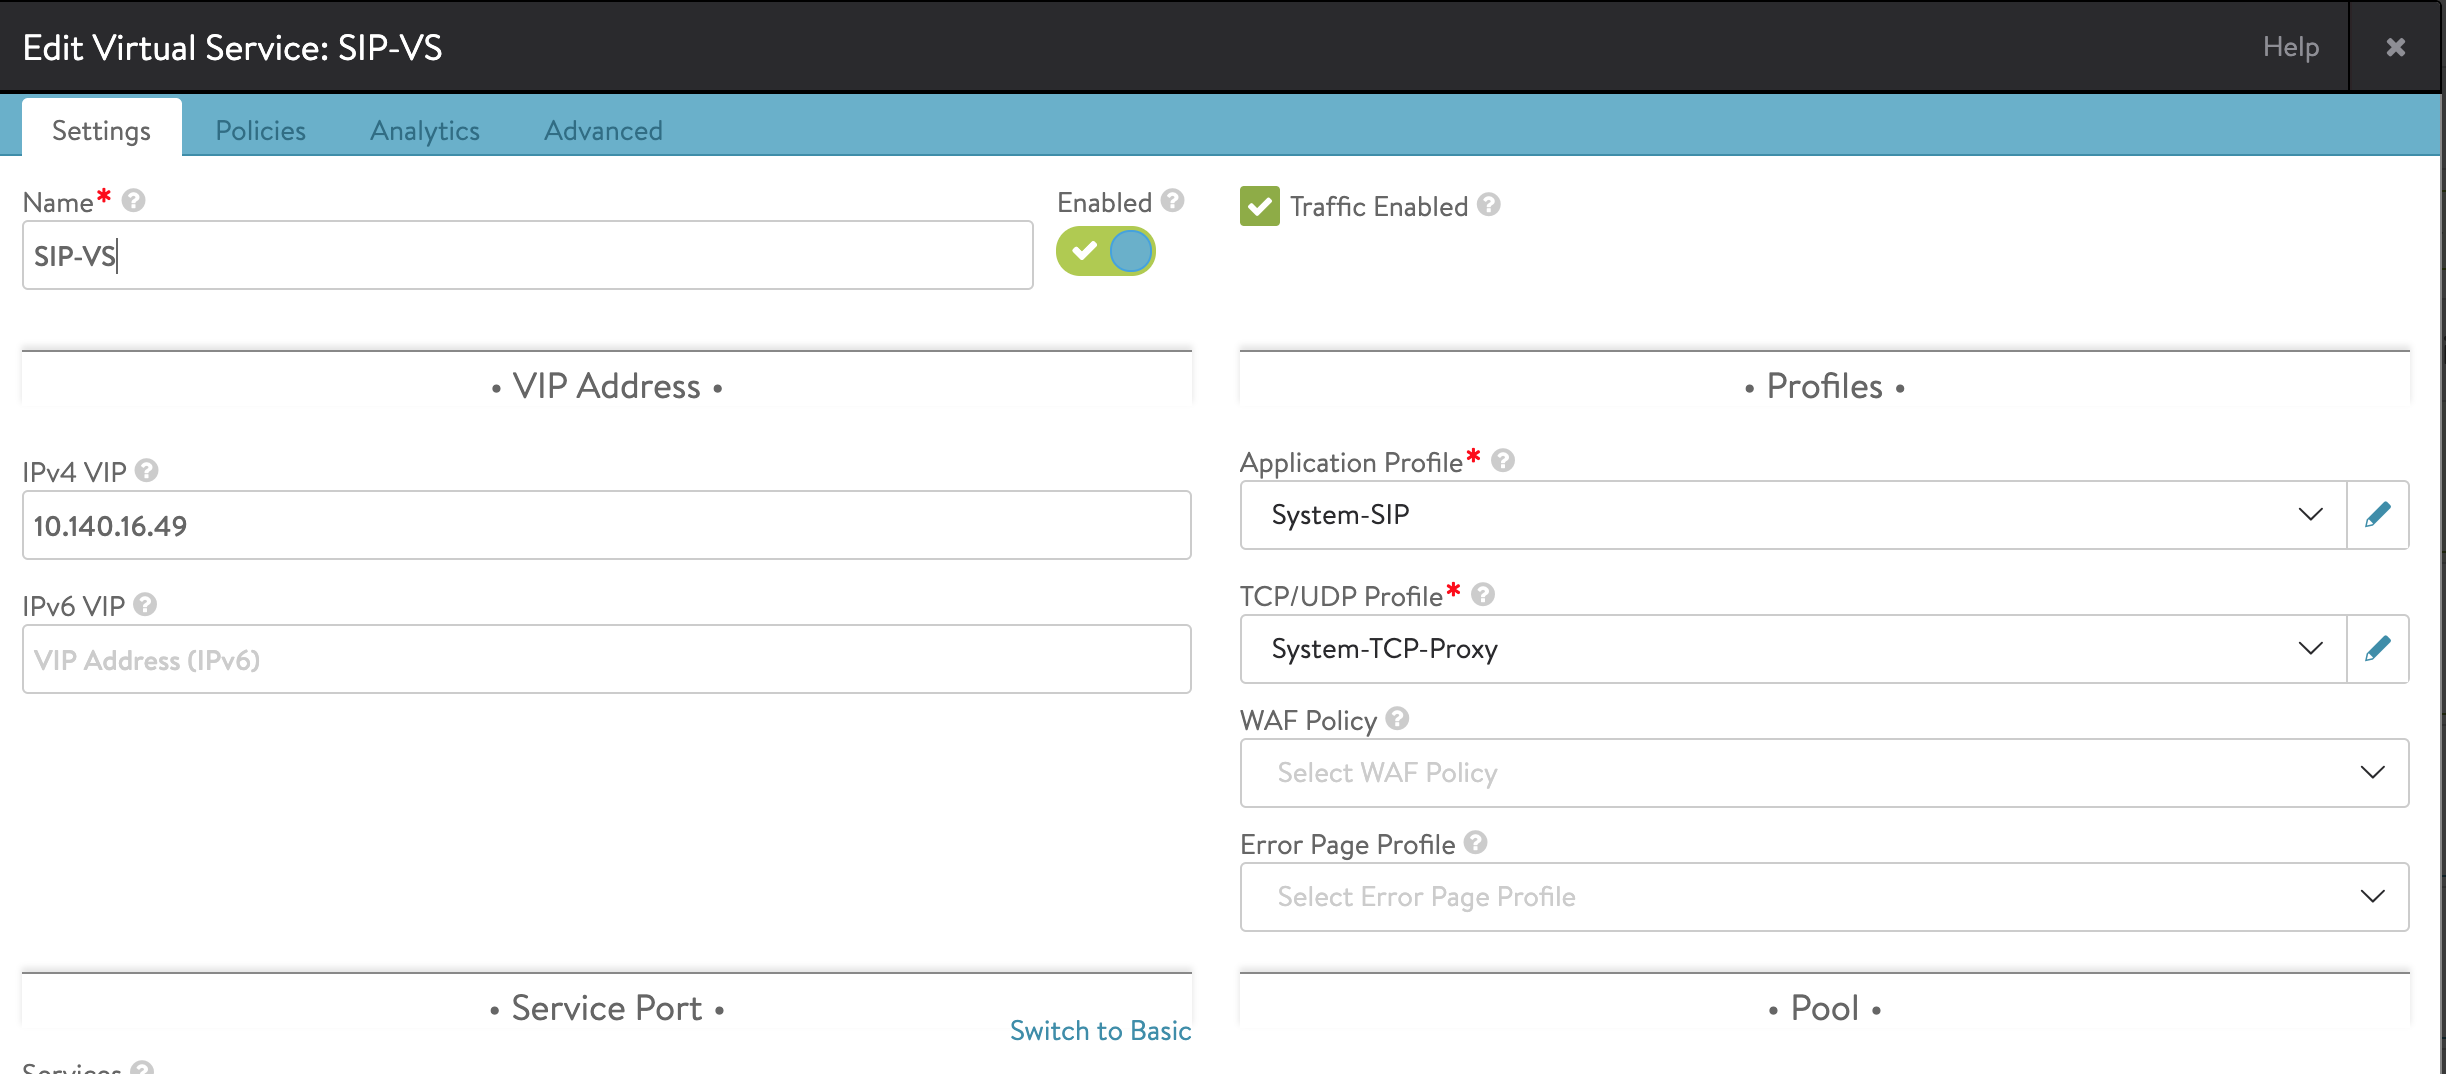
SIP Application/Load Balancing using TCP-Proxy
Select the application profile created earlier and then select network profile, i.e., TCP/UDP profile as System-TCP-Proxy.
The CLI command is as follows:
[admin:10-X-X-X]: > configure virtualservice sip_vs
[admin:10-X-X-X]: virtualservice> services
New object being created
[admin:10-X-X-X]: virtualservice:services> port 5060
[admin:10-X-X-X]: virtualservice:services> port_range_end 5060
[admin:10-X-X-X]: virtualservice:services> exit

[admin:10-X-X-X]: virtualservice> vip
New object being created
[admin:10-X-X-X]: virtualservice:vip> ip_address 10.10.10.10
[admin:10-X-X-X]: virtualservice:vip> exit

[admin:10-X-X-X]: virtualservice> application_profile_ref sip_app
[admin:10-X-X-X]: virtualservice> pool_ref sip_pool

[admin:10-X-X-X]: virtualservice> network_profile_ref System-UDP-Proxy
[admin:10-X-X-X]: virtualservice> save
+------------------------------------+-----------------------------------------------------+
| Field                              | Value                                               |
+------------------------------------+-----------------------------------------------------+
| uuid                               | virtualservice-8f25448f-4b89-46fb-a3e3-34719933160a |
| name                               | sip_vs                                              |
| enabled                            | True                                                |
| services[1]                        |                                                     |
|   port                             | 5060                                                |
|   enable_ssl                       | False                                               |
|   port_range_end                   | 5060                                                |
| application_profile_ref            | sip_app                                             |
| network_profile_ref                | System-UDP-Proxy                                    |
| pool_ref                           | sip_pool                                            |
| se_group_ref                       | Default-Group                                       |
| vrf_context_ref                    | global                                              |
| enable_autogw                      | True                                                |
| analytics_profile_ref              | System-Analytics-Profile                            |
| weight                             | 1                                                   |
| delay_fairness                     | False                                               |
| max_cps_per_client                 | 0                                                   |
| limit_doser                        | False                                               |
| type                               | VS_TYPE_NORMAL                                      |
| cloud_type                         | CLOUD_NONE                                          |
| use_bridge_ip_as_vip               | False                                               |
| flow_dist                          | LOAD_AWARE                                          |
| ign_pool_net_reach                 | False                                               |
| ssl_sess_cache_avg_size            | 1024                                                |
| remove_listening_port_on_vs_down   | False                                               |
| close_client_conn_on_config_update | False                                               |
| bulk_sync_kvcache                  | False                                               |
| tenant_ref                         | admin                                               |
| cloud_ref                          | Default-Cloud                                       |
| east_west_placement                | False                                               |
| scaleout_ecmp                      | False                                               |
| active_standby_se_tag              | ACTIVE_STANDBY_SE_1                                 |
| flow_label_type                    | NO_LABEL                                            |
| vip[1]                             |                                                     |
|   vip_id                           | 0                                                   |
|   ip_address                       | 10.10.10.10                                         |
|   enabled                          | True                                                |
|   auto_allocate_ip                 | False                                               |
|   auto_allocate_floating_ip        | False                                               |
|   avi_allocated_vip                | False                                               |
|   avi_allocated_fip                | False                                               |
| vsvip_ref                          | vsvip-845HoA                                        |
| use_vip_as_snat                    | False                                               |
| traffic_enabled                    | True                                                |
+------------------------------------+-----------------------------------------------------+

