Configuring Avi Vantage for Application Delivery in Microsoft Azure
Overview
This document describes the process of configuring Avi Vantage as an application delivery controller for application workloads running inside Microsoft Azure.
Avi Vantage integration with Microsoft Azure is divided into the following sections:
- Installing Avi Controller or connecting to Avi SaaS
- Configuring Microsoft Azure cloud on Avi Vantage
- Configuring virtual service
To install or provision Avi Controller in Microsoft Azure, refer to Installing Avi Controller in Microsoft Azure.
Notes:
Use the instructions mentioned in this article to connect your cloud to an Avi Controller.
These instructions are applicable both for customer-managed Avi Controller as well for Avi Saas.
Intended Audience
The document is intended for
- Network administrators: To configure and operationalize the Avi Vantage solution.
- Azure system administrators: To provision the Avi Vantage solution.
We assume familiarity with
- The basics of load balancing and application delivery.
- Basic Azure functionality. For detailed information refer to the Microsoft Azure Documentation.
Prerequisites
Both Microsoft Azure and Avi Vantage provide a variety of configuration and deployment options, based on individual requirements. This guide makes the following assumptions regarding the infrastructure:
Roles
For the virtual network where the Avi Service Engine instances are to be deployed, a role of AviController or higher is required. For more details on creating the AviController role, refer to Role Setup for Installation into Microsoft Azure.
A role of Contributor is also required in a resource group where Avi objects are created.
Avi Controller is configured to deploy Service Engines in a specific resource group that is tied to the user’s subscription. This user should have the contributor role for this resource group.
For more information on the roles setup, refer to Role Setup for Installation in Microsoft Azure.
Ports and IP Address
- Specific ports need to be allowed on the Service Engine and Avi Controller management subnets to enable Controller-to-Service Engine communication. For details, refer to the Protocol Ports Used by Avi Vantage for Management Communication.
- The Service Engine subnet should allow incoming TCP connections on port 7 from the IP address 168.63.129.16. This is used by Azure to probe the Service Engine health. For more details on this requirement, refer to Microsoft’s Understand load balancer probes.
License Support
Starting with Avi Vantage release 18.1.4, Azure Pay-as-you-go (Azure PAYG) license is supported. Currently, Avi Vantage 18.1.4 has only beta support for Azure PAYG license. This version should be used in non-production environments only.
You must choose the license type during the cloud creation, and it cannot be changed later.
For more information on the different type of licenses available for Azure deployment, refer to Azure Marketplace Licensing.
Note: Before proceeding with the steps to configure Azure cloud, it is recommended to finalize the license model as per the requirement. Avi UI has the following two options for the license model:
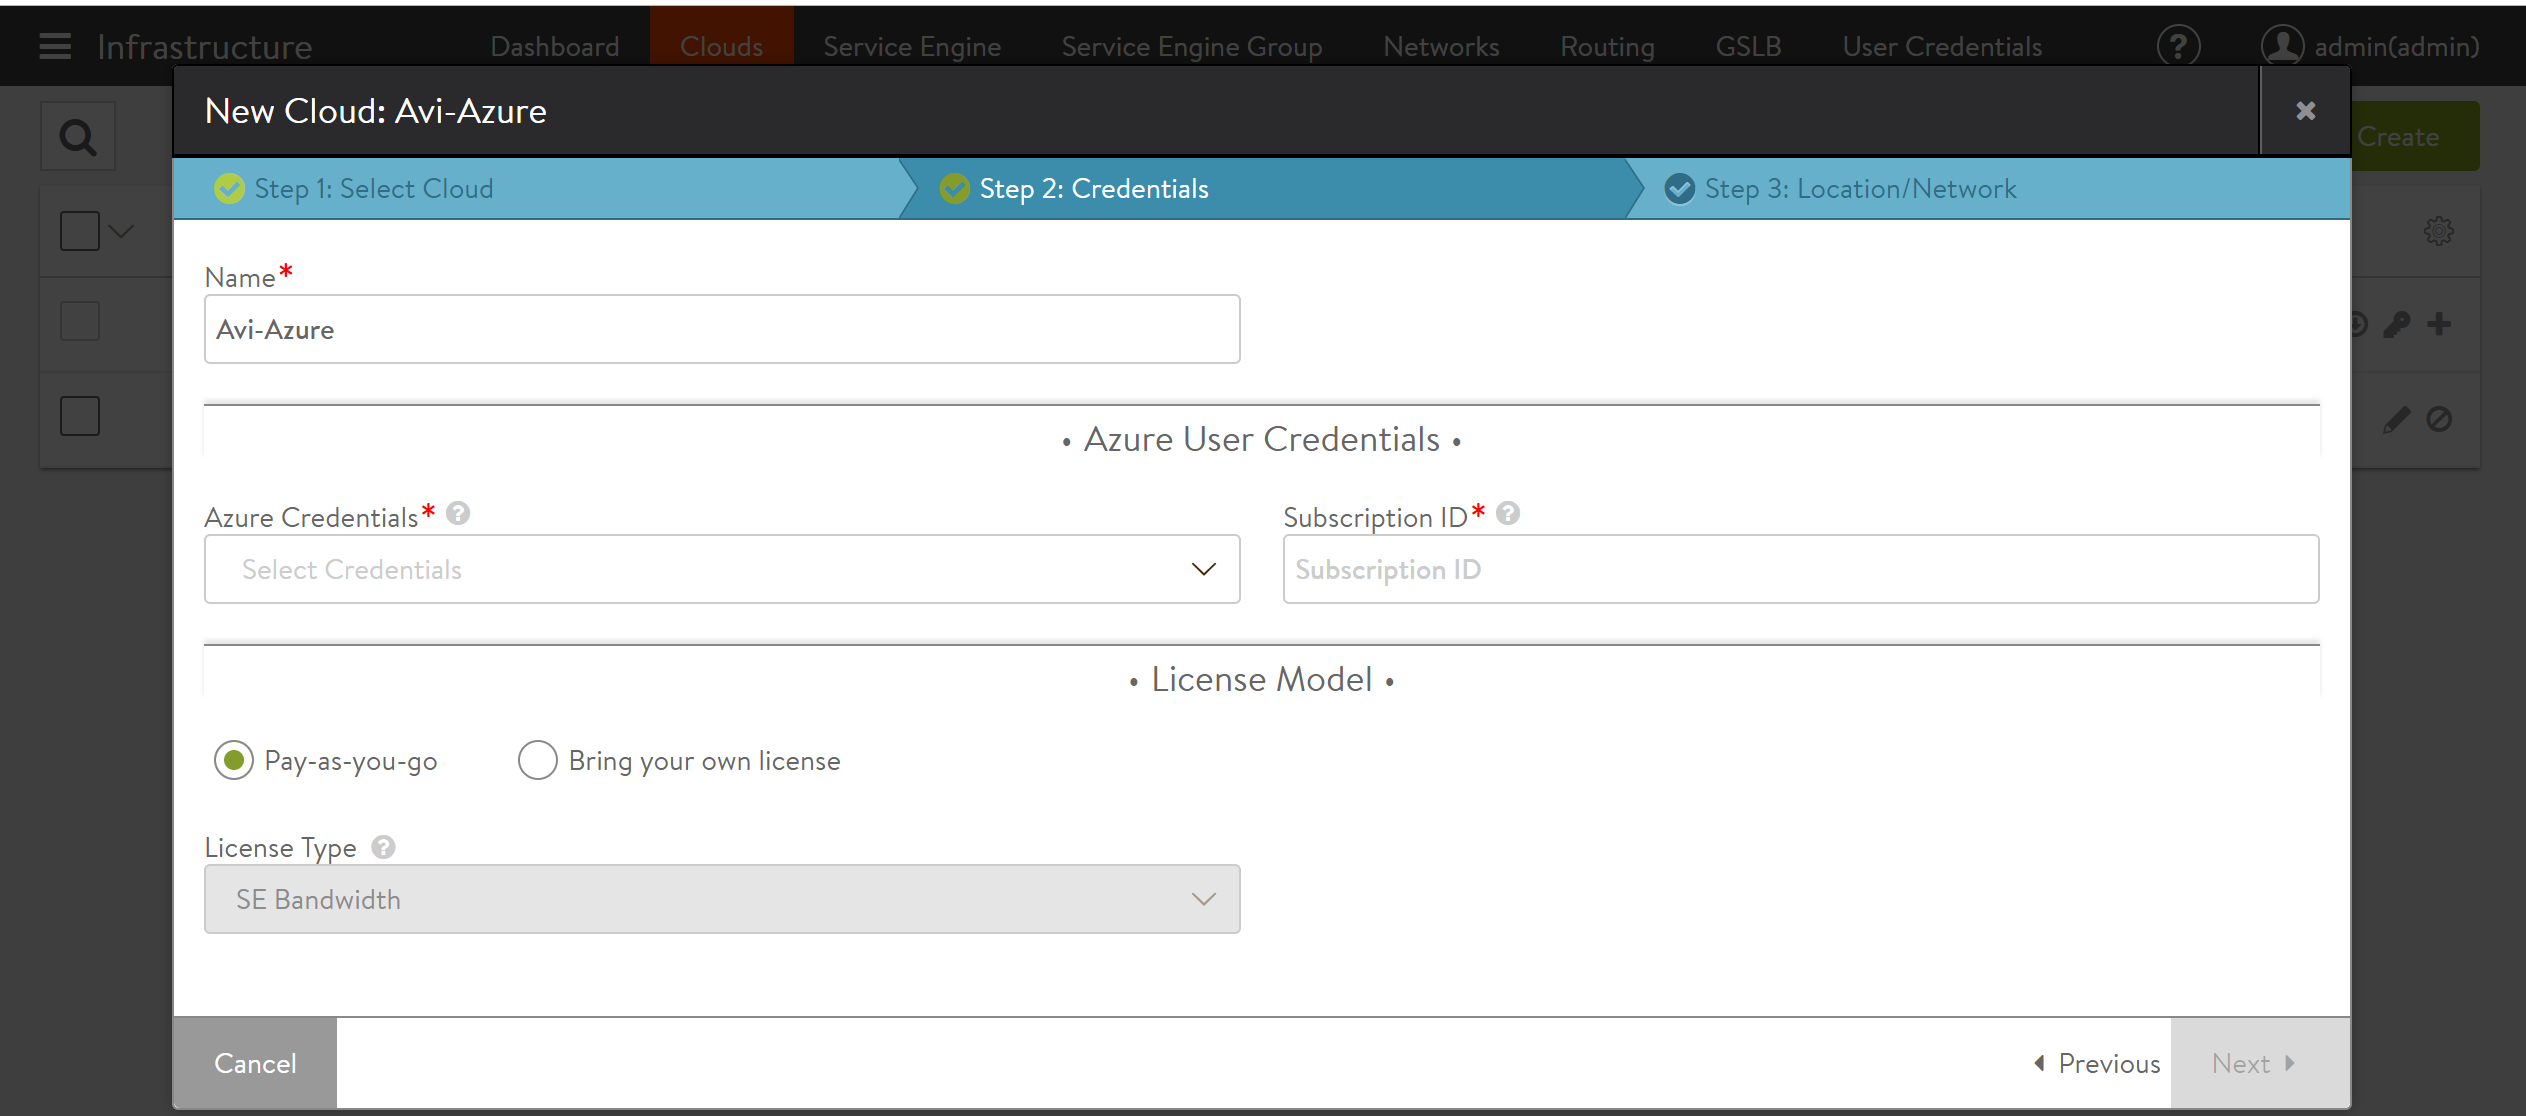
- Azure Pay-as-you-go – The licensing and usage are calculated based on the Service Engines instantiated in Azure.
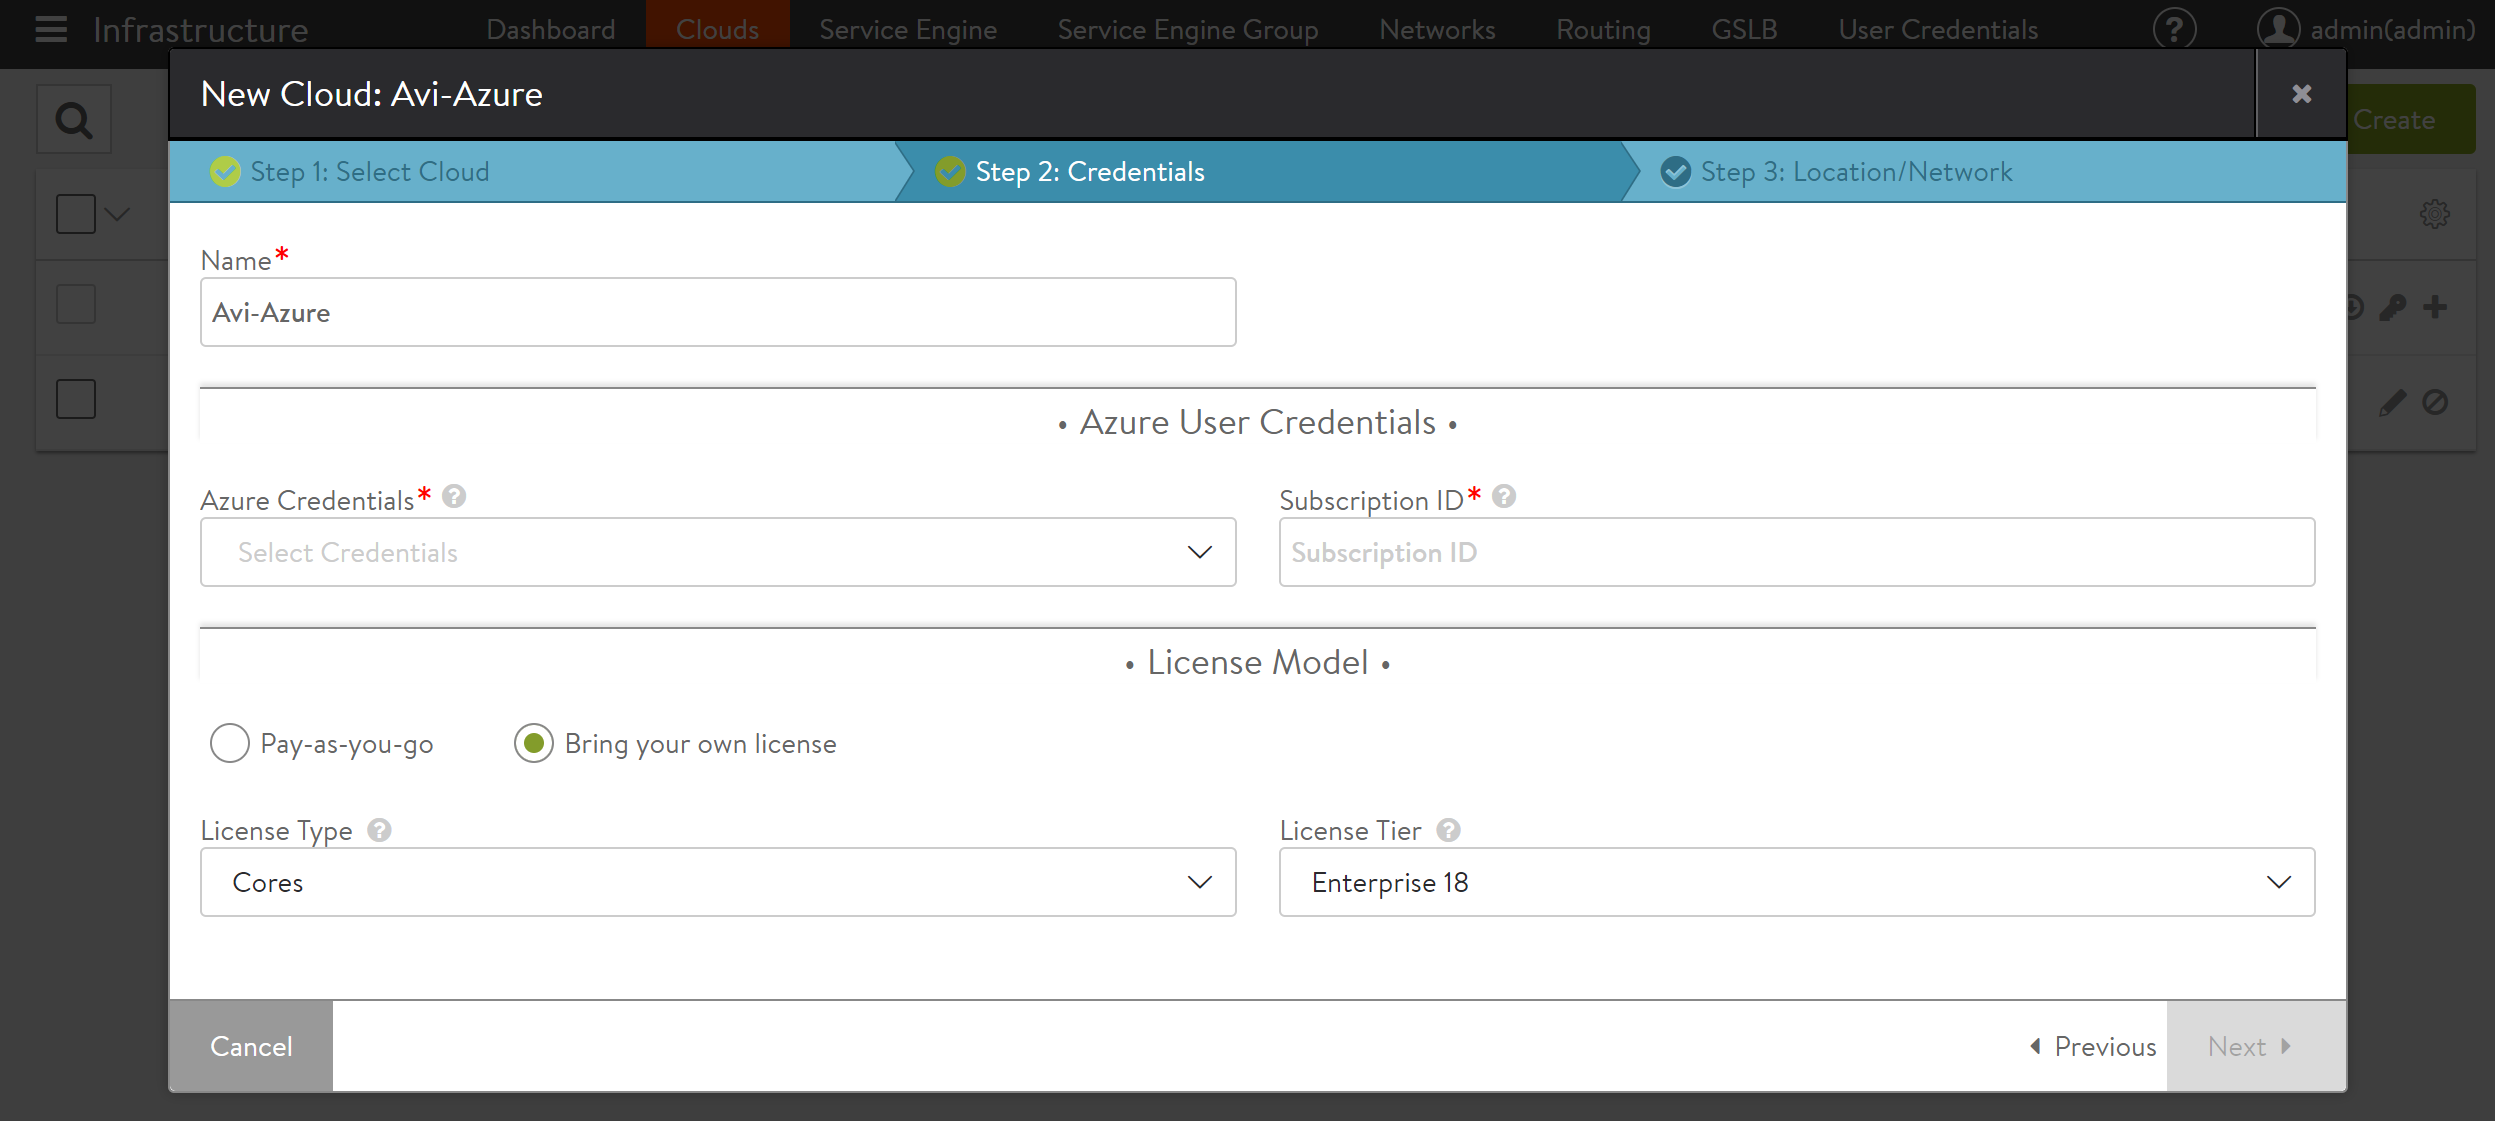
- Bring your own license – The license type can be selected either based on the vCPU, or the SE Bandwidth.
Networking
The resource group must have an Azure Virtual Network (VNet) configured with a subnet.
For the purpose of this document, the resource group avi-vantage will be used to deploy the Avi solution. As displayed in the screenshot below, this group has avi-vantage-vnet VNet, with an available address space of 10.20.0.0/16 and a subnet of 10.20.0.0/24.
Microsoft Azure Resource Limits
Microsoft Azure objects have predefined limits to the number of instances that can be instantiated.
These limits are based on the location of a given subscription. For instance, the total number of cores that can be used by the subscription in a particular location defines these limits.
The following limits must be increased appropriately, to allow scaling Avi virtual service and object creation in Microsoft Azure:
Networking Limits
- Public IP addresses - Static
The default value is 20. This value should be increased if the deployment is expected to have more 20 public IPs.
Load Balancer Limits
-
Frontend IP configuration - Basic
The default value is 10. It is recommended to set this to a higher value. Each virtual service IP and port combination consumes one frontend IP configuration.
-
Rules per resource - Basic
The default value is 150. It is recommended to increase this to a higher value. Each virtual service IP and port combination consumes one rule.
-
Load Balancers
The default value is 100. This limit should be raised as required, if more than 100 Service Engine groups are expected.
Additional Information
The above limits can be increased by submitting a request to Microsoft Azure via a support case. For more details, please refer to Azure subscription and service limits, quotas, and constraints.
Configuration
Avi UI is used to create a cloud configuration of type Azure, so that Avi Vantage can spin up Service Engines in the Azure VNet, and the load balance workloads present there.
Follow the given steps to complete the cloud configuration. Each step is provided with an associated screenshot.
-
Login to Avi UI using Avi Controller IP address, navigate to Infrastructure -> Clouds
-
Click on the Create button to add a new cloud. Provide a name, and select Microsoft Azure as the Cloud infrastructure type.
-
On the next tab, provide information related to the Azure account.
Starting with 18.1.4, Avi UI has the option to select the desired License Model.
-
Start by clicking on Create Credentials tab and provide Azure credentials.
You can either choose an Azure account username/password, or an Application ID. In the screenshot below, the username method is used.
-
Select the license model that you want to use. You can either choose the Pay-as-you-go, or the Bring your own license option. The below screenshot exhibits the option for the Pay-as-you-go license model. For the PAYG licence model, the license type is set to SE Bandwidth automatically.

For the Bring your own license model, you can use the drop-down option to use the following licence types:
- Cores
- SE Bandwidth
For more information on the new license model, refer to Azure Marketplace Licensing.
-
Save and select these newly created credentials and provide the Azure subscription ID. Click Next.
-
Provide the Azure location details. These details are associated with the location of resource group, the resource group and the VNet that can be used, and the subnet for the Service Engine management network.
Optionally, a DNS provider can be selected as well. Instead of Azure DNS, AWS Route 53 can also be used by selecting Other.
-
Click on Complete, to provision the Azure cloud. At this time, the Controller will upload the Service Engine VHD into an Azure storage account, so that SEs can be deployed as required by the applications.
-
Save the settings. The system is now ready for virtual service creation. Follow the steps mentioned in the next section to complete the same.
Virtual Service Configuration
To create a virtual service to load balance an application workload, perform the following steps:
- Create a pool containing application servers that need to be load balanced.
- Create a virtual service with a front-end virtual IP.
Pool Creation
-
Navigate to Application -> Pools and click Create Pool.
-
Provide a pool name. The other fields are optional and the defaults are sufficient. Click Next.
-
Add one or more application (back-end) servers. If the applications are part of an Azure scale set, the scale set option can be selected. If not, just provide the IP addresses of the servers and click Next.
-
Click through the remaining steps, by retaining the defaults to complete the pool creation process.
Creating the Virtual Service
-
Navigate to Application -> Virtual Services and click Create Virtual Service. Select Advanced Setup.
-
Provide a VS name.
-
Select a network from which the front-end VIP should be allocated. The VIP will be allocated by Azure.
-
If the virtual service needs to be accessible via the Internet, select the option Assign Public IP for External Client Access.
-
Select the service ports. Port 80 is configured by default. Add port 443 as an SSL port as well.
In the Pool section, select the previously created pool from the dropdown menu.
-
Click Next through the remaining screens. Click Save at the last screen to complete the provisioning.
-
At this point, the UI will refresh to the VS dashboard.
The Avi deployment and virtual service configuration is now complete. Wait for 2-3 minutes for the internal Azure network configurations to be completed, before sending traffic for verification. Send some traffic from a client to the virtual service IP to verify if the virtual service is functioning.
Azure VM Sizes for the Avi Service Engines
Avi Service Engines are automatically deployed on Azure by the Avi Controller, based on the virtual services that have been configured.
Avi SEs can be deployed on VMs with various sizes. This can be configured under Service Engine Group -> Advanced setting.
The table below shows the maximum SSL TPS performance observed on some Azure VM sizes.
| Azure VM Size | SSL TPS Performance |
|---|---|
| F1s | 1900 |
| F2s | 3850 |
| F4s | 6300 |
| F8s | 11000 |
Notes :
- The performance results provided above are indicative numbers for a subset of instance types. There are other VM sizes available under the Service Engine group settings that can be used.
- SSL performance (TPS - transactions per second) has been measured considering one configured virtual service (HTTPS, ECDHE-ECDSA-AES256-SHA cipher) and GET requests for a 128-byte payload without session reuse. More details regarding Service Engine performance can be found here.


